background image

OM-550

u

22

u

4.0 PROGRAMMING

When prior to operating the OM-550 it must first be programmed. This section covers
all of the programming options available. All programmed settings but the time & date
are stored in EEPROM and retained even if the batteries are removed.

••

 Programming outline:

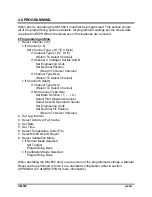
1. Select Channel (1-6)

 If Channel (1-5)

Set Channel Type (J,K,T,E,V,Skip)

If Channel Type (J,K,T, Or E)

(Return To Select Channel)

If Channel V (Voltage) Set Mx And B

Set Engineering Units
Set Decimal Position

(Return To Select Channel)

If Channel Type Skip

(Return To Select Channel)

 If Channel 6 (Math)

If Channel Type Skip

(Return To Select Channel)

If Not Channel Type Skip

Set Math Function ( +, - , /, X )
Select First Operand Channel
Select Second Operand Channel
Set Engineering Units
Set Decimal Fix Position

(Return To Select Channel)

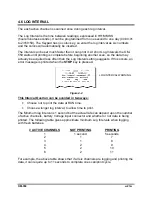
2. Set Log Interval
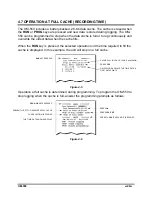
3. Select Activity at Full Cache
4. Set Date
5. Set Time
6. Select Temperature Units (F/C)
7. Select 60/50 Hz A/D Reject
8. Select Calibration Mode

 If Normal Mode Selected

Set Tadjust
Programming Done

 If Calibration Mode Selected

Programming Done

When operating the OM-550 and you are unsure of the programmed settings, a Manual
Reset can be performed to force it to a standard configuration (refer to section

APPENDIX A: CALIBRATION

 for more information).

Summary of Contents for freedom OM-550

Page 1: ...T 7 OK 7 2 1 3 CHANNEL CONNECTORS 8 2 1 4 PRINTER WINDOW 9 2 1 5 THERMAL PAPER 10 2 1 6 BATTERY COVER 10 2 1 7 DC JACK 10 2 1 8 SERIAL DATA PORT 10 2 1 9 GAIN ADJUST 11 2 1 10 TILT STAND 11 2 2 POWER...

Page 2: ...29 4 10 TEMPERATURE UNITS 29 4 11 REJECTION FREQUENCY 29 4 12 CALIBRATION MODE 30 4 13 TADJUST 31 4 14 VOLTAGE INPUT SCALING 32 4 14 1 MATCHING TRANSDUCERS TO THE OM 550 32 4 14 2 MATCHING A VOLTAGE T...

Page 3: ...actices that could result in damage to the equipment Informs the user that the note includes important information Thermocouple may be referred to as T C The OM 550 Datalogger may be referred to as Lo...

Page 4: ...cuitry provide functional isolation of the measurement and data circuitry sufficient to allow for small electrical noise related potentials to occur This functional isolation is not intended for elect...

Page 5: ...l external rechargeable battery pack only Extended exposure to temperatures above the specified maximum may damage the OM 550 itself or its optional external rechargeable battery pack Do not excessive...

Page 6: ...been packed separately Retain the shipping carton for reshipment for recalibration or any other purpose Figure 1 1 OM 550 VOLTAGE INPUT CONNECTOR RS 232 CABLE CABLE ADAPTERS 4 1 5V AA BATTERIES OM 550...

Page 7: ...for the OM 550 System and optional items 2 1 OM 550 FEATURES OM 550 features Figure 2 1 Figure 2 2 CHANNEL CONNECTORS KEYPAD PRINTER WINDOW ACTIVITY LED THERMAL PAPER TILT STAND BATTERY COVER GAIN AD...

Page 8: ...Figure 2 3 A periodic beep beep and flash flash indicates that the OM 550 is being programmed Key closures override this regular activity with a steady beep or blat whenever a key is pressed If no act...

Page 9: ...tions are discussed here Figure 2 4 The ON OFF and PROG EXIT keys are toggles They are often discussed here by separate function to avoid confusion For example the ON key and the OFF key are the same...

Page 10: ...If the OM 550 is ON pressing the OFF key will cause it to print Figure 2 6 then deactivate It will remain OFF until the ON key is pressed The OM 550 can turn itself OFF power save mode when logging at...

Page 11: ...data should be printed during logging refer to section 4 7 OPERATION AT FULL CACHE RECORDING TIME Pressing the YES key will activate the OM 550 to begin collecting data for all active channels those n...

Page 12: ...he Program mode and will erase the data cache and print a complete description of its current programming The Activity LED double blinks and the horn double beeps to signal that the unit is in Program...

Page 13: ...ppropriate color of connector CONNECTOR COLOR APPLICATION White Uncompensated Voltage inputs Black Type J thermocouples Yellow Type K thermocouples Blue Type T thermocouples Purple Type E thermocouple...

Page 14: ...ree angle then pull it away from the case as shown in Figure 2 10 Figure 2 10 2 Replace the window by reversing the removal sequence making sure the tabs click into place The window material is very d...

Page 15: ...bottom side of the OM 550 To remove it simply slide it toward the thermal paper roll refer to section 3 1 1 BATTERY INSTALLATION for more information 2 1 7 DC JACK Omega offers an optional AC Power A...

Page 16: ...550 one for adjusting the Volt Gain and another for adjusting the Temp Gain see APPENDIX A CALIBRATION for more information 2 1 10 TILT STAND The Tilt Stand to allows the user to get a better view of...

Page 17: ...de of the unit The AC Power Adapter does not charge the internal batteries Use only alkaline size AA batteries Do not use rechargeable Ni cad cells The DC power cord connects to a 12V DC automobile ci...

Page 18: ...nge 10 VDC VOLTAGE connects to signals in the 10 VDC range 4 20 mA CURRENT converts 4 20 mA loop currents to 2 VDC signals For convenience the OM 550 can be programmed to Scale data The following tabl...

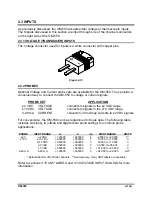
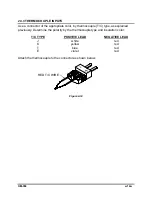
Page 19: ...thermocouple T C type as explained previously Determine the polarity by the thermocouple type and insulation color T C TYPE POSITIVE LEAD NEGATIVE LEAD J white red K yellow red T blue red E violet red...

Page 20: ...ally erased Do not press RUN or PROG until the data has been transferred to a PC otherwise it will be lost During a Manual Reset 100 phony data readings will automatically be logged to the cache as CH...

Page 21: ...che Figure 2 15 If appears on the tape as shown in Figure 2 15 the value stored in cache memory is not printable If the selected Log Interval was shorter than the time required to log or log and print...

Page 22: ...ed If the batteries are exhausted while logging the OM 550 will automatically stop then turn OFF Printing time is will also be prohibited and data will be retained To retrieve the data connect the AC...

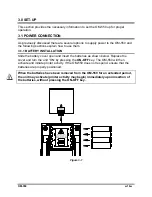
Page 23: ...N Slide the battery cover open and insert the batteries as shown below Replace the cover and turn the unit ON by pressing the ON OFF key The OM 550 will then activate and initiate printer activity If...

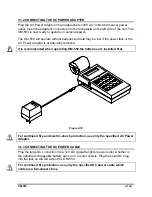
Page 24: ...wer Adapter is accidentally removed It is recommended when operating OM 550 the batteries are installed first Figure 2 18 For continued fire and electric shock protection use only the specified AC Pow...

Page 25: ...lot Paper orientation is very important because only one side is coated for thermal printing Figure 3 2 3 Insert the paper into the rear paper slot as shown in Figure 3 2 Turn the OM 550 ON then press...

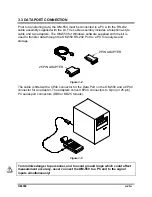
Page 26: ...ta through the OM 550 RS 232 Port to a PC for analysis and storage Figure 3 4 The cable is fitted with a 4P4C connector for the Data Port on the OM 550 and a 6P4C connector for an adapter The adapters...

Page 27: ...eturn To Select Channel If Channel 6 Math If Channel Type Skip Return To Select Channel If Not Channel Type Skip Set Math Function X Select First Operand Channel Select Second Operand Channel Set Engi...

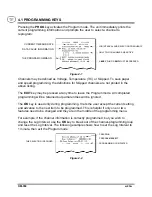
Page 28: ...ring programming It lets the user accept the current setting and advance to the next item to be programmed This is helpful if only one or two features need to be changed and they are in the middle of...

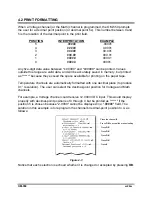
Page 29: ...able for printing on the paper tape Temperature channels are automatically formatted with one decimal place to produce 0 1 resolution The user can select the decimal point position for Voltage and Mat...

Page 30: ...channels and Tadjust Temperature channel readings are automatically converted from Fahrenheit to Celsius according to the selected temperature units but the Tadjust value is a convenient numeric cons...

Page 31: ...10 C then Program CH 5 as a Voltage channel m 0 00000 b 000100 dp 1 units 00 Program CH 6 as CH 1 CH 5 Other math functions can be used for desired results Now channel 5 will always be logged as 0010...

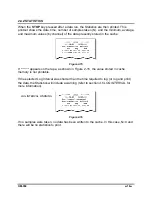
Page 32: ...rval setting suggests If this occurs an error message is printed when the STOP key is pressed Figure 4 4 This Interval Overrun can be avoided in two ways Choose not to print the data at RUN time Choos...

Page 33: ...operation and the time required to fill the cache is displayed In this example the unit will stop on a full cache Figure 4 5 Operation at full cache is determined during programming To program the OM...

Page 34: ...RE UNITS Any channel except the Math channel may be programmed to be a Temperature channel All Temperature channel data is scaled stored and printed in the current temperature units C or F The tempera...

Page 35: ...ted with additional characters Figure 4 7 To return to Normal mode Turn the unit OFF then back ON Reprogram the unit answering NO to the CAL Mode prompt Perform a Manual Reset When unattended for abou...

Page 36: ...with another measurement device Tadjust is programmed differently from other values because its use is different The Tadjust value is cumulative When a value of 0 2 C is selected during programming t...

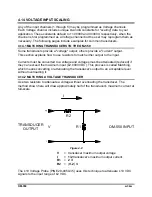
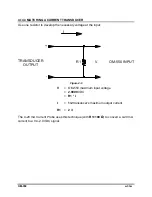
Page 37: ...stors to match either output to the input Currents must be converted to a voltage and voltages must be attenuated reduced if they can exceed the maximum input 2 0000 VDC This process is called Matchin...

Page 38: ...essary voltage at the input R1 V OM 550 INPUT I TRANSDUCER OUTPUT Figure 4 9 V OM 550 maximum input voltage 2 0000 VDC R1 I I 1 2 transducer s maximum output current R1 2 I The 4 20 mA Current Probe u...

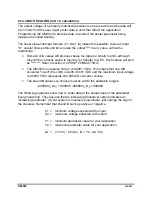
Page 39: ...t as Refer to section 4 2 PRINT FORMATTING The OM 550 can resolve 100 V 0 0001 VDC This means that one A D converter count the LSB is worth 0 0001 VDC and the maximum input voltage 2 0000 VDC represen...

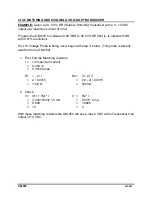
Page 40: ...dicate RH with 0 01 resolution If a 10 Voltage Probe is being used begin with step 3 below This probe is already matched to the OM 550 1 First find the Matching resistors I 1 2 maximum current 0 003 2...

Page 41: ...nt 2 2000 display counts Y2 90 00 RH keep decimal point 2 9000 display counts Desired RH resolution 2 places to right m Y1 Y2 X1 X2 of the decimal point 01 RH 2000 9000 0 20 000 0 35000 b Y2 m X2 9000...

Page 42: ...ducer output is 4 mA the OM 550 will see 0 4 VDC and when the transducer output is 20 mA the OM 550 will see 2 VDC 2 Next find m b X1 0 4000 VDC minimum expected input 4000 A D counts at Transducer mi...

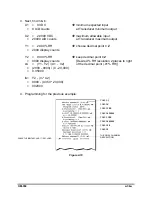
Page 43: ...550 u38u 3 Programming for the previous example Figure 4 11 PRESS 1 PRESS V PRESS YES PRESS 093750 PRESS NO PRESS 003750 PRESS 55 PRESS 2 THE FINAL CHANNEL DESCRIPTION PRESS THE EXIT KEY AND IT IS ECH...

Page 44: ...e programmed with an individual Unit label and every available label has an associated number When prompted for a Units label during programming enter the corresponding number to assign the Unit or pr...

Page 45: ...er programming procedures and alternate options 1 Turn the OM 550 ON 2 Press the PROG key to confirm the current programming information Figure 5 1 Programmed Information If the channel information is...

Page 46: ...m Figure 5 3 Log Interval Time 4 Select whether to stop collecting data when the Cache is full collect data continuously or press OK to advance to the next item OR Figure 5 4 Operation at Full Cache 5...

Page 47: ...e to the next item Figure 5 6 Current Date 7 Select the desired temperature units or press OK to advance to the next item OR Figure 5 7 Temperature Units 8 Select the Rejection frequency or press OK t...

Page 48: ...or press OK to advance to the next item OR Figure 5 9 Cal Mode Selection 10 Enter a Tadjust value or press OK to finish programming Figure 5 10 Tadjust Value Selection Programming is now complete and...

Page 49: ...data collection process is complete the data stored in the internal cache can now be transferred to a PC 13 Connect the RS 232 cable to the Data port on the OM 550 and make sure the other end is conn...

Page 50: ...1 units 00 Blank The Temperature Units for all temperature channels are C The Real time Clock Calendar is initialized to 00 00 00 01 01 00 The Log Interval is 00 00 30 30 seconds The OM 550 is in the...

Page 51: ...ted every 6 months Setup 1 Perform a Manual Reset 2 Press the PROG key to enter the programming mode 3 Expect a printout similar to the following Figure A 2 4 Answer the prompts as follows Figure A 3...

Page 52: ...3 Apply a 2 00000 VDC standard voltage to channel 1 4 Start logging and produce a printout press RUN YES on the keypad 5 Adjust the Volt Gain pot for a CH 1 reading of 2 0000 V 0 0001V 6 Press the ST...

Page 53: ...gnoring the cold junction compensation To return to normal operation Press PROG on the keypad to enter the programming mode then use the OK key to step down through the menu to the Calibration prompt...

Page 54: ...ESISTANCE EFFECT 20 V 800 COLD JUNCTION COMPENSATION 0 5 C Max 10 C to 40 C CMRR at 50 60 Hz 120 db NMRR at 50 60 Hz 60 db ACCURACY TYPE RANGE C TABLE CONFORMITY TOTAL ACCURACY J 165 to 760 0 08 0 8 0...

Page 55: ...F INPUT CHANNELS 5 Voltage or Thermocouple 1 Pseudo math INTERNAL DATA STORAGE MAXIMUM CAPACITY 28 Kbytes or 7000 data samples ENVIRONMENTAL OPERATING AND STORAGE ENVIRONMENT Indoor use only OPERATING...

Page 56: ...ndent on the nominal line voltage to earth POWER CURRENT REQUIREMENTS INTERNAL CELLS 4 AA alkaline cells OM 550 POWER INPUT 9VDC 50 mA 700 mA Peak while printing AC POWER ADAPTER INPUT 120 VAC or 230...

Page 57: ...OM 550 DOS Software...

Page 58: ...MASTER MENU 2 2 1 READING DATA FROM THE OM 550 3 2 2 LOAD EXISTING LOG FILES 4 2 3 MODIFY SOFTWARE CONFIGURATION 5 2 4 LIST DATA ON MONITOR 7 2 5 PRINT DATA ON PRINTER 8 2 6 SAVE TEXT FILE 8 2 7 EDIT...

Page 59: ...s will increment as new experiments are saved or can be user configurable In addition to the OM 550 data an experiment file can optionally contain information describing the parameters of the experime...

Page 60: ...dium for the software program and can be recalled from the hard drive at any time The data may also be saved in Text files LOG PRN for export to spreadsheet programs Although the software can write bo...

Page 61: ...follows CPU RAM Hardware 386 640K RAM minimum 400KB of free disk space Disk Drive 3 5 high density floppy disk drive Mouse IBM compatible mouse plugged into either a dedicated mouse or serial port Se...

Page 62: ...am disk before installing the software any standard text viewer can be used The README contains the latest information on the software and installation instructions HARD DRIVE INSTALLATION 1 Insert di...

Page 63: ...key For example if the program in installed in the default directory C M50 type CD C M50 M50C If you have a computer with a CGA video card CD C M50 M50E If you have a computer with a EGA video card C...

Page 64: ...t file or modify the software configuration parameters custom labels and computer configuration The following sections will describe how each option will assist the user to analyze the data collected...

Page 65: ...50 is ON To transfer data 1 Press the key and instructions how to properly transfer data will appear on the screen Data Transfer Screen 2 Press any key to start transferring data and the number of byt...

Page 66: ...saved experiment files will appear The list includes the Log Interval used to acquire the data the Date and Time when the last datapoint in the file was taken the Number of data points in the file an...

Page 67: ...ed M51 CON when this screen is exited To make changes 1 Press the key and a list of configuration items will appear Software Configuration Screen 2 To make new entries or change existing ones use the...

Page 68: ...ncluded when you Print the data List or save it as a Text file The Next Available File Number determines the number assigned to the next saved file The user can select the next file number that will b...

Page 69: ...experiment data in columnar format To list data 1 Press the key and experiment data will start scrolling vertically across the screen To stop or start the data press the Spacebar at any time To incre...

Page 70: ...done spooling the software will automatically return to the Master Menu 2 6 SAVE TEXT FILE Option 6 Save Text File on the Master menu allows the user to save the currently loaded data as a text file...

Page 71: ...2 Enter the Plot title and channel labels by highlighting the text field and typing the desired text Press the enter key to move to the next text field to enter a description To skip a text field pre...

Page 72: ...phical format and allows the user analyze the data The HOT PLOT screen is designed for use with either a mouse or a keyboard and this manual describs the functionality for both The HOT PLOT has the fo...

Page 73: ...ser can use the mouse to read Times and Values anywhere on the plot The X and Y Readout shows the Day Time and Y Axis Value at the place where the mouse pointer is currently positioned The Day and Tim...

Page 74: ...l informing the user to Click and drag to select area 2 Position the mouse pointer to select one corner of the desired area to enlarge 3 Press the left mouse button and drag the pointer diagonally to...

Page 75: ...ith a white outlined box MAGNIFIED AREA MAGNIFY MAP To return to the full view click the Magnify Map outside of the magnified area To show even more detail in the Data Graph Magnify can be performed m...

Page 76: ...channels are linked together then the Y Axis labels show the information for the last channel selected Y AXIS LABLES For example if you plot channel 1 then add channel 2 the Y Axis Labels will show t...

Page 77: ...mn show which channels are Selected and the boxes in the left column show which channels are Linked together The boxes toggle between the selected and deselected CHANNEL LINK BUTTONS CHANNEL SELECT BU...

Page 78: ...nes 1 Determine which channels are displayed on common Y Axis Selected channels will be scaled together The multi channel select deselect feature also works when linking channels 2 Click the Channel l...

Page 79: ...OM 550 DOS Software u17u Channels 4 5 After Linking...

Page 80: ...the OM 550 is graphed in XY format The Data Graph X horizontal axis represents time or point and the Y vertical axis shows the values of the data points The values are also shown in the X cursor Data...

Page 81: ...X Cursor controls the X values displayed in the X Cursor Data Table When an X Cursor is moved values in the X Cursor Data Table Time or point will automatically update Press the F9 key to toggle the...

Page 82: ...of the HOT PLOT is the Help Menu This menu lists all available Keyboard functions Refer to APPENDIX A KEY FUNCTIONS for more details To activate the Help menu 1 Press the key and the Help menu will ap...

Page 83: ...Modify Software Configure To list log files 1 Press the key and the printing process will start When it is finished spooling the program will automatically return to the Master Menu 2 10 QUIT Option...

Page 84: ...FF Selects X Cursor 3 Toggles Channel 3 ON OFF Selects X horizontal zoom zone Toggles Channel 4 ON OFF Selects Y vertical zoom zone Toggles Channel 5 ON OFF Prints Screen Toggles Channel 6 ON OFF Help...

Reviews: