background image

21 | 

M 5 7 9 0


8  Navigating Layer N Cloud 

The Layer N Cloud is the bridge between Layer N Smart Sensing devices and getting your data when you need it on any 

device with a web browser. The Layer N Cloud delivers state and status monitoring, data logging, visualization, and 

analytics. Accounts can be created and accessed by visiting: 

http://cloud.omega.com


Once you have access to your account and have completed your initial device pairing, you will be presented with your 

connected devices on the Layer N Cloud interface. 

8.1 

Devices 

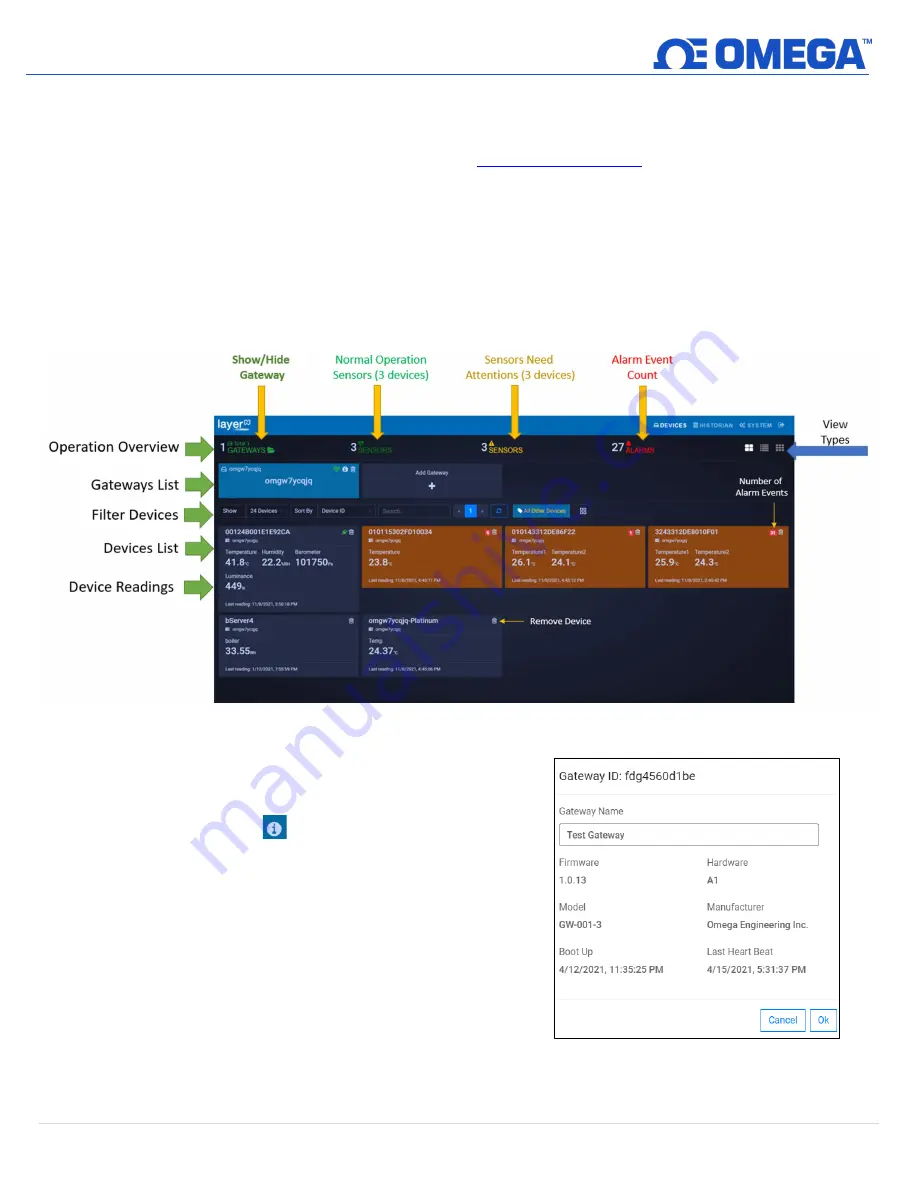
After signing in, the

 Devices

 tab immediately presents the readings of all registered Layer N Gateways and their 

connected sensing devices. From here, you may access your gateway details, add additional gateways to your cloud 

account, monitor device health, and access specific sensor analytics. 

Figure 23: Layer N Cloud main interface - Devices 

8.1.1 

Gateway Details 

To view your gateway details or change the name of your 
device, click the  

  icon associated with the gateway 

you wish to view. From here, you will be able to change 

your gateway name and view your gateway ID, firmware 

version, model number, initial boot-up date and time, 

hardware type, manufacturer, and last recorded device 

heartbeat. 

Figure 24: Layer N Cloud registered gateway details


Summary of Contents for GW-001 Series

Page 1: ...TM User sGuide Shop online at omega com e mail info omega com For latest product manuals www omega com en us pdf manuals GW 001 Series Long Range Layer N Ethernet Gateway ...

Page 2: ...ineering Inc Omega Engineering Inc 800 Connecticut Ave Suite 5N01 Norwalk CT 06854 Toll Free 1 800 826 6342 USA Canada only Customer Service 1 800 622 2378 USA Canada only Engineering Service 1 800 872 9436 USA Canada only Tel 203 359 1660 e mail info omega com Fax 203 359 7700 Omega Engineering Limited 1 Omega Drive Northbank Irlam Manchester M44 5BD United Kingdom Omega Engineering GmbH Daimlers...

Page 3: ...5 2 2 Security Settings 14 5 2 3 System Settings 15 5 2 4 Log 15 6 Registering your Gateway to OEG Enterprise Mode 16 6 1 1 Configuring Sensing Devices after Pairing with OEG 18 7 How to Pair a Sensing Device to a Layer N Gateway 19 7 1 Wireless Pairing 19 7 1 1 SS 001 RUG Pairing 19 7 2 Wired Pairing 20 8 Navigating Layer N Cloud 21 8 1 Devices 21 8 1 1 Gateway Details 21 8 1 2 Management 22 8 1 ...

Page 4: ...4 M 5 7 9 0 10 General Public License Statement 35 11 Specifications 36 ...

Page 5: ...vice as it contains important information relating to safety and EMC Failure to follow all the safety precautions may result in injury and or damage to the equipment The following labels identify information that is especially important to note Note Provides information that is important to successfully set up and use the Layer N Gateway Caution or Warning Informs about the risk of electrical shoc...

Page 6: ...se Gateway OEG do not need to create a Layer N Cloud account to use the Layer N Gateway in Enterprise Mode Refer to the following LED Status Indicator table to identify the different Gateway behaviors and statuses LED Color Status Description Amber Orange solid Gateway is powered on no network connection Green blinking repeatedly Gateway is in Pairing Mode or Firmware Upgrade was successful Amber ...

Page 7: ... Serial Data and Alarm Connector The 5 pin terminal can accept RS232 or RS485 inputs from authorized Omega accessories and devices such as OM240 CN616A and DP612 The 5 pin screw connector on the gateway is labeled as follows Pin Description Pin 1 TX D Pin 2 RX D Pin 3 GND Pin 4 Alarm N O Pin 5 Alarm N O Contact Omega or visit our website to see other compatible devices 3 3 1 Alarm Relay Wiring The...

Page 8: ...o section 4 1 Registering your Gateway to Layer N Cloud for more information Step 1 Connect the antenna included with the gateway to the side of the device housing Step 2 Connect the DC 12 V adapter to the back of the gateway Step 3 Connect an RJ45 Ethernet cable to the port labeled Ethernet 1 on the gateway Step 4 Connect the other end of the Ethernet cable to a DHCP enabled router with Internet ...

Page 9: ...stration process Once the user credentials are verified the user can sign in and will be presented with the Layer N Cloud homepage Step 3 From the cloud homepage click Add Gateway Step 4 Type in the Gateway ID GID from the label on your gateway Step 5 Type in the Registration ID RID from the label on your gateway and click Register Important The label containing your Gateway ID and Register ID is ...

Page 10: ... on the rear label of the unit When entered successfully the user will be prompted to create a new password Once the user has accessed the UI for the first time they may leave the network settings as DHCP or they may choose a Static IP under the Network Settings menu Additionally after the first time setup the user may choose to enable Enterprise Mode to pair the GW 001 to an Omega Enterprise Gate...

Page 11: ...the communication parameters for your device including the interface type baud rate data bits stop bits parity device ID and reading interval 5 1 1 1 Omega Platinum Omega Platinum controllers being added to the GW 001 require users to identify the IP address and Port number of the Controller device Figure 9 Add Device Controller Setup Figure 10 Platinum series controller Add Device interface ...

Page 12: ... require users to know the IP address of their controller device An IP scanner software can be used to identify the DAQ IP address 5 1 3 Meter To add a Meter device select it from the Product Family dropdown and select your Product Model from the dropdown You can then set the communication parameters for your device including the interface type baud rate data bits stop bits parity device ID and re...

Page 13: ...t from the Product Family dropdown and select your Product Model from the dropdown You can then set the communication parameters for your device including the interface type device ID and reading interval Figure 13 Layer N Smart Probe Add Device interface ...

Page 14: ... change your gateway device name and change your IP Assignment between DHCP and Static IP 5 2 2 Security Settings To manage the password required to access your gateway web UI select the Security option from the Settings dropdown at the top right of the webpage UI From here users can turn off the cloud registration to enable Enterprise Mode For more information refer to section 6 Registering your ...

Page 15: ...default out of the box settings 5 2 3 1 How to Update the Firmware on a Layer N Gateway Once in the System Settings the user may click the magnifying glass icon accompanying the Upload Firmware box to open the File Explorer Select the new firmware file and click Open Click Upload to confirm the firmware upgrade A red LED on the gateway will indicate that the upgrade is in process Once the update p...

Page 16: ... to the Security Settings in the Gateway UI Step 2 Click the Turn Off Cloud Registration checkbox to disable the feature and set the GW 001 to Enterprise Mode Figure 18 Gateway UI Security Settings Turn off Cloud Registration Step 3 Click the Update button to save the setting change The gateway LED will flash orange 3 times indicating the device is in Enterprise Mode Note The GW 001 may be configu...

Page 17: ...CP enabled GW 001 unit has been disconnected and moved to a separate DHCP enabled local area network router or PC the user must log back into the gateway internal UI to identify the new IP Address that the unit has been assigned under the local area network Step 7 Click Advanced to reveal the text field for Username and Password The Username will automatically populate to admin Input the password ...

Page 18: ... off and on again Omega Enterprise Gateway should also be restarted from the Windows OS Services application In the future if users will be using the Layer N Cloud service they must navigate to the Gateway web UI again to uncheck the Turn off Cloud Registration box 6 1 1 Configuring Sensing Devices after Pairing with OEG If a sensing device paired wirelessly or wired directly to the Layer N Gatewa...

Page 19: ... Gateway will blink green indicating the Gateway is in Pairing Mode When the IF 006 or Smart Sensor has been successfully paired to the Layer N Gateway the LED will stop blinking on both devices 7 1 1 SS 001 RUG Pairing To pair an SS 001 RUG sensor to a Layer N Gateway follow the instructions below Step 1 Locate the small pinhole on the underside of the SS 001 RUG unit and insert a paperclip to pr...

Page 20: ...he default page set once you are signed in to the internal gateway UI From here you can add devices to your gateway to have them appear in your Layer N Cloud account Figure 22 Gateway Internal User Interface To add a device to your gateway from the internal gateway web UI begin by clicking the button at the top right of the web page Refer to section 5 1 Connected Devices Main Interface for more in...

Page 21: ...er signing in the Devices tab immediately presents the readings of all registered Layer N Gateways and their connected sensing devices From here you may access your gateway details add additional gateways to your cloud account monitor device health and access specific sensor analytics Figure 23 Layer N Cloud main interface Devices 8 1 1 Gateway Details To view your gateway details or change the na...

Page 22: ...add users and devices to your group 8 1 2 2 Creating a Device Group and Adding Devices To create a Device Group and add sensing devices to that group follow these instructions Figure 26 Layer N Cloud devices homepage Step 1 On the Layer N Cloud homepage click on the management icon Step 2 Click Groups then click Add Group and create a name for your group Click Create to finalize Note The dropdown ...

Page 23: ...face Step 4 Once back on the Manage Device Groups window click the icon to add sensing devices to your newly created group Click OK to finalize the changes Figure 30 Assigning a device to a specific group 8 1 2 3 Assign Gateway to Admin Admin Only To assign a gateway to an admin click the Gateway icon Enter the admin s email address and select the gateway that will be assigned to them Click Assign...

Page 24: ...r Real Time are down sampled to 10 minutes when plotted on the Layer N Cloud interface regardless of the Cloud subscription level All Real Time data fully remains in the Historian See section 6 2 Historian for more information Figure 31 Layer N Cloud sensor measurements Graph View 8 1 3 2 Alarms and Events The Alarms and Events tab displays all alarms and events that were triggered by this device ...

Page 25: ... to establish the desired threshold or setpoint to trigger an alarm when a condition is met Triggering an alarm repeatedly in a short period however can produce unwanted results such as having the alarm flip between inactive and active several times and triggering unwanted actions tied to that alarm as a result Additionally the constant alarm email notifications may result in an email service shut...

Page 26: ...as been established and the alarm will not be triggered within that region In OEG the deadband feature in the alarm settings is expressed as an absolute value For example if a user enters a value of 5 in the Deadband text box a range of 5 to 5 from the threshold has been established and the alarm will not be triggered within that region Figure 35 Setpoint as a percentage Figure 36 Setpoint as an a...

Page 27: ...t Figure 37 Layer N Cloud Historian interface 8 2 1 How to Generate a Historical Data Report The Historian tab allows users to create reports of past readings within a range of time and presents them as a graph Through the Historian tab users can export their chart data as a csv file Begin by clicking Select Devices and making your selection Select the range of time your wish to view and choose a ...

Page 28: ...ices interface Select a period or a range of dates To specify the range of time the report will cover users can select Today This Week or Custom date and time Click Apply to finalize the changes Figure 41 Custom date range calendar interface Save the Result Export Chart Data Users can save and export the generated data by clicking the save icon A csv file of the data will be generated and the user...

Page 29: ...nterface provides three methods of presenting graphed data Plot Time Series Plot Histogram and Plot Prediction Figure 42 Graph data viewing options Plot Time Series Figure 43 Plot time series graph view Plot Histogram Figure 44 Plot Histogram graph view ...

Page 30: ...lot Prediction To utilize the Plot Prediction feature enter the date and time of the value you would like to predict and click the Predict Future Values button to display the data Figure 45 Plot Prediction graph view ...

Page 31: ...ure settings such as associated email addresses passwords security questions and notifications Using the email address associated with the account or by providing an SMS email address users can receive notifications directly whenever an alarm or event is triggered Passwords can be updated by entering the old password in the text box then entering and confirming the new password as directed on the ...

Page 32: ... data for your gateway on their Layer N Cloud accounts To add a user enter their email address in the text box and choose Can Change or Can View to grant full access or restrict access respectively 8 3 3 1 How to Add Users To add users to your Layer N Cloud account follow these steps Figure 49 Layer N Cloud Users tab Step 1 On the Layer N Cloud homepage click on the SYSTEM tab and click on Users E...

Page 33: ...il may be in the user s spam folder 8 3 4 Subscription The Subscription tab shows your current subscription tier and provides a link to the Omega website should you choose to upgrade your subscription plan If you purchased the subscription with a billing email different than your Layer N Cloud account email you may link the two here 8 3 5 Contact Us The Contact Us tab provides an email address lin...

Page 34: ... of the re pairing process may be disregarded Step 1 Navigate to the Layer N Cloud Portal that is associated with the Smart Sensor and remove the Smart Sensor from the account Step 2 Ensure the unit is being powered with either a USB connection or batteries Press and hold the Pairing Button on their Smart Sensor for 8 seconds so that the LED Status Indicator blinks red to factory reset the device ...

Page 35: ...oduct have rights to acquire modify and redistribute the source code in accordance of the terms of the GPL and LGPL If you have any questions or wish to receive a copy of any source code that you may be entitled under the term please contact us at iiot opensource omega com Please include the SKU of this product in your request The subject should be GW001 GPL license statement request The original ...

Page 36: ...g Temperature 20 C to 65 C 4 F to 149 F non condensing Mechanical Dimensions 170 mm L x 100 mm W x 42 mm H 6 69 x 3 93 x 1 65 Certifications Contains FCC ID WR3 MOD16370915 Contains IC ID 8205A MOD16370915 Emission Immunity for EMI EMS FCC FCC Part 15B CE Radio Equipment Directive 2014 53 EU EMC Directive 2014 30 EU RoHS Directive EU 2015 863 UKCA Radio Equipment Regulations 2017 Electromagnetic C...

Page 37: ...GA if the unit is found to be defective it will be repaired or replaced at no charge OMEGA s WARRANTY does not apply to defects resulting from any action of the purchaser including but not limited to mishandling improper interfacing operation outside of design limits improper repair or unauthorized modification This WARRANTY is VOID if the unit shows evidence of having been tampered with or shows ...

Page 38: ...rs M U Turbine Paddlewheel Systems M U Totalizers Batch Controllers pH CONDUCTIVITY M U pH Electrodes Testers Accessories M U Benchtop Laboratory Meters M U Controllers Calibrators Simulators Pumps M U Industrial pH Conductivity Equipment DATA ACQUISITION M U Communications Based Acquisition Systems M U Data Logging Systems M U Wireless Sensors Transmitters Receivers M U Signal Conditioners M U Da...

Reviews: