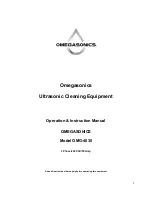
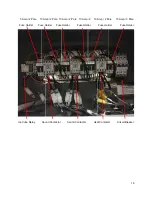
background image


Omegasonics 


Ultrasonic Cleaning Equipment 


Operation & Instruction Manual  


OMEGASONICS 


Model OMG-4030                 


3 Phase/240 VAC/50 Amp 


Read all instructions thoroughly before operating this equipment 


Summary of Contents for OMG-4030

Page 1: ...1 Omegasonics Ultrasonic Cleaning Equipment Operation Instruction Manual OMEGASONICS Model OMG 4030 3 Phase 240 VAC 50 Amp Read all instructions thoroughly before operating this equipment...

Page 2: ...Set Up 5 General 5 Digital Temperature 6 Digital Timer 7 Cleaning Procedures 8 Machine Operation 8 FDM Parts 9 FDM Recipes 10 Equipment Maintenance 11 General 11 Tank Draining 11 Limited Warranty 12 T...

Page 3: ...d cleaning speed and consistency when compared with simple soaking or immersion with agitation Additionally the bubbles are small enough to penetrate even microscopic crevices cleaning them thoroughly...

Page 4: ...tainless steel welds Due to the heated liquid in the tank use baskets tongs or wires to insert or remove parts from the tank Do not operate the unit with wet hands Use only biodegradable cleaning agen...

Page 5: ...he tank to maximize insulation efficiency Set digital timer and temperature controls The OMG 4030 utilizes 6 900 Watt built in silicone heating element and is well insulated The time required to heat...

Page 6: ...ting mechanism and the OUT light will go on off based on a 5 variance This protects the life of the motor contrator AT ALM 2 Omegasonics use only Return Key Operation The temperature controller is fac...

Page 7: ...ay The ultrasound is factory set to 15 00 minutes To adjust the preset value press the blue keys Press the up arrow key to increase or down arrow key to decrease Left most blue key corresponds to 10 m...

Page 8: ...o the ON position The selector switch will spring back to the center position Before cleaning your first batch of items operate the ultrasound for fifteen 15 minutes This process is called degassing a...

Page 9: ...0 require 30 60 minutes c Larger parts 10 require 1 3 hours plus Activate the ultrasound by switching SONICS to ON Parts being cleaned do not require continuous supervision or labor intensive cleaning...

Page 10: ...SR100 SR110 ABS 158 F 158 F Polycarbonate 167 176 F Nylon 12 2 Part 145 F Nylon 12 3 Part 158 F PCABS 158 F 158 F Polycarbonate ISO 167 176 F ABS Translucent 158 F 158 F ABS I Medical 158 F 158 F Ulte...

Page 11: ...he inside of the tank with a clean soft cloth Do not use steel wool cleaning pads as they are too abrasive and will scratch the tank surface Rinse the tank again If the tank will not be used for a lon...

Page 12: ...re the responsibility of the user This warranty does not include damage or product failure which results from cavitation erosion misuse abuse or transportation damage This warranty is limited to the o...

Page 13: ...nk to the middle of the spray bar a Unplug the machine from the facility power supply b Remove upper panel located on the right end of the machine c Look for the ice cube relay located at the left end...

Page 14: ...ck or charcoal white they must be replaced 5 Call Omegasonics to order new heat blanket s Ultrasound is causing the circuit breaker to trip 1 Remove lower vented panel located on the right end of the...

Page 15: ...O can you manually push in the coil to activate the ultrasound a NOTE Use an insulated screwdriver to push in the center coil b If you cannot push in the coil manually the contactor needs to be replac...

Page 16: ...10 Amp 2 Pole 10 Amp 2 Pole 10 Amp 2 10 Amp 2 Pole 15 Amp 3 Pole Fuse Holder Fuse Holder Fuse Holder Fuse Holder Fuse Holder Fuse Holder Ice Cube Relay Sound Contactor Sound Contactor Heat Contactor...

Page 17: ...3 Position Selector 2 Position Selector Heat Switch 2 Position Selector Power Button Push Button Motor Contactor Contactor 240 Heat Blanket 6 Heat Blanket 900 2400V Ice Cube Relay Relay 240 Caution R...

Page 18: ......

Page 19: ......

Reviews: