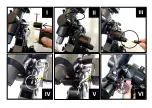
I.
Platzieren Sie den Motor
II.
Drehen Sie den Knauf fest.
III.
Stecken Sie das Stromkabel in den Sockel
IV
. Kontrollieren Sie die Kupplung um die Position
der Schrauben.
V.
Dehnen Sie die Feder und befestigen Sie diese mit der Schraube
VI
. Die Kupplung lasst sich drehen
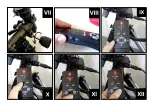
VII.
Entkoppeln Sie, um manuell
nachzuführen
VIII.
Schalten Sie den Motor an „ON“
IX.
Die LED leuchtet, wenn der Motor an ist
X.
Wählen Sie die richtige Hemisphäre (N oder S); der
Motor beginnt zu laufen
XI.
Drücken Sie „STOP“, um den Motor anzuhalten
XII.
Wählen Sie 2x oder 4x, um die Geschwindigkeit zu erhöhen.
I.
Place motor
II.
Tighten hand knob securely.
III.
Insert power cable in socket
IV
. Check clutch and screw positions.
V.
Stretch spring and thread
thumbscrew
VI
. Clutch rotates
VII.
Clutch up to use the manual control
VIII.
Power ON
IX.
Led lights when powered
X.
Choose Hemisphere (N or S) motor
starts to run
XI.
Press STOP to halt motor
XII.
Choose 2x or 4x to increase correction speeds.
I.
Placer le moteur
II.
Serrer le buton de main
III.
Inserer le cable dans la douille
IV
. Vérifier le embrayage et position de la vis.
V.
Distendre resort et enfiler
la vis
VI
. Embrayage tourne.
VII.
Embrayage en haut pour utilisation manuel
VIII.
Allumer ON
IX.
LED ON quand allumée
X.
Choisir Hémisphere (N où S)
moteur tourne
XI.
Primer STOP pour arreter le moteur
XII.
Choisir 2x ou 4x pour augmenter la velocité de correction.
I.
Colocar el motor
II.
Aprete la perilla
III.
Conecte el cable
IV
. Atención a la posición de embrage y del tornillo.
V.
Estique el muelle e aprete el tornillo
VI
.
Embrague roda
VII.
Embrague arriba para uso manual
VIII.
Cambiar para ON
IX.
LED encendido cuando ON
X.
Escoja Hemisferio (N o S) motor empieza a
trabajar
XI.
Pulse STOP para parar el motor
XII.
Escoja 2x o 4x para aumentar la velocidad de corrección.
I.
Coloque o motor
II.
Aperte o parfuso
III.
Ligue o cabo
IV
. Atenção à posição da embraiagem e do parafuso.
V.
Estique a mola e aperte o parafuso
VI
. A
embraiagem roda
VII.
Embraiagem para cima para uso manual
VIII.
Mudar para ON
IX.
LED aceso quando ON
X.
Escolha o Hemisfério (N ou S) motor
começa a trabalhar
XI.
Pressione STOP para parar o motor
XII.
Escolha 2x ou 4x para aumentar a velocidade de correção.
Reproduction of part or all of the contents of this document in any form is expressly prohibited other than for individual use only.
All text, images and labels are property of Nimax Gmbh.


