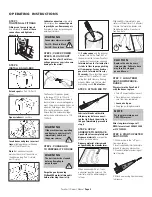
STEP 1:
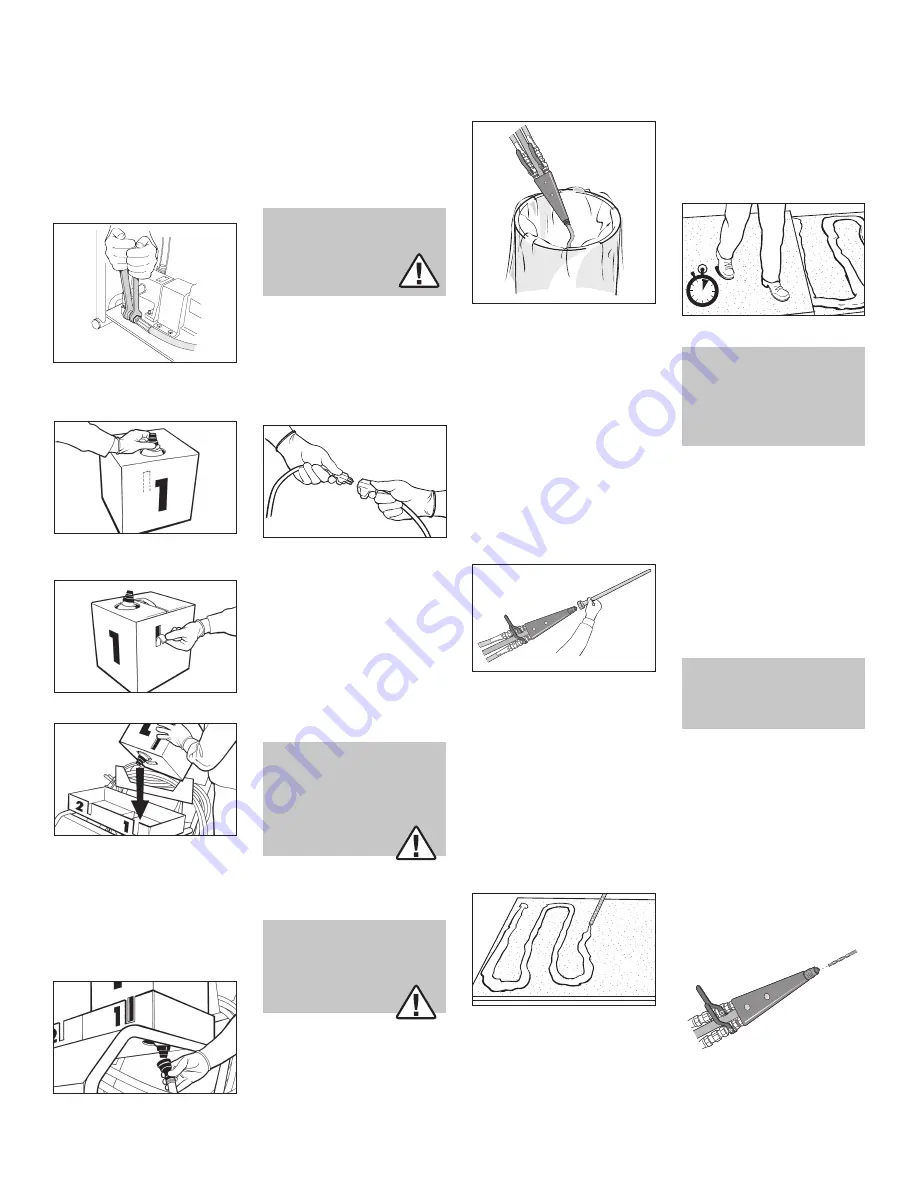
TIGHTEN ALL FITTINGS
Fittings can loosen in transit.
Use a wrench to
check all hose
connections and tighten as
necessary.
STEP 2:
INSTALL BAG-IN-BOX
Extend spout
on Part 1 & Part 2
boxes.
Open window
on each box.
Invert boxes and place in correct
trays,
aligning windows with open
slots at front of each tray.
Note
that adhesive tray color
matches the color of the nozzle on
the adhesive bag. Part 1 is black,
part 2 is gray.
Lubricate connectors
using white
lithium spray, then
connect spouts
to gravity hoses. Remove any air
from gravity hoses by squeezing and
pushing air into box.
WARNING
Connector colors must match!
Part 1A: Black to Black
Part 2B: Gray to Gray
STEP 3: CHECK POWER
SPECS, PLUG IN CART
Never run PaceCart 3 with low-
voltage power or you risk severe
damage to the motor!
The PaceCart 3 requires power
in the range of 110 to 125 volts,
15 amp. Check the power source to
be sure there is no competing equip-
ment. Using an overloaded line or an
extension cord longer than 75 feet
(23m) will diminish your power.
Ensure that the on-board voltage
meter shows ample power: i.e. 110-
125 Volts.
WARNING
If the machine stops operating
and begins to hum, turn it off
immedi ately and check
the power source.
STEP 4: PURGE GUN
TO PREPARE IT FOR USE
WARNING
The nozzle must be cleaned
before attempting to
purge the gun.
Purge the gun by running
OlyBond500 material through it
before
attaching the mix tip.
With
valves open
and the gun over
a bucket, turn on the PaceCart 3 at
the power switch. For new PaceCart
3 equipment, leave valves open and
let material run for 1 minute after
it starts to flow to purge packing
oil from pumps. For each subse-
quent use, let material flow for
30 seconds.
There should be equal
streams of Part 1 and Part 2, indi-
cating that both sides are flowing
properly. Make sure the two sides
are running evenly.
Shut valves.
STEP 5: ATTACH MIX TIP
Lubricate threads with white
Lithium spray before connect-
ing the tip. Attach the mix tip to
the gun. Immediately proceed to
step 6.
STEP 6: APPLY
ADHESIVE TO SURFACE
Open both valves completely and
dispense material
in a serpentine
pattern as shown above.
Dispense material at increments
as specified by the manufacturer.
When dispensed with a 1:1 ratio,
a chemical reaction occurs on the
substrate, and the adhesive begins
to foam.
OlyBond500 is formulated to give
roofers sufficient time (3–4 minutes)
to place the insulation boards onto
the adhesive before it reaches its
tack-free state.
CAUTION
Replace the mix tip every
time you stop. Failure to do so
may result in clogged
gun and hoses.
STEP 7: LONG TERM
SHUT-DOWN PROCE-
DURES
Always store the PaceCart 3
with the boxes in place.
• Turn off power to adhesive cart.
• Close ball valves - relieve pres-
sure from lines completely.
• Leave mix tip on.
• Keep gun pointing downward.
NOTE
For long term storage, use
OMG PCPreserver.
After long-term storage, call
OMG for service at 800.633.3800
or 413.789.0252.
STEP 8: START-UP AFTER
SHUT-DOWN
1. With machine in the "off" posi-
tion, open valves.
2. Insert supplied drill bit and rotate
by hand to clear any obstructions.
3. Clean drill bit before clearing out
the other side.
4. Attach new mixing tip when ready
to dispense.
OPERATING INSTRUCTIONS
PaceCart 3 Owner’s Manual
Page 5


