background image

RhinoBond Owner’s Manual

  Page 9


MANUAL CALIBRATION  

We recommend using the tool in OptiWeld mode, but recognize that you will want to adjust the weld settings from time to time, so we’ve made it easy to do that. 

Here’s how:  


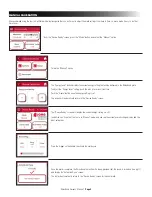
From the “Device Ready” screen, press the “Mode” button, and select the “Manual” option. 


Select the “Manual” option.

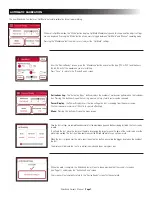
The “Energy Level” button displays the current energy setting that will be delivered to the RhinoBond plate.  

To adjust the “Energy Level” setting, push the plus (+) or minus (-) buttons. 

Push the “Home” button once the energy setting is set. 

The screen will automatically return to the “Device Ready” screen.

The “Device Ready” screen will display the current energy setting (i.e. +5). 


In addition, you’ll see that the tool is in “Manual” mode, and can see the current power/voltage display and the 

day’s activations. 

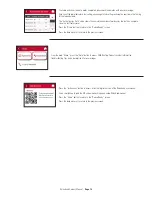
Press the trigger on the handle to activate the weld cycle.

Once the weld is complete, the RhinoBond tool will emit a beep, provided that the sound is turned on (see pg 11) 
and display the”Activation Done” screen.

The tool will automatically return to the “Device Ready” screen for the next weld.

Summary of Contents for RhinoBond RB7

Page 1: ...v 06252020 153 BOWLES ROAD AGAWAM MA 01001 USA 800 633 3800 413 789 0252 RHINOBOND COM Non penetrating fastening system for commercial roofing IMPORTANT Save this manual and read it in full before use...

Page 2: ...le easy to use system that secures membrane to roofing substrates using micropro cessor controlled induction welding Roofing installed this way has several benefits Fewer Fasteners RhinoBond requires...

Page 3: ...conditions Keep the tool dry at all times ALWAYS ENSURE that the tool is properly grounded CFCI Circuits are best and that power is from a safe and reliable source ALWAYS WEAR proper personal protecti...

Page 4: ...z 220V 50Hz EXTENSION CORD 12 gauge min 100 ft max 110V 2 5mm X 30m 16A 230V 3x15 30m 10A 30m PORTABLE GENERATOR POWER SOURCE 5 000W min with 2 20A GFCI Circuits 2 5 KVA min with 16Amp 110V protected...

Page 5: ...s under each plate to protect the insulation from melting On foil faced insulation the recommended minimum cover board is 1 in 38 mm Metal Deck A minimum of 1 inches 38 mm of insulation over a metal d...

Page 6: ...progress If necessary you can calibrate the touch screen at this time To do so touch this screen once to begin the calibration process see below Once startup is complete the screen will display the L...

Page 7: ...es can be reviewed Power Display The Power Display shows the line voltage the tool is receiving from the power source The tool requires a minimum of 100 volts to operate effectively Menu Pressing this...

Page 8: ...ce of membrane from the project weld each plate and apply a magnetic heat sink to each Allow plates to cool to the touch approx 5 minutes before removing the magnetic heat sinks Turn the membrane over...

Page 9: ...gy Level setting push the plus or minus buttons Push the Home button once the energy setting is set The screen will automatically return to the Device Ready screen The Device Ready screen will display...

Page 10: ...gnetic cooling clamp on the plate and mark the energy setting on the membrane for reference Adjust the Energy Level to the next higher setting and repeat the test weld process until all five plates ar...

Page 11: ...arrow to return to the previous screen Press the Sound button to change the Activation Complete tone The sound can be enabled by press ing the On button and disabled by pressing the Off button You ha...

Page 12: ...t factory reset Press the Home button to return to the Device Ready screen Press the back arrow to return to the previous screen From the main Menu press the Help button to access OMG Roofing Products...

Page 13: ...main Menu press the Help button to review the Troubleshooting tips and error message descriptions Press any of the error message buttons to get more information and recommendations Press the back arro...

Page 14: ...Voltage Directive LVD 2006 95 EC The following harmonized standards were applied LVD EN60335 1 2012 A11 2014 EN60335 2 45 2002 A2 2012 RhinoBond Induction Welding Tools wielding the CE Mark comply wi...

Page 15: ...RhinoBond Owner s Manual Page 15 NOTES...

Page 16: ...OMG Roofing Products 153 Bowles Road Agawam MA 01001 USA 800 633 3800 413 789 0252 www rhinobond com...

Reviews: