background image


Cod. 710.0138.01.00 Rev04A 

– 03.2017 

© Copyright 2017 OMI Srl - All rights reserved


  7 

– 12


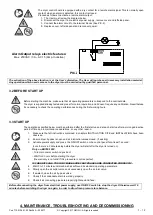
The dryer control board is equipped with a dry contact for a remote alarm signal. This is normally open 
contact: when an alarm is detected, this contact is closed. 
Proceed as follows to activate a remote alarm output: 

1.  The User must review the diagram below. 
2.  Disconnect the dryer from electrical power supply, remove cover and left side panel. 
3.  Connect the alarm circuit to the terminal blocks (See PIC.2). 

4. 

Replace cover, left side panel and reconnect power.


Alarm Output relays electric features: 

Max. 250VAC / 3A 

– AC 15 (Amp. Inductive) 

PIC.2


The activation of the above function is at the User’s discretion. The User will purchase all necessary installation material. 
Any operation which needs access to the dryer must be carried out by qualified personnel. 


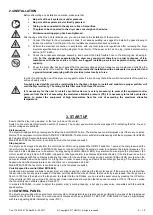
3.2 BEFORE START UP 


Before starting the machine, make sure that all operating parameters correspond to the nominal data. 
The dryer is supplied already tested and preset for normal operation, and it doesn’t require any calibration. Nevertheless, 
it’s necessary to check the operating performances during the first working hours. 


3.3 START UP 


The operations specified below must be performed after the first start up and at each start up after a prolonged inactive 
period of time due to maintenance operations, or any other reason. 

1.  Make  sure that  all  instructions  contained  in  chapters  INSTALLATION  SITE  and  INSTALLATION  have  been 

observed. 

2.  Ensure dryer by-pass is open and air inlet/outlet valves closed. (if existing). 

3.  Activate power supply and press  the ON/OFF switch on the control panel for at least 1 second. 

(note there is a 2 minute delay before the dryer will start after the dryer is turned on). 

Only on ED780-1000


- Turn main power switch on position 1. 

- Wait for 8 hours before starting the dryer 

  (the warranty is not valid if this procedure is not respected). 

IF THE UNIT FAILS TO START MAKE SURE THAT PHASES ARE CONNECTED CORRECTLY.


4.  Wait 5 to 10 minutes until machine has achieved its standard operating parameters. 

5.  Slowly open the air outlet valve and successively open the air inlet valve. 

6.  If existent, close the air by-pass valve. 

7.  Check if the condensate drain is working properly. 

8.  Check if all connecting pipes are properly tightened and fixed. 

Before disconnecting the dryer from electrical power supply, use ON/OFF switch to stop the dryer. Otherwise wait 10 
minutes before switching the dryer on again, in order to allow freon pressure to rebalance. 


4. MAINTENANCE, TROUBLESHOOTING AND DECOMMISSIONING 

Summary of Contents for ED18

Page 1: ...138 01 00 Rev04A 03 2017 Copyright 2017 OMI Srl All rights reserved 1 11 DIRECT EXPANSION COMPRESSED AIR DRYERS Operators Manual ED18 ED24 ED72 ED54 ED108 ED144 ED180 ED225 ED260 ED360 ED480 ED660 ED7...

Page 2: ......

Page 3: ...ion 4 3 START UP 3 1 Control panel 4 3 1 1 Keys function 5 3 1 2 Condensate discharge parameters programming 6 3 1 3 Anomaly warning 6 3 1 4 Remote signalling alarm 7 3 2 Before start up 7 3 3 Start u...

Page 4: ...Cod 710 0138 01 00 Rev04A 03 2017 Copyright 2017 OMI Srl All rights reserved...

Page 5: ...ion to the risk of electric shock Condensate drain point Rotation direction of the fan Pay particular attention to the risk of moving parts Explosion risk Lifting point Don t lift from this point Atte...

Page 6: ...s counterflow the initial air air exchanger and it is reheated by the inlet hot air with the consequence of energy recovering and also reduction of the relative humidity contained in the outflowing ai...

Page 7: ...empt to lift heavy objects without proper lifting equipment i e crane hoist slings or fork truck Lifting any unit without proper lifting equipment may cause serious injury Use fork lift channels where...

Page 8: ...l isolation switch if present The control panel will show the message OFF indicating that the line and control voltages are available Start sequence The dryer will initially start by pressing and hold...

Page 9: ...splayed value of one unit per second during the first 10 seconds than of one unit every 0 1 sec ON OFF Pressed it activates or deactivates the dryer When the dryer is deactivated the display shows OFF...

Page 10: ...R USER IT S FORBIDDEN TO ATTEMPT TO MODIFY THE OTHER CONFIGURATION PARAMETERS OF THE ELECTRONIC CONTROLLER WITHOUT AUTHORIZATION AND COLLABORATION OFOMI S AUTHORIZED DISTRIBUTOR 3 1 3 DISPLAY INDICATI...

Page 11: ...e operations specified below must be performed after the first start up and at each start up after a prolonged inactive period of time due to maintenance operations or any other reason 1 Make sure tha...

Page 12: ...ed YEARLY OR EVERY 2000 HOURS OF OPERATION Check if the flexible tube used for condensate drainage is damaged and replace it if necessary Check if all connecting pipes are properly tightened and fixed...

Page 13: ...1000 Intervention of the high pressure switch Reset the high pressure switch Problems with cabling or with the electronic control board Check the cabling and the electronic control board if the troubl...

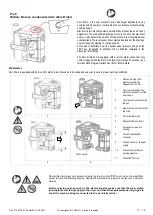
Page 14: ...extremely delicate Do not remove the probe from its position In case of any kind of problem please contact your localOMI distributor Pic 3 drain solenoid valve When it is necessary Clean the mesh filt...

Page 15: ...than 30 seconds see terminal block diagrams attachment B for futher details Maintenance Zero Drain is equipped with Service Unit which is recommended to be changed every year to ensure proper working...

Page 16: ...electricity supply to the dryer and then affix appropriate warning signs to avoid the machine being reconnected to the electricity mains Please consult the contents and the safety instructions in the...

Reviews: