background image

18

3’ minimum

(76 mm minimum)

ceiling

(plafond)

Annex

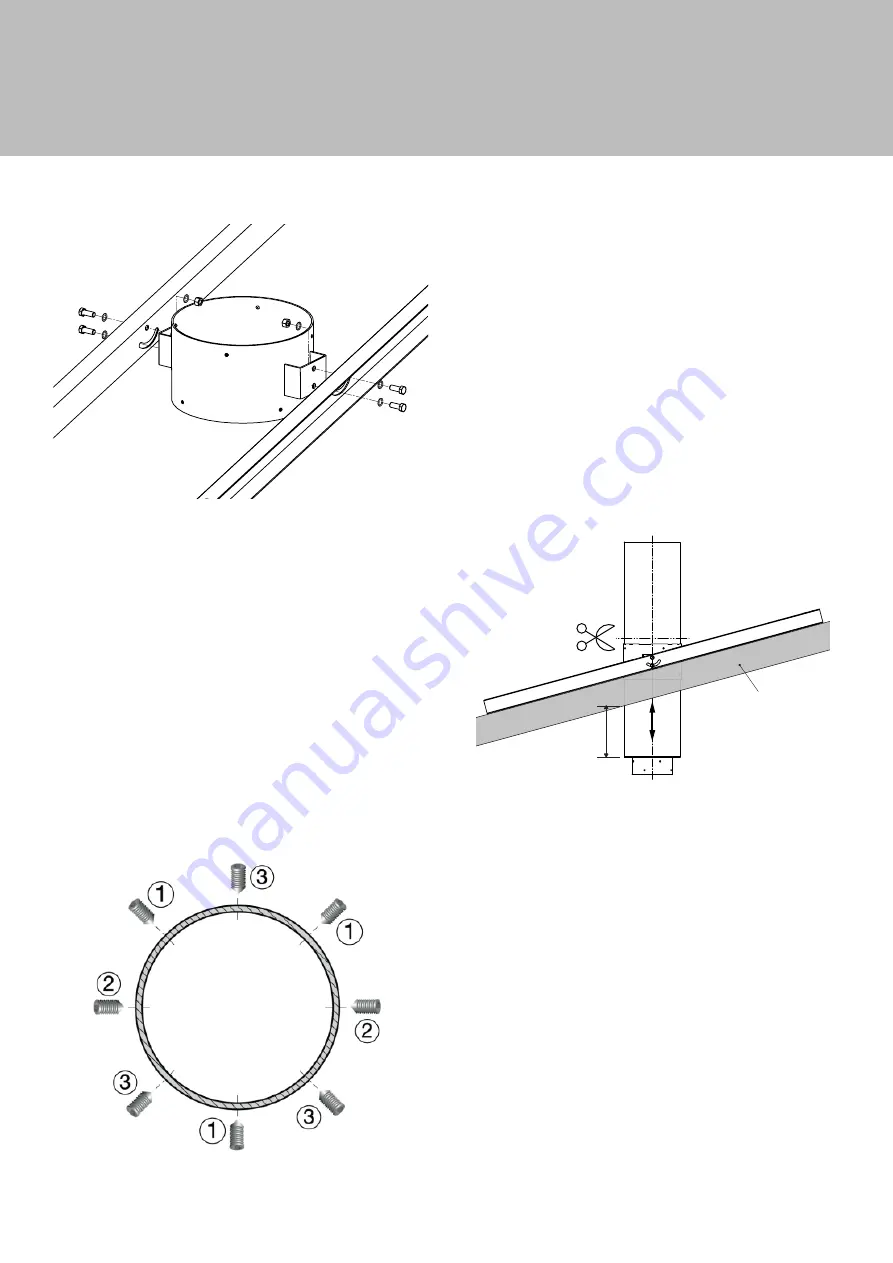
7 - Cut the drum with an angle grinder outfitted with 

cutting wheel following the tape.

8 - Install the drum again into the support collar. Using 

a level, confirm and tighten firmly cramping screws 

following the pattern below.

Screw 1 – Install first x 3

Screw 2 – Install next x 2

Screw 3 – Install last x 3

Note: Screws are not designed to sit flush with support 

collar.

7 - Couper le fourreau à l’aide d’une meuleuse d’angle munie 

d’un disque de coupe suivant le ruban.

8 - Remonter le fourreau dans le collier de soutien. À l’aide 

d’un niveau, confirmez et serrez fermement les vis de serrage 

en suivant le modèle ci-dessous.

Vis 1 - A installer en premier x 3

Vis 2 - A installer ensuite x 2

Vis 3 - A installer en dernier x 3

Remarque : Les vis ne sont pas prévues pour être à fleur du 

collier de soutien.

The steps of installation and cutting of the adjustable 

suspension plate are as follows:

1 - Place support collar between the mounting bars. 

Tighten bolts using supplied nuts and lock washers.

2 - Mount this assembly in the ceiling or roof.

3 - Install the drum inside the support collar from below.

Les étapes d’installations et de coupe de la platine de suspen-

sion ajustable sont les suivantes:

1 - Placer le collier de soutien entre les barres de montage. 

Serrer les boulons à l’aide des écrous et des rondelles frein 

fournis.

2 - Monter l’ensemble sur/sous le plafond ou toit.

3 - Installer le fourreau dans le collier de soutien par dessous.

4 - Adjust drum to desired length. The large portion of 

the drum must be a minimum 3’’ below ceiling finish.

5 - If drum is to be cut, mark the drum above the support 

collar with a pencil using the support collar as a guide.

6 - Remove the drum from the support collar and apply 

tape around pencil marks. Use as cutting guide.

4 - Ajuster le fourreau à la longueur désirée, minimum de 3’’ 

(76mm). Mesure à prendre depuis la base du fourreau. 

5 - Si le fourreau doit être coupé, marquer le fourreau au-des-

sus du collier de soutien avec un crayon en utilisant le collier 

de soutien comme guide.

6 - Retirez le fourreau du collier de soutien et appliquez du 

ruban adhésif autour des marques de crayon. Utiliser comme 

guide de coupe.

Summary of Contents for focus MEIJIFOCUS

Page 1: ...ries Inc and approved to UL 737 2011 and ULC S627 00 US EPA exempt Report Number 0304WF014S This document was packed with the appliance KEEP THESE INSTRUCTIONS FOR FUTURE USE MEIJIFOCUS ____ DESIGN IN...

Page 2: ...ACTERISTICS ROOF OUTLET REQUIREMENT CHIMNEY REQUIREMENT STRUCTURAL REQUIREMENT CONNECTOR FRESH AIR INTAKE CLEARANCES TO COMBUSTIBLES A CLEARANCES TO FLOOR AND CEILING B CLEARANCES TO WALLS Installatio...

Page 3: ...en this room heater is not properly installed a house fire may result To reduce the risk of fire follow the installation instructions Contact local building or fire officials about restrictions and in...

Page 4: ...inimum 16 feet for an installation less than 3 miles from the ocean or if a 30 elbow is necessary The m ijifocus must be connected to a chimney complying with the requirements for Type HT chimneys in...

Page 5: ...n attic or roof space closet or similar concealed space or a floor or ceiling Passage through an attic roof frame floor or ceiling must be done using an insulated chimney respecting all chimney manufa...

Page 6: ...m clearance of 16 from the floor to the top of the stationay plate strictly must apply 40 cm 16 US 45 cm 18 Canada minimum 9 minimum 2 74 m 16 406 mm fresh air air frais 18 11 16 475 mm 19 9 32 490 mm...

Page 7: ...ble wall mur combustible 26 660 mm Manufacturer specifications When placed close to a non combustible wall leave a minimum of 4 for proper ventilation To avoid premature aging of your painted walls on...

Page 8: ...ughout the entire diameter of the track In the event the fire bowl is to be recessed keep a gap of 1 inch on the radius to allow the fire bowl position to be adjusted recess diameter 32 1 2 inches For...

Page 9: ...JUNCTION SLEEVE DETAIL NOTE The junction sleeves are provided only in case the floor to ceiling height requires more than one flue section E SUSPENSION MECHANISM DETAIL CAUTION SCREWS DO NOT SIT FLUS...

Page 10: ...glass as this may cause breakage Please check the hood level to be 490 mm 19 5 16 from stationary box support level The meijifocus receives 5 glass panels 3 stationary and 2 sliding on track To fit a...

Page 11: ...ould be placed on a non combustible floor or on the ground well away from all combustible materials pending final disposal If the ashes are disposed of by burial in soil or otherwise locally dispersed...

Page 12: ...while it is still hot To avoid thermal shocks we strongly advise against throwing buckets of water on a very vigorous fire to try to put it out BUILDING STARTING AND MAINTAINING THE FIRE CAUTION DO NO...

Page 13: ...l the damper is fully open Handle can rotate at 30 60 and 90 horizontal closed In closed position the damper obturates by 75 the flue section To modify the damper position first pull the handle then r...

Page 14: ...reosote buildup has occurred If a significant layer of creosote has accumulated 3mm or more it should be removed to reduce the risk of a chimney fire SWEEPING YOUR CHIMNEY CAUTION CHEMICAL SWEEP NOT P...

Page 15: ...stationary glasses Thickness 5 32 4 mm Height 19 11 16 500 mm Radius 16 2 32 408 mm Developed length 21 21 32 550 mm 2 sliding glasses Thickness 5 32 4 mm Height 19 11 16 500 mm Radius 16 17 32 420 mm...

Page 16: ...16 Annex ADJUSTABLE SUSPENSION PLATE 78 3 4 2 000 16 3 8 416 2 50 3 1 8 8 0 8 7 8 OD 225 OD 4 1 220 4 100 12 3 4 OD 324 OD 0 12 12 0 45 13 330 338...

Page 17: ...od or metal installation to support the weight of the fireplace and flue Components La plaque de suspension r glable Focus est con ue pour tre utilis e sur des chevrons ou des structures ayant une inc...

Page 18: ...lts using supplied nuts and lock washers 2 Mount this assembly in the ceiling or roof 3 Install the drum inside the support collar from below Les tapes d installations et de coupe de la platine de sus...

Page 19: ...R value of the proposed alternate floor protector I Use the formula in step 1 to convert values not expressed as R II For multiple layers add R values of each layer to determine overall R value 3 If...

Page 20: ...20 Note...

Page 21: ...21 Note...

Page 22: ...22 Note...

Page 23: ...23 Note...

Page 24: ...V 7 January 2020 chemin es contemporaines...

Reviews: