background image

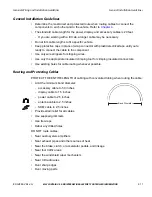
Routing and Protecting Cables

General Wiring and Installation Guidelines

3-12

MAY CONTAIN U.S. AND INTERNATIONAL EXPORT CONTROLLED INFORMATION

80-J4866-2 Rev. G

Special Exterior Routing Guidelines

• Always use convoluted tubing to protect the cables. Secure the cables to the vehicle with 

tie wraps at approximately 18" intervals.

• Route away from exhaust pipes and moving parts. If an exhaust pipe or moving part must 

be crossed, use extra tie wraps and route the cable in such a manner that if the tie wrap 
fails, the cable will be caught or rest on a safe part (not hot or moving).

• Seal all external holes for cables with refrigeration/tar tape or silicone sealant to keep 

moisture out. 

• Route cables with any existing vehicle cables.

Special Interior Routing Guidelines

• Route cables under kick plates or carpets.

• Avoid high foot traffic areas.

• When reinstalling kick plates or carpets, be careful that screws do not penetrate cables.

• Route cables with any existing vehicle cables.

• Use convoluted tubing and refrigeration/tar tape when cables are routed through interior 

holes with sharp edges.

Storing Excess Cabling

• Secure excess cabling with tie wraps.

• Stow out of sight.

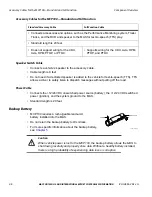
Service Loops (Drip Loops)

• Provide for all cables.

• Ensure that service loops do not cause any obstruction. 

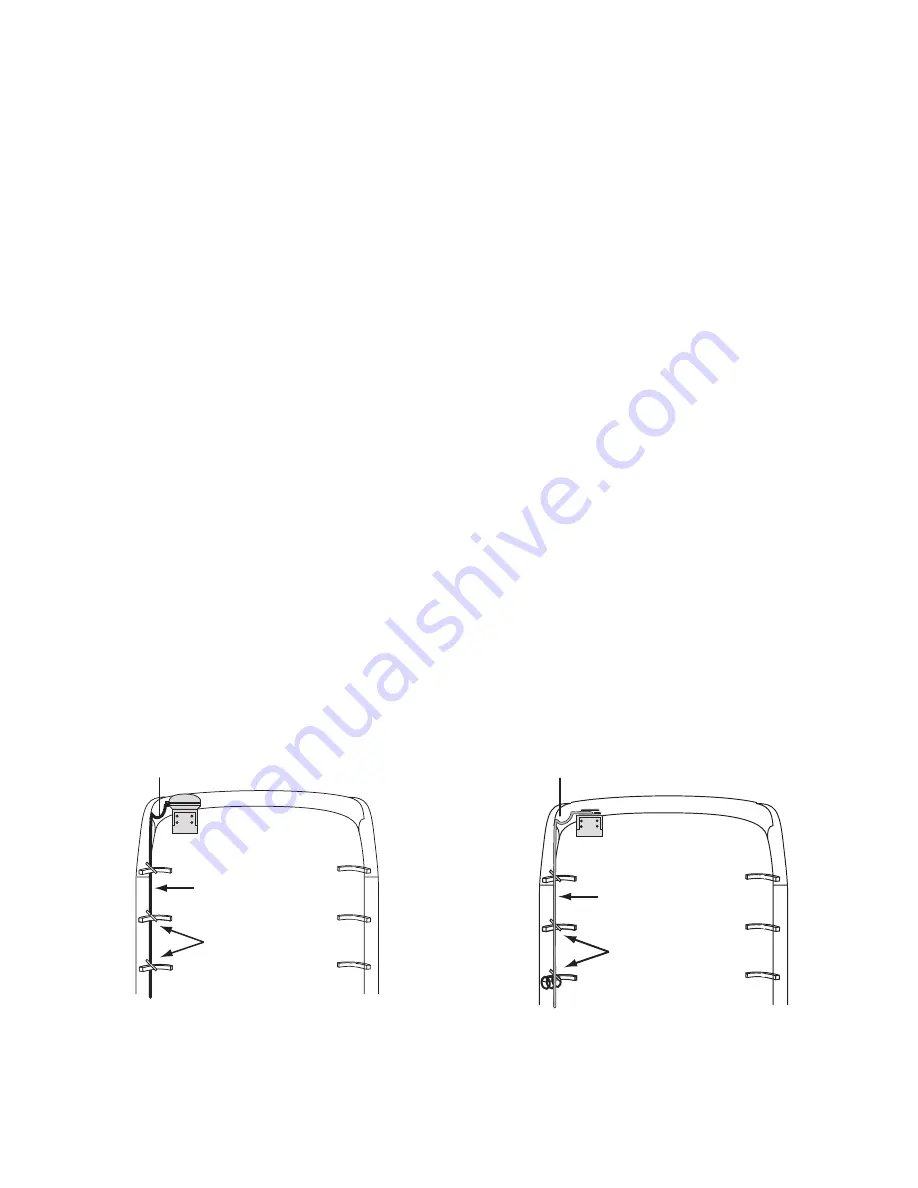
Cable tied to existing
boomerang brackets

Convoluted tubing

05AAA_223E

Drip loop

Terrestrial Antenna

Rear View

Rear View

Cable tied to existing
boomerang brackets

Convoluted tubing

Drip loop

05AAA_223A

Satellite Data Modem

Summary of Contents for MCP100

Page 1: ...MCP100 Installation Guide 80 J4866 2 Rev G October 2015 ...

Page 2: ... endeavors to ensure that the information in this document is correct and fairly stated but Omnitracs is not liable for any errors or omissions Published information may not be up to date and it is important to confirm current status with Omnitracs This technical data may be subject to U S and international export re export or transfer export laws Diversion contrary to U S and international law is...

Page 3: ...ork 1 4 CDMA Wireless Network and PCS 1 5 How the Terrestrial MCP100 Uses PCS 1 5 MCP100 Mobile Components 1 5 Chapter 2 Component Overview MCP100 Masterpack 2 2 Satellite Data Modem SDM 2 3 Satellite Data Modem SDM Cable 2 3 Terrestrial Data Modem TDM and Antenna 2 3 TDM Cable 2 4 Media Display Unit MDU 2 4 Display Cable 2 4 Using the MDU 2 4 Mobile Application Server MAS 2 5 Accessory Cables for...
Page 4: ...tellite MCP100 4 4 Conventional Vehicle Types 4 4 Straight Truck Vehicle Types All Makes 4 7 Cabover Engine Vehicle Types All Makes 4 7 Tools and Supplies Recommended for Installations 4 8 Omnitracs Approved Sealants 4 8 Chapter 5 Mobile Application Server MAS Installation General Installation Guidelines 5 2 Installing the Backup Battery into the MAS 5 2 Installing the MAS 5 3 Selecting a Mounting...

Page 5: ...ing Bolts 8 3 Line of Sight Requirements 8 4 Trailer Swing Area 8 5 Installing the SDM Cable 8 5 Connecting the SDM Cable 8 5 SDM Cable Run 8 6 SDM Cable Installation 8 6 Connecting the SDM Cable to the MAS 8 7 Chapter 9 Media Display Unit MDU Installation General Installation Guidelines 9 2 Selecting a Mounting Location 9 2 Installing the MDU Holster Using Well nut Fasteners 9 3 Installing the MD...

Page 6: ...y Cable 11 5 Option 1 Connecting J1939 Using the Repeater Cable 11 5 Making the Connection 11 6 Option 2 Connecting J1939 Using the Converter Cable 11 8 Making the Connection 11 8 Option 3 Connecting Directly to J1939 11 10 Making the Connection 11 11 Connecting J1708 J1587 11 12 Verifying Data Source Connectivity 11 14 Chapter 12 System Verification What Is Basic MCP100 System Verification 12 2 P...

Page 7: ...ressor 13 14 PTO Data Input Verification Procedure 13 16 Chapter 14 Vehicle Maintenance Installation Vehicle Maintenance Overview 14 2 Feature Requirements 14 2 Connecting the J1939 Wires 14 2 Vehicle Maintenance System Verification 14 3 Chapter 15 Critical Event Reporting CER System Verification CER Overview 15 2 CER System Verification 15 3 Test System by Manually Reporting an Event 15 6 Data Li...

Page 8: ...ification 19 2 Chapter 20 Remote Message Waiting Light RMWL Installation RMWL Overview 20 1 Installing the Remote Message Waiting Light 20 2 Installation Verification 20 2 Chapter 21 Wired Panic Button Installation Wired Panic Button Overview 21 1 Installing the Panic Button 21 2 Installation Verification 21 4 Automated Panic Button Test System Dial in Procedure 21 4 Chapter 22 Wireless Panic Butt...

Page 9: ...Process 23 4 O Neil Printer Parts List 23 4 Chapter 24 In Cab Scanner Installation Installation Guidelines 24 2 Mounting the Scanner 24 2 Scanner Mounting Option 24 2 Holster Mounting Option 24 2 Installing the Scanner 24 2 Calibrating the Scanner 24 3 Sending a Scan 24 4 Cleaning the Scanner 24 5 Return Material Authorization RMA Process 24 5 Appendix A Wiring Diagrams and Charts Satellite MCP100...

Page 10: ... Upgrading the MCP100 Using Secure Digital Cards Checking the Software Versions Installed D 2 SD Card Instructions D 3 Upgrading Only the MAS Software D 3 Upgrading the MAS Operating System and MAS Software D 4 Upgrading the SDM Software D 5 Upgrading the MDU Software D 6 Appendix E Preventive Maintenance Inspection uHow Often Should Inspections Be Performed E 2 Inspecting the Mobile Application S...

Page 11: ...4866 2 Rev G MAY CONTAIN U S AND INTERNATIONAL EXPORT CONTROLLED INFORMATION xi Appendix G Feedback Form Feedback Form G 1 Company Information G 1 Documentation Content G 2 Documentation Format G 3 Glossary ...

Page 12: ...xii MAY CONTAIN U S AND INTERNATIONAL EXPORT CONTROLLED INFORMATION 80 J4866 2 Rev G ...

Page 13: ...vers installers and application developers who use and or locate all types of display units If you are a Driver do not use a display unit when the vehicle is in motion If you are an Installer do not locate the display unit including third party devices where it obstructs the driver s field of vision distracts the driver from the driving task or interferes with the driver s operation of controls or...

Page 14: ...Safety Advice Important Safety Information xiv MAY CONTAIN U S AND INTERNATIONAL EXPORT CONTROLLED INFORMATION 80 J4866 2 Rev G ...

Page 15: ...ription 1 3 Data Satellite and GPS Network 1 4 CDMA Wireless Network and PCS 1 5 MCP100 Mobile Components 1 5 For technical questions contact Omnitracs Customer Support Customer Support is staffed 24 hours a day 365 days a year In the United States call 800 541 7490 In Canada call 800 863 9191 Note This guide combines satellite and terrestrial MCP100 information and installation procedures Most of...

Page 16: ...ustomers Provides dispatchers with vehicle location and position history information by tracking the location of each MCP100 using latitude and longitude or distance and direction from landmarks usually large towns and cities Drivers can inform the dispatcher of road conditions or problems Optional devices allow monitoring of driver performance engine diagnostics trailer locations and refrigeratio...

Page 17: ...ctions QTRACS 400 and QTRACS Windows customers access the NMC via dialup using PPTP or a frame relay connection QTRACS Web customers transmit information via the NMC using RI Web client over a PPTP connection SDM K w N E S W Customer dispatch computer NOC Antenna and TDM Terrestrial network MAS MDU Esc 4 5 6 7 8 9 0 Back spac e Tab 0 E R T Y U I P Ente r Dele te Shif t L K J H G F D M N B V C V V ...

Page 18: ...PS receiver which is integrated inside the antenna to determine location Position data from the MCP100 is forwarded to dispatch whenever information is sent to a vehicle and acknowledged and whenever a driver sends information Position data is sent at regular intervals and is made available to dispatch Code Division Multiple Access CDMA Wireless Network Radio frequency RF signals are received from...

Page 19: ...en dispatch and the driver Antenna receives and transmits wireless information to and from the MAS Antenna interfaces with local wireless networks Information is collected at the PCS gateway and obtained by the Omnitracs NOC where it is distributed to the dispatch center Dispatchers respond by sending information back to the Omnitracs NOC where it is relayed to the PCS gateway and broadcast out to...

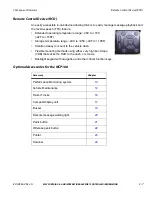
Page 20: ...ation with the dispatcher Consists of a keyboard and a color touchscreen LCD display Remote control device RCD Small keypad that allows the driver to safely listen to incoming messages without having to stop the vehicle and read the message s on the display Media Display Unit MDU Media Display Unit MDU Mobile Application Server MAS Mobile Application Server MAS Remote Control Device RCD Remote Con...

Page 21: ...refer to Optional Accessories for the MCP100 on page 2 7 MCP100 Masterpack 2 2 Satellite Data Modem SDM 2 3 Terrestrial Data Modem TDM and Antenna 2 3 Media Display Unit MDU 2 4 Mobile Application Server MAS 2 5 Backup Battery 2 6 Remote Control Device RCD 2 7 Optional Accessories for the MCP100 2 7 For technical questions contact Omnitracs Customer Support Customer Support is staffed 24 hours a d...

Page 22: ...Terrestrial data modem TDM Remote control device RCD Media display unit MDU Cables SDM SDM Cable Accessory Connections e g RMWL J1708 RCD TTS Power Cable Accessory Cable Power Connections MAS Display Cable Remote Control Device CB or Stereo Speaker Speaker Cable Media Display Unit TMCP_SMCP Satellite MCP Connection Points MAS Display Typical truck cab top view MAS Antenna cable Terrestrial Antenna...

Page 23: ...ellite Robust sealing mechanism for use in all outdoor environments Rugged lightweight housing with the same bolt pattern as the OmniTRACS antenna communication unit ACU for ease of installation Gyroscopic based steering algorithm for quick satellite signal reacquisition in the event of a momentary loss of signal Maintains a two way transmission link between the Network Operations Center NOC locat...

Page 24: ...ndicator LEDs for alerting drivers of incoming messages connectivity and other information Tethered display allows for use anywhere in the cab 16 9 aspect ratio color TFT LCD touchscreen Backlighting allows the driver to distinguish keys in the dark An ambient light sensor adjusts backlight when it gets dark Touchscreen provides valid Cartesian touch coordinates for the entire active display surfa...

Page 25: ...cale PXA Processor Backup battery for cold crank conditions and graceful shutdowns Supports a wide range of port interfaces that allow connections to on board equipment One J1708 bus connects to J1708 bus of older trucks J1939 CAN bus connects to J1939 bus of newer trucks that can be used to drive some serial tachographs USB host port allow USB peripherals such as handheld scanners and storage dev...

Page 26: ...dard length is 20 feet Backup Battery MCP100 requires a rechargeable lead acid battery installed into the MAS Do not return the backup battery to Omnitracs For more specific information about the backup battery see Chapter 5 Caution When vehicle power is lost to the MCP100 the backup battery allows the MAS to shut down gracefully and properly store data Without a healthy battery installed there is...

Page 27: ... to 158F Storage temperature range 40C to 85C 40F to 185F Small and easy to mount to the vehicle dash Flexible mounting methods using either very high bond tape VHB that sticks the RCD to the dash or screws Backlight keypad with navigation and other critical function keys Optional Accessories for the MCP100 Accessory Chapter Performance Monitoring system 13 Vehicle Maintenance 14 Trailer Tracks 16...

Page 28: ...Optional Accessories for the MCP100 Component Overview 2 8 MAY CONTAIN U S AND INTERNATIONAL EXPORT CONTROLLED INFORMATION 80 J4866 2 Rev G ...

Page 29: ...ing connections to cables and wires and the proper connectors to use to avoid potential problems Making Electrical Connections 3 2 Proper Grounding 3 10 General Installation Guidelines 3 11 Routing and Protecting Cables 3 11 For technical questions contact Omnitracs Customer Support Customer Support is staffed 24 hours a day 365 days a year In the United States call 800 541 7490 In Canada call 800...

Page 30: ...oper wiring guidelines and using improper crimps and butt splices may cause intermittent connections and may result in unexpected truck down time or system failure Wire Stripping Caution Use care in stripping wires Vibration can cause nicked wires to fail Using wire cutters knives or other tools can damage the conductor wire and or insulation Knowing and following proper wire stripping techniques ...

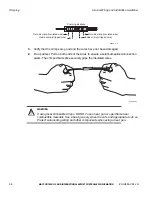
Page 31: ...od butt splice has these characteristics The ends of the bare wires are visible through an inspection window The ends of the wires butt up against the stop The wires are not exposed beyond splice shielding Crimping does not sever or damage the wires or insulation Butt Splicing Connections Done Inside the Vehicle Out of the Weather 1 Insert the stripped wires approximately half way into a butt spli...

Page 32: ...osition on the crimp tool and not the crimping tooth of the tool Crimping butt splices incorrectly can result in a severed wire and a failed wire connection Caution DO NOT crimp on the crimp tooth 1 Using a crimping tool crimp the butt splice one end at a time First crimp the inside crimp area where the wire has been stripped Apply necessary pressure to this inside area 03AAA_90b Crimp tooth INSUL...

Page 33: ...crush the butt splice and sever the wire or the insulation on the wire 2 After crimping the inside of both ends of the butt splice on the insulated area of the crimping tool next crimp the outside of both ends of the butt splice WRONG Butt splice is visibly crushed possibly damaging the wire and the wire connection Some wires are exposed CORRECT Crimping is done properly protecting the wire and th...

Page 34: ...butt spliced connection exists The crimped butt splice securely grips the insulated wires WARNING If using heat shrinkable crimps DO NOT use a heat gun or open flame near combustible materials Use a heat gun only when it is safe and appropriate to do so Protect surrounding wiring and other components when using a heat gun Crimping locations Inside crimp stripped wire Outside crimp insulated wire 0...

Page 35: ...he vehicle when the crimps are verified to be good use plastic seal tape to wrap the entire connection Use a minimum of two layers of seal tape to completely wrap the connection 3M industrial tape tape sealant vinyl rubber mastic is available in a 10 roll from Omnitracs MCN 800 01788 0168 To find a local or nationwide supplier visit http www 3m com Mastic Scotch Vinyl 04AAA_22a Wrap two layers min...

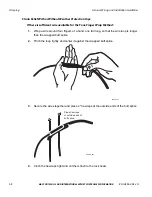
Page 36: ...he Four Finger Wrap Method 1 Wrap a wire around four fingers of a hand one full loop so that the wire loop is longer than the wrapped butt splice 2 Pinch the loop tightly and center it against the wrapped butt splice 3 Secure the wires together and place 4 tie wraps at the outside ends of the butt splice 4 Cinch the tie wraps tight and cut them flush to the lock head 04AAA_24a Place tie wraps at o...

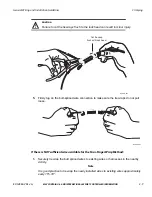
Page 37: ...5 Firmly tug on the butt spliced wire connection to make sure the tie wraps do not pull loose If there is NOT sufficient wire available for the Four Finger Wrap Method 1 Securely tie wrap the butt spliced wires to existing wires or harnesses in the nearby vicinity Note It is good practice to tie wrap the newly installed wires to existing wires approximately every 15 18 04AAA_25a Cut tie wrap flush...

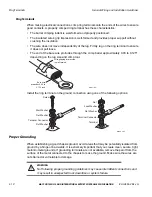
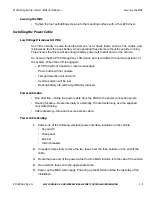
Page 38: ...epending on the lug size and crimp tool Install the ring terminal on the ground connection using one of the following options Proper Grounding When establishing a good chassis ground avoid areas that may be potentially isolated from ground by a hinge or bad welds It is extremely important that you create clean secure tight metal to metal grounds If grounding terminals are not available remove the ...

Page 39: ...to the component Use only wire strippers for stripping wires Use only the appropriate insulated crimping tool for crimping insulated connectors Use existing holes for cable routing whenever possible Routing and Protecting Cables PROTECT THE ENTIRE LENGTH of cabling with convoluted tubing when routing the cable Limit the minimum bend diameter accessory cable to 5 0 inches display cable to 1 5 inche...

Page 40: ...ilicone sealant to keep moisture out Route cables with any existing vehicle cables Special Interior Routing Guidelines Route cables under kick plates or carpets Avoid high foot traffic areas When reinstalling kick plates or carpets be careful that screws do not penetrate cables Route cables with any existing vehicle cables Use convoluted tubing and refrigeration tar tape when cables are routed thr...

Page 41: ...th a 9 pin DSUB connector e g SDM cable 1 hole is needed for the TNC connectors on the antenna cable Finish holes prior to routing cables Debur holes Use supplied grommet convoluted tubing with internal holes Extend convoluted tubing beyond the hole Stress Relief At the MAS tie wrap cables to each other to reduce stress on any individual cable Ensure cables have enough slack so connections are not...

Page 42: ...Routing and Protecting Cables General Wiring and Installation Guidelines 3 14 MAY CONTAIN U S AND INTERNATIONAL EXPORT CONTROLLED INFORMATION 80 J4866 2 Rev G ...

Page 43: ...ion Guidelines 4 2 Typical Installation Sequence 4 2 Typical Installation Locations for the Terrestrial MCP100 4 3 Typical Installation Locations for the Satellite MCP100 4 4 Tools and Supplies Recommended for Installations 4 8 For technical questions contact Omnitracs Customer Support Customer Support is staffed 24 hours a day 365 days a year In the United States call 800 541 7490 In Canada call ...

Page 44: ...unt the terrestrial antenna in locations where the unit will receive uninterrupted and undegraded GPS satellite signals Refer to Routing the Terrestrial Antenna Cable on page 7 4 Mount SDMs in locations where the unit will receive uninterrupted and undegraded GPS satellite signals Refer to Line of Sight Requirements on page 8 4 Install all components in locations where they will not be abused Do n...

Page 45: ...he antenna to the vehicle s exterior tractor roof with a clear view of sky to the GPS satellite see Chapter 7 Install the display unit in the cab where it can be easily accessed by the driver WARNING The driver should not use the display unit while the vehicle is in motion Install the MAS and TDM in a dry protected space such as the side box or bunk area Install the RCD within reach of the driver ...

Page 46: ...a dry protected space such as the side box or bunk area Install the RCD within reach of the driver but where it will not interfere with the operation of the vehicle Conventional Vehicle Types International Navistar MAS Install on side wall or hang under bunk Install so there is always SD card slot access MDU Install on dash where space allows customer preference Cables Route externally or internal...

Page 47: ...ng under the bunk Install so there is always SD card slot access MDU Install on face of mapbox Cables Route externally Connect power cable to key switch Cables exit enter sleeper floor near MAS Cables enter exit cab through firewall high on driver side Look for rubber plugs Drill a 1 1 2 hole in floor of side box for SDM cable A hole already exists in the firewall Kenworth T2000 MAS Install on sid...

Page 48: ...wall or hang under the bunk Install so there is always SD card slot access MDU Install behind passenger seat Cables Route display cables internally or externally Connect power cable to solenoid behind pyrometer panel Cables exit enter the sleeper floor near MAS Cables enter exit cab through firewall high on passenger side Use existing cable path Remove map box Drill a 1 1 2 hole in floor of side b...

Page 49: ...Makes MAS Install on side wall or hang under bunk Install so there is always SD card slot access MDU Install on dash Cables Route internally Connect power cable to main bus or keyswitch Drill a 1 1 2 hole in floor of side box for SDM cable Special Cable Ordering Instructions for Tilt Cabs Typically the SDM cable must be routed through the cab pivot point to allow for the tilt In most tilt cab vehi...

Page 50: ...ze bits Utility Knife 1 1 2 Hole Saw Files flat round 3 8 Cordless Drill this will speed up installation time Channel Locks Radio Removal Tool U Straight Awl 1 4 Drive Standard Deep Well Socket Set with rachet Miscellaneous Supplies Silicone Sealant or Refrigeration Tar Tape Flash Drop Light Assorted Ring Terminals Assorted Butt Splices Electrical Tape Items marked with a bullet are considered nec...

Page 51: ...S and connecting the cables to the MAS General Installation Guidelines 5 2 Installing the Backup Battery into the MAS 5 2 Installing the MAS 5 3 Installing the Power Cable 5 5 Grounding Guidelines 5 7 Installing the Accessory Cable 5 7 For technical questions contact Omnitracs Customer Support Customer Support is staffed 24 hours a day 365 days a year In the United States call 800 541 7490 In Cana...

Page 52: ... into the mounting surface 3 Connect the accessory and power cables to the MAS Installing the Backup Battery into the MAS Install the backup battery before installing the MAS 1 Open the battery door on the MAS using a Torx 10 driver 2 Hold the backup battery in a vertical position with the connector facing down 3 Insert the backup battery connector into the keyed mating connector in the MAS 05AAA_...

Page 53: ...he MAS is not watertight DO NOT get it wet Do not locate the MAS where it could come into contact with liquids or solvents Adequate Clearance The minimum requirements for adequate clearance around the MAS for ventilation cooling and easy access are Sides and back of unit 1 Top of unit 1 Top of unit 3 to open the battery door and access the battery Front of unit 6 to allow for proper cable bend dia...

Page 54: ...tire chains or other tools will not likely be stowed on top of the unit or cables Do not mount the unit near items that may fall on it or bump cable connections Choose a location for the MAS that is structurally sound The surface must support the full weight of the MAS under all circumstances Choose a location that provides for the various cable lengths In cabover vehicles install the MAS in the r...

Page 55: ...00 will not transmit or receive messages Panic button will not operate Tamper detection will not work Vehicle position will be lost Backup battery life will be significantly reduced Power Cable Run Run direction Route the power cable from the MAS to the power connection points Routing location Route internally or externally If routed externally use the supplied convoluted tubing Cable dressing Sto...

Page 56: ...cle chassis or one that is connected to the chassis Refer to Grounding Guidelines on page 5 7 for more information 2 Connect the yellow BAT wire to an unswitched Main 12 24 VDC power source such as the hot side of the vehicle main wiring bus the battery side of the ignition switch or the battery side of the fuse block not the load side This bus provides constant 12 24 VDC to the MCP and must not b...

Page 57: ... the bolt for a good metal to metal ground connection Installing the Accessory Cable Connects the MCP100 to the RCD for text to speech the J1708 1587 data link and other vehicle inputs and optional system devices Provides necessary wiring for optional system features such as display screen disabling the Performance Monitoring system Trailer Tracks asset management buzzer RMWL panic button and othe...

Page 58: ...r to the MAS for text to speech TTS play Does not support wiring for the CDU Axle RPM PTOP or PTOC Full Function Omnitracs MCP100 Accessory Cable Connects accessories and options and the RCD and speaker to the MAS for text to speech TTS play Supports wiring for the CDU Axle RPM PTOP and PTOC VIO VIO RED VIO ORN BLU RED BRN GRN BLU BLK BLU RED BLU GRN 06AAA_125T2 BLU YEL BLU VIO RCD PANIC_LOW PANIC...

Page 59: ... optional accessories which use the accessory cable are provided in later chapters of this guide Before connecting the accessory cable to the MCP100 inspect the connectors to make sure they are not damaged and the pins are not bent Do not attempt to straighten bent pins This further weakens the pins and results in cable failure Connecting Cables to the MAS 1 Inspect all connectors for bent pins 2 ...

Page 60: ...Connecting Cables to the MAS Mobile Application Server MAS Installation 5 10 MAY CONTAIN U S AND INTERNATIONAL EXPORT CONTROLLED INFORMATION 80 J4866 2 Rev G ...

Page 61: ...ns for installing the TDM General Installation Guidelines 6 2 Installing the TDM 6 2 Installing the TDM Cable 6 3 Connecting the TDM Cable to the MAS 6 3 For technical questions contact Omnitracs Customer Support Customer Support is staffed 24 hours a day 365 days a year In the United States call 800 541 7490 In Canada call 800 863 9191 Note The TDM is only used with the terrestrial MCP100 ...

Page 62: ...ape a Velcro type tape As long as the TDM is firmly adhered to the MAS you can orient the TDM in any direction 2 Both the TDM and MAS have pre installed dual lock tape Apply suitable pressure when sticking the two pieces of tape together ensuring that the interlocking fibers of the tape are completely mated to secure the TDM in place Caution The TDM is not watertight DO NOT get it wet Do not locat...

Page 63: ... 9 pin DSUB connector into the SDM slot of the MAS 2 Plug the 25 pin connector into the TDM Connecting the TDM Cable to the MAS 1 Inspect the connector for bent pins 2 Only hand tighten the thumb screws on the connector 3 Align the connector so it is straight before sliding into position 4 Connect the TDM cable into the satellite data modem SDM slot I 0 I 0 07AAA_56A 05AAA_222E DSPL DSPL SDM SDM I...

Page 64: ...Connecting the TDM Cable to the MAS Terrestrial Data Modem TDM Installation 6 4 MAY CONTAIN U S AND INTERNATIONAL EXPORT CONTROLLED INFORMATION 80 J4866 2 Rev G ...

Page 65: ...uidelines 7 2 Option A Antenna Installation Using VHB Tape 7 2 Option B Mount Method Installation Using Hardware 7 3 Routing the Terrestrial Antenna Cable 7 4 Connecting the Antenna Cable to the TDM 7 4 For technical questions contact Omnitracs Customer Support Customer Support is staffed 24 hours a day 365 days a year In the United States call 800 541 7490 In Canada call 800 863 9191 Note The fla...

Page 66: ...2 If you are using self drilling screws see Option B Mount Method Installation Using Hardware on page 7 3 Option A Antenna Installation Using VHB Tape Attaches to the backside of the vehicle roof without drilling Caution Do not use VHB tape on chrome surfaces Antenna Surface Preparation 1 Pick a location toward the back of the vehicle roof 2 Ensure that the vehicle mounting surface is flat 3 Verif...

Page 67: ...structions on page 7 4 Option B Mount Method Installation Using Hardware Attaches to the backside of the vehicle roof by using self drilling screws Mount Surface Preparation 1 Use alcohol pad to ensure that the vehicle mounting surface is free of dirt and wax 2 Using a razor knife cut the adhesive tape from the four vertical bracket mounting holes 3 Using the vertical bracket as a template hold it...

Page 68: ...rection Start at the antenna and run the cable down to the TDM Run location Route the cable internally or externally Cable connectors Make sure the rubber boots are completely forward so the connectors are totally covered Connecting the Antenna Cable to the TDM 1 Inspect the TNC connectors for damaged or bent pins 2 Connect the TNC connectors to the terrestrial data modem TDM 07AAA_56BQMCP Terrest...

Page 69: ...al Installation Guidelines 8 2 Orienting the SDM on the Mount 8 2 Installing Mounting Bolts 8 3 Line of Sight Requirements 8 4 Trailer Swing Area 8 5 Installing the SDM Cable 8 5 Connecting the SDM Cable to the MAS 8 7 For technical questions contact Omnitracs Customer Support Customer Support is staffed 24 hours a day 365 days a year In the United States call 800 541 7490 In Canada call 800 863 9...

Page 70: ...adache racks are mounted to the vehicle frame and there is no shock cushioning An SDM mounted on a headache rack risks damage Omnitracs reserves the right to charge for replacement or repair of damaged or malfunctioning SDMs which Omnitracs determines to have failed as a result of installation on the headache rack DO NOT paint the SDM Painting the SDM will degrade the performance of the MCP100 and...

Page 71: ...m hitting the connector Install the SDM so that it does not exceed the Federal D O T mandated maximum legal height of 13 6 Installing Mounting Bolts 1 Mount the SDM to the mounting bracket using the bolts and washers supplied with the SDM mounting hardware or exact substitutions Normally bolts longer than 3 4 should not be used If longer bolts are needed such as when the SDM is being attached to a...

Page 72: ...hat a trailer hooked up to the vehicle does not extend above the 12 angle Satellite signal can normally pass through thin layers of glass fiberglass and plastic Thick layers or obstructions above the 12 angle may block the satellite signal and cause blind spots Keep blind spots to a minimum Multiple layers of fiberglass glass or plastic Areas with numerous bends in the fiber glass Metal and wood b...

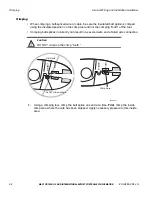
Page 73: ...forward the trailer clears the SDM when executing sharp turns or going up ramps If the vehicle will be hauling refrigerated trailers make sure that the refrigeration unit still clears the SDM when the driver turns sharply or drives up ramps Installing the SDM Cable Connects SDM to MAS Connecting the SDM Cable 1 Install the SDM cable on the SDM connector and hand tighten Caution If the cable does n...

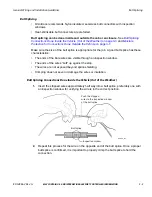
Page 74: ...e the cable externally Cable dressing SDM cable comes with pre installed convoluted tubing and UV resistant tie wraps SDM Cable Installation 1 Start at the SDM and run the cables down the back of the sleeper cab and under the body toward the MAS Route the cable using existing brackets as tie points Convoluted tubing Service drip loop Tie wraps Tie wraps Convoluted tubing Cable tied to existing boo...

Page 75: ...adache rack Headache racks are mounted to the chassis and move at different rates than the body Caution Loose cables can cause damage to paint and wear to the fiberglass Ensure that the cables are secured to the vehicle with tie wraps at approximately 18 intervals Connecting the SDM Cable to the MAS 1 Inspect the connector for bent pins 2 Only hand tighten the thumb screws on the connector 3 Align...

Page 76: ...Connecting the SDM Cable to the MAS Satellite Data Modem SDM Installation 8 8 MAY CONTAIN U S AND INTERNATIONAL EXPORT CONTROLLED INFORMATION 80 J4866 2 Rev G ...

Page 77: ...nstallation Guidelines 9 2 Installing the MDU Holster Using Well nut Fasteners 9 3 Installing the MDU Cable 9 4 Connecting the MDU Cable to the MDU 9 4 Inserting the MDU into the Holster 9 5 Connecting the MDU Cable to the MAS 9 6 For technical questions contact Omnitracs Customer Support Customer Support is staffed 24 hours a day 365 days a year In the United States call 800 541 7490 In Canada ca...

Page 78: ...s the area swept by the windshield wipers blocks the deployment of an airbag DO locate the MDU where it can be safely installed on a secured bracket that is robust enough to minimize any vibration and sustain the weight of the MDU Permanently affix the MDU to the front dash area top of dash area the mounting surface is strong enough to support the mounting hardware the mounting surface is flat it ...

Page 79: ...tor vehicle with any object or material placed displayed installed affixed or applied upon the windshield or side or rear windows Consider the owner s preference in selecting the installation location and whether there is a team or a single driver Installing the MDU Holster Using Well nut Fasteners 1 Mount on any rigid surface between 035 and 232 inches thick and able to support the weight of the ...

Page 80: ...may be installed in the sleeper In this case route the cable internally to this area Cable dressing For strain relief the base of the coil should be secured with tie wraps The strain relief tie wrap is normally positioned at the point where the cable transitions from a straight cable to a coiled cable Connecting the MDU Cable to the MDU 1 If the cable is not yet routed refer to page 3 11 for routi...

Page 81: ...en the cable strain tie wraps on the back of the MDU 6 Route the display cable through the right or left channel on the back of the MDU 7 Reinstall the back housing 8 Install the rubber plug on the opposite side from where the cable has been run 9 Secure the cable with tie wrap Inserting the MDU into the Holster 1 Push bottom of display into lower holster tabs 2 Push top of display into upper hols...

Page 82: ...to position 4 Connect the MDU cable into the DSPL slot Esc 4 5 6 7 8 9 0 Backspace Tab 0 E R T Y U I P Enter Delete Shift L K J H G F D M N B V C V V Opt Back 1 2 3 Q Caps W Shift Ctrl Alt Sym S A X Z 05AAA_224 Esc 4 5 6 7 8 9 0 Backs pace Tab 0 E R T Y U I P Enter Delete Shift L K J H G F D M N B V C V V Opt Back 1 2 3 Q Caps W Shift Ctrl Alt Sym S A X Z Tab Tab Tab Tab Tab Holster Holster Push b...

Page 83: ...f the icons on the touchscreen and the screen is not responding quickly the touchscreen may not be calibrated properly To recalibrate the MDU touchscreen settings from the Home screen Tap the Settings icon Tap the Displays tab Tap the Advanced tab Tap the Touch Screen button When the four targets display carefully tap each of the targets in the center Press Enter when prompted Calibration is compl...

Page 84: ...MDU Touchscreen Calibration Media Display Unit MDU Installation 9 8 MAY CONTAIN U S AND INTERNATIONAL EXPORT CONTROLLED INFORMATION 80 J4866 2 Rev G ...

Page 85: ...e MCP100 text to speech TTS feature General Installation Guidelines 10 2 Installing the Remote Control Device RCD 10 2 Selecting a Speaker 10 3 Option 1 Connecting to an Existing or Shared Speaker 10 4 Option 2 Connecting to a Dedicated 8 ohm Speaker 10 6 For technical questions contact Omnitracs Customer Support Customer Support is staffed 24 hours a day 365 days a year In the United States call ...

Page 86: ...is free of cable wires and or hoses 3 Drill a 1 4 hole in the dash panel and debur the hole OPTIONAL If routing the cable over the dash use tie wraps to secure the cable 4 Route cable through the hole and behind the dash panel 5 Use the alcohol wipe provided to clean the mounting surface of any dirt oil or grime OPTIONAL There are two nutserts on the back of the RCD that can be used instead of in ...

Page 87: ...d truck audio speaker should be used for text to speech play 6 ohm and 4 ohm speakers may work but should be tested first to confirm oeration on a known good MCP100 system Choosing a Speaker Text to speech works with either an existing speaker typically the driver s side door speaker that is part of the vehicle s audio system or a speaker that can be added If you are using a vehicle s audio system...

Page 88: ... speaker wires where they can be cut and where there will be enough room to work on either side of the cut 5 Cut the speaker wires 6 Butt splice the yellow SPKR OUT wire on the speaker switch cable to the positive wire that leads from the speaker 7 Butt splice the black SPKR OUT wire on the speaker switch cable to the negative wire that leads from the speaker 8 Butt splice the orange VEH AUDIO IN ...

Page 89: ... Butt splice the yellow MAS SPKR wire on the speaker switch cable to the blue yellow SPKR wire on the accessory cable 2 Butt splice the black MAS SPKR wire on the speaker switch cable to the blue violet SPKR wire on the accessory cable 3 Butt splice the green GND wire on the speaker switch cable to the violet orange COM5 GND on the accessory cable 05AAA_148DQMCP Door Speaker Accessory Cable SPKR B...

Page 90: ...r text to speech play directly to the accessory cable 1 Butt splice the blue yellow SPKR wire on the accessory cable to the positive wire that leads from the speaker 2 Butt splice the blue violet SPKR wire on the accessory cable to the negative wire that leads from the speaker Note The speaker switch cable is not used if you are adding an external dedicated speaker 05AAA_148T Accessory Cable SPKR ...

Page 91: ...lection 11 3 Guidelines for Connecting to the J1939 Data Bus 11 3 J1939 Pre installation Check Out 11 4 Option 1 Connecting J1939 Using the Repeater Cable 11 5 Option 2 Connecting J1939 Using the Converter Cable 11 10 Option 3 Connecting Directly to J1939 11 10 Connecting J1708 J1587 11 12 Verifying Data Source Connectivity 11 14 For technical questions contact Omnitracs Customer Support Customer ...

Page 92: ... monitored on the vehicle data services VDS screens The vehicle data source makes this data available to specific applications on the MCP100 J1939 Data Bus Omnitracs applications only support 2007 and newer trucks with ECMs that support the SAE J1939 71 Rev Nov 2006 standard High speed 250 Kb sec data bus Uses a two wire differential serial bus which is a network backbone running throughout the ve...

Page 93: ... not know which data source to use contact your Omnitracs representative for assistance Guidelines for Connecting to the J1939 Data Bus Choose Option 1 Option 2 or Option 3 depending on which accessory cable is used DO NOT extend factory wires Maximum stub length is 10 feet Minimum stub spacing is 4 inches Never have more than one ECM device on the same stub Termination Resistors at Ends of the Ma...

Page 94: ...in diagnostic Deutsch connector Note If you have a 6 pin connector you have J1708 J1587 only See Connecting J1708 J1587 on page 11 12 3 Using an ohmmeter place the positive lead on pin C and the negative lead on pin D of the diagnostic connector Verify that the resistance is 55 65 ohms If the resistance is not 55 65 ohms there is a problem with your J1939 data bus Fix the problem Note On some vehi...

Page 95: ... Connecting J1939 Using the Repeater Cable Use the repeater cable when the distance between the MAS and J1939 bus connection point exceeds 10 feet Also use option 1 for any after market installations Connect the MCP100 accessory cable to the CAN repeater A CAN repeater cable is required for this procedure see Appendix A for detailed pin and wire callouts of the CAN repeater cable Mobile Applicatio...

Page 96: ...ector at a time If another device is already present you will need to splice directly into the vehicle s backbone When slicing directly to the J1939 backbone bus you will need to Ohm out 0 Ohms CAN and CAN wires to Pin C CAN high and Pin D CAN low on the diagnostic connector Contact Omnitracs Customer Support for assistance if needed 3 Splice the yellow CAN high J1939 wire from the repeater cable ...

Page 97: ...ck is in good working order and displays no dash faults 9 Verify that the J1939 data is being passed to the MAS from the data bus by monitoring the VDS screen on the MAS Refer to Verifying Data Source Connectivity on page 11 14 10 Stow and secure any loose wires making sure to keep the wires clear of sharp edges and away from panels and moving parts 05AAA_038D CAN 1 Connector 6 pin Mole x connecto...

Page 98: ...9 green 2 Determine a suitable J1939 location point In many vehicles you can connect behind the truck diagnostic connector Be aware that only one electronic device should be connected to the J1939 stub at the back of the diagnostic connector at a time If another device is already present you will need to splice directly into the vehicle s backbone When slicing directly to the J1939 backbone bus yo...

Page 99: ...e the CAN 4 pin Molex connector on the MCP100 accessory cable 7 Connect the CAN converter cable to the CAN 4 pin Molex plug on the MCP100 accessory cable 8 Start the vehicle and verify that the truck is in good working order and displays no dash faults 9 Verify that the J1939 data is being passed to the MAS from the data bus by monitoring the VDS screen on the MAS Refer to Verifying Data Source Co...

Page 100: ...essory cable is supplied that has a distance of less than 10 feet Connect the MCP100 accessory cable to the OEM supplied stub connector In order for the MCP100 to receive J1939 data the MAS CAN J1939 wires must be connected to the truck s J1939 CAN bus in the vehicle Follow all SAE guidelines when connecting to the J1939 data source CAN_H CAN_L Termination Resistors at the far ENDS of the Main Bac...

Page 101: ...ackbone Locate a connector point and Ohm out 0 Ohms CAN and CAN wires to Pin C CAN high and Pin D CAN low on the diagnostic connector 4 Measure the J1939 bus resistance at the diagnostic connector It should read 60 ohms 5 Start the vehicle and verify that the truck is in good working order and displays no dash faults 6 Verify that the J1939 data is being passed to the MAS from the data bus by moni...

Page 102: ...entify the wires some are marked DATA and DATA or D L and D L and some are marked with numbers or colors Note which wire is plus and which is minus To avoid confusion cut and splice the positive wires first and then the negative wires Because there usually is not much slack in the engine data diagnostic connector wires be careful in cutting and splicing to them 4 Splice the brown J1708 wire from t...

Page 103: ...gnostic connector 6 Start the vehicle and verify that the truck is in good working order and displays no dash faults 7 Go to Verifying Data Source Connectivity on page 11 14 8 Stow and secure any loose wires making sure to keep the wires clear of sharp edges and away from panels and moving parts such as throttle and brake linkage Dress any bare ended wires to prevent a short Maintain wire twists a...

Page 104: ...r J1939 or J1708 The light indicator will be green when a data source is enabled to receive data from that source Data source must be active to increment data If you have any questions contact Omnitracs Customer Support Note Tap the Green Light Red Light icon located along the bottom of the screen to display the VDS Summary screen and note the data source and LED status Black Not Configured No Dat...

Page 105: ... that J1939 data is present Speed RPM Distance LTD Fuel LTD Engine Time LTD Note Tap the VDS Details icon located along the bottom of the screen to display the VDS Details screen and note the data source b VDS must be configured to J1587 J1708 Verify data is present Verify the J1587 J1708 data fields are showing green and incrementing to confirm that J1587 J1708 data is present Note Tap the VDS De...

Page 106: ...Verifying Data Source Connectivity Vehicle Data Bus Connections 11 16 MAY CONTAIN U S AND INTERNATIONAL EXPORT CONTROLLED INFORMATION 80 J4866 2 Rev G ...

Page 107: ...stem Verification 12 13 Basic MCP100 System Verification Procedure 12 15 Omnitracs MCP100 System Verification Form 12 20 For technical questions contact Omnitracs Customer Support Customer Support is staffed 24 hours a day 365 days a year In the United States call 800 541 7490 In Canada call 800 863 9191 For verifying the Performance Monitoring system the Trailer Tracks system and other accessorie...

Page 108: ... the MCP100 is operating properly Performing System Verification Shortly after you power up the MCP100 the Driver Warning screen displays Scroll through the icons Tap the System icon to access the Display screens on the following pages System verification information has been stored on screens tabs under the System icon How to Find the MCP100 Unit Address UA Before calling Omnitracs Customer Suppo...

Page 109: ...00 System Screens System Screen Tap the System tab to access system information about the MCP100 Field Description Unit Address Also called the UNIT SERIAL NUMBER Shows the mobile unit MCP100 ID e g 105000xxx Tells the dispatcher the correct address for sending messages to the vehicle If the MCP100 is replaced this field will display a different address ...

Page 110: ...100 and is up to date This is the desired state Out of Sync is displayed if the mobile unit information has not been received by the MCP100 and is waiting to be updated Last DB Sync Indicates the date of the most recent SyncComplete status for the MCP100 Vehicle Info Msgs Indicates the total number of messages the MCP100 has received from the electronic control module ECM since the ignition was tu...

Page 111: ...cation The strength of a wireless communication network signal being received by the antenna during forward link acquisition to the wireless network provider RSSI should be less than 100 Registered MCP100 terrestrial system checks network coverage every 3 minutes If the unit is within the RegisterdHomeNetwork it is in home network coverage If the unit is RegisteredRoaming it is either roaming to f...

Page 112: ...pically values should be greater than 50 RL C No Signal strength received from the MCP100 the return signal Typically values should be greater than 33 Software Version Indicates the firmware version currently installed on the SDM Group Addresses Shows the group ID to which the MCP100 is assigned Also shows the number of other groups which the MCP100 is a member Numbers are defined and used by the ...

Page 113: ...date This value should update every second Latitude The last received latitude value Longitude The last received longitude value Mode Indicates the MCP100 s GPS status 3 D is displayed if the receiver is able to view three or more GPS satellites Under normal performance a 3 D mode will be displayed 2 D is displayed if the receiver is able to calculate a position but has a limited view to the GPS s...

Page 114: ...ill be active when motion is detected shown as Disabled or BlankEntireScreen Configured by dispatch Ign ON MIPRs Indicates if a mobile initiated position report will be sent when ignition is turned ON BOT EOT MIPRs Indicates if beginning of trip and end of trip mobile initiated position reports will be sent MIPR Freq Indicates the frequency HH MM SS of mobile initiated position reports Panic Indic...

Page 115: ...ee the state of the backup battery Engineering Screen This screen is for engineering purposes only Field Description Backup Battery Indicates the backup battery is detected Results of last test Indicates the voltage of the backup battery when last tested Next scheduledauto test The date the next automatic test will be performed Test Battery Used to perform a manual battery test ...

Page 116: ...le unit detects hard brake events Hard Braking Deceleration Rate The rate of deceleration that triggers a hard brake event Default 9 MPH SEC VDC Enabled disabled Stability control is enabled disabled VDC Minimum Speed Minimum speed at which mobile unit detects VDC notifications VDC On Threshold Number of ATC PID hex value is 97 on notifications that must be seen in a row before a VDC event is cons...

Page 117: ... is green if the vehicle is receiving data from the J1939 data source Trad The PTO which is always active the light is always green RCV These are the packets of data being received on the data bus Value should be constantly increasing Xmt Packets of data being received on the data bus as requested transmitted packets Msg Packets of data being received on the data bus that are of longer length than...

Page 118: ... 12 MAY CONTAIN U S AND INTERNATIONAL EXPORT CONTROLLED INFORMATION 80 J4866 2 Rev G Speed Speed of the vehicle Rpm RPM of the vehicle Temp Oil temperature Accel Acceleration throttle position percentage Fuel Life to date LTD fuel Field Value ...

Page 119: ...tes Step 6 See Chapter 12 in the Omnitracs MCP Diagnostic Guide Check Database State Is database out of sync or sync complete Out of Sync SyncComplete Go to Step 10 Mode No Fix Not incrementing Mode 3 D or 2 D Incrementing Display GPS screen Is Mode 3 D or 2 D Last Update incre menting Step 8 See Chapter 10 in the Omnitracs MCP Diagnostic Guide Display Battery screen Touch the Test Battery button ...

Page 120: ...sage to dispatcher Step 12 Have dispatcher send test message to MCP Step 15 Turn ignition OFF No Yes Step 13 See Chapter 7 in the Omnitracs MCP Diagnostic Guide Was test message received at MCP No Yes Yes Step 14 See Chapter 15 in the Omnitracs MCP Diagnostic Guide Can you play message with RCD No Does MDU stay on with ignition OFF See Chapter 11 in the Omnitracs MCP Diagnostic Guide Step 16 No Ye...

Page 121: ...be running 2 Make sure the vehicle is in a good location If you are using the terrestrial MCP100 the vehicle should be in a location where the antenna is able to acquire a wireless communication network signal Additionally a clear view of the sky is needed for GPS when the unit is brought on the air for the first time or after any reset If you are using the satellite MCP100 the SDM should have a c...

Page 122: ...ork correctly perform the diagnostic procedure in Chapter 5 in the MCP100 Diagnostic Guide 4 Check the display unit NO SIGNAL light When the MCP100 acquires the PCS network satellite signal the NO SIGNAL light goes out If the NO SIGNAL light goes out go to step 5 If the NO SIGNAL light continues to flash after 10 minutes call Omnitracs Customer Support US 800 541 7490 Canada 800 863 9191 If the NO...

Page 123: ...tes If the Database State is SyncComplete go to step 8 If the Database State is Out of Sync perform the diagnostic procedure in Chapter 13 in the MCP100 Diagnostic Guide 7 Check the signal strength Tap the SDM tab The FL C No value should be greater than 50 the RL C No value should be greater than 33 If the C No values are in a high range go to 2 step 8 If the C No values are in a low range perfor...

Page 124: ...nostic procedure in Chapter 10 in the MCP100 Diagnostic Guide 9 Tap the Battery tab Tap the Test Battery button Note It may take a few minutes to perform this test After the field updates check that the last test results are Good If the results of last test are Good go to step 10 If the results of last test are Bad perform the diagnostic procedure in Chapter 17 in the MCP100 Diagnostic Guide 10 Se...

Page 125: ...vailable call Omnitracs Customer Support 800 541 7490 to have the message sent If the Remote Message Waiting Light or Message Waiting Buzzer feature is installed you can also test them at this time by having an Important or Sleepy Important message sent 13 After a few minutes the unit should chirp the Message Waiting Light should come on and a voice notification will tell you the message has been ...

Page 126: ...an be played with the RCD go to step 15 If the message cannot be played with the RCD perform the diagnostic procedure in Chapter 15 in the MCP100 Diagnostic Guide 15 Turn the vehicle ignition OFF 16 Make sure the display unit stays on with the ignition OFF If the display unit stays on go to step 17 If the display unit does not stay on perform the diagnostic procedure in Chapter 11 in the MCP100 Di...

Page 127: ...80 J4866 2 Rev G MAY CONTAIN U S AND INTERNATIONAL EXPORT CONTROLLED INFORMATION 12 21 System Verification Omnitracs MCP100 System Verification Form ...

Page 128: ...Omnitracs MCP100 System Verification Form System Verification 12 22 MAY CONTAIN U S AND INTERNATIONAL EXPORT CONTROLLED INFORMATION 80 J4866 2 Rev G ...

Page 129: ...nce Monitoring System Overview 13 2 Performance Monitoring System Verification 13 2 Performance Monitoring System Display Screens 13 4 Special Alert Display Notifications 13 13 Power Take off PTO Overview 13 14 PTO Data Input Verification Procedure 13 16 For technical questions contact Omnitracs Customer Support Customer Support is staffed 24 hours a day 365 days a year In the United States call 8...

Page 130: ...f 1 Connecting the MCP100 to the data link or the standard speed and RPM sensors 2 Sending Performance Monitoring parameters from the host computer 3 Performing system verification Performance Monitoring System Verification Conducting a Road Test First verify that Performance Monitoring parameters have been sent to the unit and received Use the Parameters tab and verify the Tag field is not 0 Have...

Page 131: ...ring the road test Compare the speedometer readout with the value displayed on the MDU in the SPD field and verify that they are the same 5 When you re finished check the change in distance MI field on the MDU to verify that it corresponds with the distance of the road test as indicated by the vehicle s odometer 6 If Life to Date distance on the Odometer screen does not match the truck s odometer ...

Page 132: ...is displayed Logged in since Number of minutes current driver has been logged in Eng Time Engine time in minutes and seconds PTO Indicates if PTO configuration is using Pump or Compressor Trip State Current trip state Possible values are WARMING IDLE WARM IDLE PRE INTERTRIP IDLE PRE TRIP RUN PRE TRIP IDLE TRIP RUN TRIP IDLE COOL IDLE POST INTERTRIP IDLE ENGINE STOP PTO COMP PTO PUMP PTO ENGN MI To...

Page 133: ... Field Description Driver Active driver name If no driver is currently logged on as the active driver UNIDENTIFIED is displayed Logged in since Number of minutes current driver has been logged in PTO Indicates if PTO is Enabled or Disabled Trip Current trip number Eng Time Total elapsed time the engine has been running Drive Time Driving road time Trip State Current trip state MI Total miles accum...

Page 134: ...longer than one minute Max Longest single period of time spent over RPM threshold Over Speed Displays while overspeed time is accumulating 50 Accumulates by one each time vehicle exceeds speed threshold for longer than one minute Max Longest single period of time spent over speed threshold Ex Speed 66 Displays while excessive speed time is accumulating Warm Up 10 Minimum amount of idle time engine...

Page 135: ...e must travel before the MCP100 declares the Beginning of Trip and starts Trip_Run recording EOT End of Trip time threshold in minutes SPD Cal Speed calibration parameter RPM Cal RPM calibration parameter Park Fuel Current value of the amount of fuel used while parked Idle Fuel Current value of the idle fuel Coast OOG Coasting out of gear time displayed in minutes and seconds Gear Current gear rat...

Page 136: ...le has traveled in its lifetime if data is provided by the ECM otherwise it is Life To Date Performance Monitoring system miles only Source Indicates that the signal source for the vehicle s distance is the standard speed sensor AXLE or the J1708 1587 data link J1708 Axle Sensor Calibration Speed or distance calibration value Number should be the same as the SPD CAL value displayed on the Performa...

Page 137: ...PTO Time Total time logged as PTO data Displayed in minutes and seconds until the elapsed time exceeds 1 hour then it is displayed in hours and minutes Inputs Pump Inputs Compressor Inputs Engine Displays Y if the PTOP input is active Displays Y if the PTOC input is active Displays Y if the PTOE input is active Note If the PTO is DISABLED or if the VEHICLE IS IN MOTION 20 MPH the INPUTS will alway...

Page 138: ...number is not steadily incrementing several times per second when the engine is running the J1708 1587 data link is not correctly connected to the MCP100 PTAG Parameter version tag Data Missing Any data that is missing from the J1708 1587 data link Field values are described on page 13 11 Active Faults Performance Monitoring faults that are currently active Field values are described in the table ...

Page 139: ...m the ECM 2 Missing Total Distance 245 Performance Monitoring system is missing distance from the ECM 3 Missing Total Engine Hours 247 Engine hour data will not be available 4 Missing Total Fuel 250 Performance Monitoring system will not record fuel data 5 Missing Throttle Position 91 Coasting will not be a factor in overspeed threshold 6 Missing Ambient Temperature 171 Ambient temperature will no...

Page 140: ...ed by the engine s diagnostics 4 Speed Sensor MCP100 Engine posted PID 194 and PID 84 Speed sensor or connection problem to engine detected by the engine s diagnostics 9 LTD Mismatch MCP100 LTD mismatch with stored MCP100 data Engine run with main power disconnected Engine run with data link disconnected Engine run with ignition line disconnected A Bad Speed MCP100 More than 2 hrs IGN ON with Spd ...

Page 141: ...otifications are accompanied by an audible chirping beep sound from the display unit speaker COASTING OUT OF GEAR Displays while coasting out of gear time is accumulating EXCESSIVE OVERSPEED Displays while excessive speed time is accumulating OVERSPEED Displays while overspeed time is accumulating OVERRPM Displays while over RPM time is accumulating INTERTRIP IDLE IN 60 SECONDS Displays only once ...

Page 142: ...must be configured to record PTO Configuration values are sent through Performance Monitoring SensorTRACS parameters Typically there are two types of switching methods those switched to 12 VDC and those switched to ground PTOP Power Take off Pump PTOC Power Take off Compressor Use your multi meter to determine which type of circuit you are connecting to by engaging the PTOP PTOC and measuring for ...

Page 143: ...uits If you only have a switched circuit that is low activated to the ground to detect PTO time a relay must be used as shown in the configuration below PTO Air line To air switch on dash to engage PTO device pump or compressor PTO Ancillary Pressure Switch WHT RED Ground BRN BLK 12 VDC Ign switched 12 VDC when active Switched GND PTOP PTOC 30 87A 87 86 85 BRN WHT BLK RED Chassis GND PTO Relay 08A...

Page 144: ...ompany dispatch to have this application enabled Tap the PTO tab 4 Verify that PTO is ENABLED and the INPUTS field displays a Y according to what is active For PTO Information screen field values see PTO Screen on page 13 9 5 To verify PTO time is being recorded check that the PTO TIME field is incrementing Is this field incrementing Note In order for the PTO time to be recorded RPM must be 0 spee...

Page 145: ...e as a vehicle diagnostics tool that alerts the driver and the fleet of active vehicle diagnostics conditions Vehicle Maintenance Overview 14 2 Connecting the J1939 Wires 14 2 Vehicle Maintenance System Verification 14 3 For technical questions contact Omnitracs Customer Support Customer Support is staffed 24 hours a day 365 days a year In the United States call 800 541 7490 In Canada call 800 863...

Page 146: ...onditions are monitored at this time Note For aftermarket installations the MCP100 J1939 conversion cable is needed E mail notification must be setup by the CSR Connecting the J1939 Wires See Chapter 11 in this guide for detailed information Description Source PGN SPN FMI Engine power supply voltage low 0 65226 627 004 Auxiliary water pump pressure high 0 65226 073 003 Auxiliary water pump pressur...

Page 147: ...rify the following on the VDS Status screen The J1939 light is green This confirms that the J1939 is enabled for the unit The Rcv value should be constantly increasing If the J1939 light is red there is an error If the J1939 light is black the unit is not enabled for J1939 The Brake light is green if the parking brake is engaged The Ignition light is green during this test Field Value RCV These ar...

Page 148: ...ion The number of conditions you create should appear in orange on the Vehicle Maintenance icon 4 Tap the Vehicle Maintenance icon and select the Conditions tab to view the current Active and Inactive Conditions Conditions with red dots are active conditions Conditions with black dots are inactive conditions The simulated condition should have a red dot Conditions must be active 40 seconds before ...

Page 149: ...nance Installation Vehicle Maintenance System Verification 5 Select the Monitor List tab to view the complete list of monitored Conditions 6 Verify that e mail notification goes out upon detection of condition If you do not receive e mail notification contact Omnitracs Customer Support at 800 541 7490 ...

Page 150: ...Vehicle Maintenance System Verification Vehicle Maintenance Installation 14 6 MAY CONTAIN U S AND INTERNATIONAL EXPORT CONTROLLED INFORMATION 80 J4866 2 Rev G ...

Page 151: ...ains information regarding Critical Event Reporting CER requirements installation and system verification The topics include CER Overview 15 2 CER System Verification 15 3 For technical questions contact Omnitracs Customer Support Customer Support is staffed 24 hours a day 365 days a year In the United States call 800 541 7490 In Canada call 800 863 9191 ...

Page 152: ...ed The event information is sent from the mobile unit over the air where it is made available to the customer for analysis via a web application Text to speech TTS can be enabled so CER events can be audibly conveyed to the driver Performance Monitoring is not required for CER The hard brake feature in Performance Monitoring does not have to be enabled for the hard brake CER trigger to operate For...

Page 153: ...nabled from the Customer Portal General Screen field definitions Field Description CER Enabled True or False If true the MCP100 captures CER events Hard Braking Min Speed The minimum speed at which mobile unit will start to detect hard brake events Hard Braking Decel Rate The rate of deceleration that triggers a hard brake event Default 9 MPH SEC Speech Enabled True or False If true the text in th...

Page 154: ...f stability control information is provided by the anti lock brake system ABS it shows Available If it is not provided shows Not Seen If stability control is enabled and the truck has ABS but it shows Not Seen contact your administrator to apply the correct configurations Min Speed Minimum speed at which mobile unit detects events On Threshold Number of messages from the ABS indicating brake or en...

Page 155: ...is installed for using J1587 LDW Data Available or Not Seen If LDW data information is provided it shows available If it is not provided shows Not Seen If LDW is enabled and the truck has an LDW system but it shows Not Seen contact your administrator to apply the correct configurations Min Speed Minimum speed at which mobile unit detects events On Threshold Number of messages from LDW that indicat...

Page 156: ...ent From the Home screen press the Shift and t keys on the MDU The screen below should appear alerting you that a CER event has just been triggered The CER notification is sent to the NOC 2 Verify that the CER web application receives the CER event notification and the data surrounding the event is present If the notification is not received at the CER web application then the NOC account could be...

Page 157: ...stantly increasing number when the ignition is ON If the number is rapidly increasing you are receiving J1708 messages If the number is not rapidly increasing you are not receiving J1708 messages and you need to recheck the installation If the J1587 light is red there is an error If the J1587 light is dark you are not enabled for J1587 data 3 To check what data is missing tap the data icon Then ta...

Page 158: ...Data Link Verification Critical Event Reporting CER System Verification 15 8 MAY CONTAIN U S AND INTERNATIONAL EXPORT CONTROLLED INFORMATION 80 J4866 2 Rev G ...

Page 159: ...and how to verify that the system is working properly Trailer Tracks System Overview 16 2 Trailer Tracks System Wiring for the Truck 16 2 Trailer Tracks System Verification 16 3 For technical questions contact Omnitracs Customer Support Customer Support is staffed 24 hours a day 365 days a year In the United States call 800 541 7490 In Canada call 800 863 9191 Note Only tethered units report reefe...

Page 160: ...obile application server MAS Trailer TracksSystem Wiring for the Truck Fuse Kit Installation Fuse kits are needed for all Trailer Tracks system installations 1 Locate the blue AUX wire in the 7 way trailer harness With ignition turned ON determine if 12 24 VDC is present on this wire If 12 24 VDC is present proceed to step 2 Refrigeration Unit Trailer Tracks Unit 12 VDC Fuse Panel Trailer Pigtail ...

Page 161: ...the vehicle s ABS PLC signal SAE 2497 from getting into the vehicle electrical system will also filter the Trailer Tracks system signal The Trailer Tracks wire should be connected so it does not go through the PLC filter ABS Interoperability The Trailer Tracks system product has been tested by Omnitracs for interoperability with the SAE standard PLC4Trucks ABS signal These tests resulted in no adv...

Page 162: ...ailer Tracks icon If a trailer is not currently connected the status is None Connected After the trailer is connected and the TrailerTRACS unit sends its ID to the MCP100 the trailer ID is updated on the display Disconnection 1 Remove 7 way pigtail 2 Leave ignition ON 3 Wait for disconnect message approximately five minutes A disconnect message is sent when the tractor s ignition is on and there h...

Page 163: ...is connected the Trailer Tracks Diagnostic screen displays A Trailer Tracks ID number displays as well as other numerical information Field Description First Line Trailer Diag Number of seconds since the ignition was turned ON Second Line First Number Trailer Tracks ID number Second Line Second Number Number of ID packets from the TrailerTRACS unit since the ignition was turned ON Second Line Thir...

Page 164: ...ure is only available on tethered products The reefer information on non tethered is only transmitted directly to the Trailer Tracks website 1 Tap the TrailerTRACS Trailer Tracks icon 2 If a refrigeration unit is detected a snowflake appears above the transmitter ID box Tap the Transmitter box 3 Refrigeration Status screen appears To send the information to dispatch tap the Send button ...

Page 165: ...ssages sent from the refrigeration unit to the MCP100 When this number is incrementing regularly your data is being sent from the refrigeration unit The number is followed by a code that identifies the refrigeration unit s manufacturer T Thermo King C Carrier Mode Refrigeration unit s operating mode SET PT Trailer s set point Shown in Celsius C or Fahrenheit F RTN Temperature of air coming out of ...

Page 166: ...Refrigeration Status Screen Trailer Tracks System Installation 16 8 MAY CONTAIN U S AND INTERNATIONAL EXPORT CONTROLLED INFORMATION 80 J4866 2 Rev G ...

Page 167: ...CDU CDU Overview 17 2 General Installation Guidelines for Selecting a Mounting Location 17 2 Installing the CDU Mount 17 3 Attaching the CDU to the Mounting Bracket 17 4 Connecting the CDU Cable to the Accessory Cable 17 4 For technical questions contact Omnitracs Customer Support Customer Support is staffed 24 hours a day 365 days a year In the United States call 800 541 7490 In Canada call 800 8...

Page 168: ...displays it obstructs the area swept by the windshield wipers it blocks the deployment of an airbag DO locate the CDU where it can be safely installed on a secured bracket that is robust enough to minimize any vibration and sustain the weight of the CDU Permanently affix the CDU to the front dash area the top of the dash the driver side overhead ceiling or console the mounting surface is strong en...

Page 169: ...ide or rear windows Before you install the device on a map box or glove compartment door measure to make sure the driver can open the compartment after the device is installed Consider the owner s preference in selecting the installation location and whether there is a team or a single driver Installing the CDU Mount Omnitracs recommends using RAM Mounting Systems National Products Inc www ram mou...

Page 170: ...U cable through the 7 8 hole in the dash to the location of the accessory cable 2 Use a grommet in the 7 8 hole to protect the CDU cable 3 Attach the CDU to the mounting bracket using 4 8 32 size screws 4 Use tie wraps to secure the CDU cable Connecting the CDU Cable to the Accessory Cable 1 Route the CDU cable to the accessory cable 2 Remove any protective caps and connect the cables together 3 W...

Page 171: ...er provide guidelines and instructions for installing the Omnitracs navigation application Introduction to Navigation 18 2 Installing Navigation 18 2 For technical questions contact Omnitracs Customer Support Customer Support is staffed 24 hours a day 365 days a year In the United States call 800 541 7490 In Canada call 800 863 9191 ...

Page 172: ...ser interface device that can be used to display an Omnitracs provided navigation application A driver can request a map to a specific destination and it will display on the device The CDU s display area is large enough to easily refer to the map while driving It is meant to be installed in a fixed position on the dash or instrument panel area Minimum Omnitracs software versions needed to support ...

Page 173: ... light circuit provided with each MCP100 It can be substituted for or used with the remote message waiting light RMWL Because the buzzer is very loud an optional toggle switch can be installed to allow the driver to disable the buzzer Topics in this chapter include Mounting Location 19 2 Installation Guidelines 19 2 Installation Verification 19 2 For technical questions contact Omnitracs Customer ...

Page 174: ...the other terminal on the buzzer This wire connects the buzzer to ground when activated by the MAS It is activated when an Important or Emergency message is received by the MCP100 Installation Verification 1 Have the dispatcher or Omnitracs Customer Support 800 541 7490 send an Important or Sleepy Important message 2 If the optional toggle switch is installed turn it OFF and ON and verify that the...

Page 175: ...ee the message waiting light The RMWL illuminates whenever an Important Sleepy Important or Emergency message is received by the MCP100 Topics in this chapter include Installing the Remote Message Waiting Light 20 2 Installation Verification 20 2 For technical questions contact Omnitracs Customer Support Customer Support is staffed 24 hours a day 365 days a year In the United States call 800 541 7...

Page 176: ...he housing assembly is secured flush against the vehicle dash and re install the bulb assembly 5 Connect the power wire to a 12 24 VDC unswitched source such as the BAT wire on the MCP100 power cable The power wire can be identified by the in line fuse holder 6 Connect the RMWL s ground wire to the accessory cable s green MSG ALERT wire using a butt splice If the RMWL bulb burns out use a GE53 rep...

Page 177: ... as a non DTTS panic button When this configuration is used the panic button sends an alert to the NMC and an Emergency message to the dispatcher but DTTS is not notified For information on installing the wireless panic button see the Wireless Panic Button Installation and User Guide 80 J6059 1 Topics in this chapter include Installing the Panic Button 21 2 Installation Verification 21 4 For techn...

Page 178: ... the area is clear of obstructions before drilling 4 Drill a 5 8 hole in the vehicle dash Caution Always deburr holes before routing the cables 5 Insert the button assembly into the dash and secure it in place using the lock washer and nut provided WARNING When routing the cable avoid any moving parts or sharp edges 6 Route the cable to where you make the accessory cable connections on the MCP100 ...

Page 179: ...wires on the accessory cable Caution Always use the appropriate crimping tool for insulated terminals 8 Connect the blue red PANIC_LOW and blue black PANIC_HIGH wires to the two wires of the PANIC button Caution Be sure to cover all wires with convoluted tubing and secure them away from sharp or moving parts 44 Pin Connector 05AAA_230B Convoluted Tubing Panic Button Butt Connectors Panic Button Wi...

Page 180: ...ATED SERVICES 3 Press the 7 key for PANIC TESTING 4 When prompted enter your customer ID and press the key 5 Confirm or re enter your customer ID 6 When prompted enter your authorization ID and press the key 7 Confirm or re enter your authorization ID 8 If more than one location has been set up for your company you will hear a list of locations Press the number key that corresponds with your curre...

Page 181: ...nic Button Test System Dial in Procedure 12 You can now press the panic button You will have an hour to perform the test When the test is complete Omnitracs sends a fax and or an e mail to your designated contact confirming the MCP100s you tested and the number of times you pressed the panic button for each MCP100 during the test ...

Page 182: ...Automated Panic Button Test System Dial in Procedure Wired Panic Button Installation 21 6 MAY CONTAIN U S AND INTERNATIONAL EXPORT CONTROLLED INFORMATION 80 J4866 2 Rev G ...

Page 183: ... carriers The WPB is designed to operate within 100 feet of the vehicle with clear line of sight no obstructions between the WPB antenna on the front windshield and the remote transmitter key fob Caution Although the WPB may be effective at ranges in excess of 100 feet local atmospheric conditions will diminish the unit s consistent success as the distance from the antenna increases beyond 100 fee...

Page 184: ...cidentally be pushed The PANIC button should show through the opening in the guard when properly installed Remote antenna Antenna cable Power harness cable with 18 pin connector 45 J6053 8 Relay harness assembly 45 J6061 1A Tie wraps 5 butt splices 4 ring terminals 3 3 pin connector housing 1 5 pin connector housing 1 T E S T R E S E T L O C K U N L O C K A U X P A N IC PowerHarness WPB Receiver W...

Page 185: ...or damaged transmitters Tools and Supplies Needed for Installation The following tools are recommended for installing the WPB crimping tool for insulated crimp terminals wire stripper s cutters screw driver s volt ohm meter alcohol swabs Caution Do not use a voltage test light as damage to the WPB receiver or the vehicle may occur Caution Do not use Scotchloks or Scotchlok type connectors Scotchlo...

Page 186: ...down firmly for at least 1 second Activating the panic feature will send an over the air panic notification to the dispatch center The panic feature will remain activated as long as the PANIC button is pressed The PANIC button is recessed within the plastic cover to prevent false panics If the button has accidentally been pressed notify your dispatcher immediately Activating the AUX Feature The AU...

Page 187: ...be mounted under the dash in a location that can easily be mounted with tie wraps preferably near the fuse panel or near the entrance of the MCP100 power cable The WPB receiver harness should be wired and checked for proper voltages see Voltage Check on page 22 8 before connecting it to the receiver Caution CB radios that have been modified to increase power beyond the legal limits including the u...

Page 188: ...R wire from the WPB power harness using a butt splice 2 Securely attach the white with red stripe PANIC wire from the WPB power harness to the white PANIC from the relay harness using a butt splice 3 Securely attach the blue red PANIC_LOW wire from the MCP100 s accessory cable to the brown AUX1 RTS wire on the relay harness using a butt splice 4 Securely attach the blue black PANIC_HIGH wire from ...

Page 189: ...M MDM Wireless Panic Button Receiver Antenna Cable Antenna To 12 Volt Power Orange Red Red Red Red MCP Power Cable Black Black Black Black Brown AUX1 RTS Blue red PANIC_LOW Relay Harness 45 J6061 1A Wired Panic Button Mobile Application Server MAS 44 Pin MCP Accessory Connector Black AUX1 CTS Blue Black PANIC_HIGH 03AAA_112A MCP100 4 Pin Connector Not Used AUX Not Used 15 Amp Fuse Ground White Par...

Page 190: ...e The black wire should read ground The white with red stripe wire should read approximately 3 8V 2 Once this is verified properly fasten the wires in place using tie wraps 3 Ensure that no wires are dangling or that none of the wires were cut in the installation process Antenna Installation The following section provides information on installing the WPB antenna Federal requirements mandate that ...

Page 191: ...na will be mounted 2 The antenna should be mounted so that it does not obstruct the view of the driver If it is necessary to mount the antenna on the windshield it should not be more than 6 inches down from the top edge of the windshield on the passenger side 3 Thoroughly clean the antenna mount area with alcohol before mounting the antenna to the windshield 4 Use the adhesive backed tape on the b...

Page 192: ...w these steps to verify that the panic button has been installed correctly Automated Panic Button Test System Dial in Procedure Before you begin you need the following The MCP100 serial numbers you are testing Your customer ID Your authorization ID If you don t have this information contact Customer Support at 800 541 7490 before dialing in to test the procedure 1 Call Omnitracs Customer Support a...

Page 193: ...transmitted the display will show the panic notification in your Outbox with a check mark indicating the panic notification has been successfully transmitted as shown below If the panic button is configured for audio notification when the notification has been successfully transmitted you will first hear A panic message has been queued and then you will hear A panic message has been sent Wireless ...

Page 194: ...mitter unit Be careful not to lose the chain 2 Remove the dead battery and dispose of it properly Note Proper disposal of defective or dead alkaline batteries is the responsibility of the WPB owner Please dispose of defective or dead batteries at a local alkaline battery recycling center 3 Replace the dead battery with a new customer provided A23 12V alkaline battery Follow the polarity shown embo...

Page 195: ... INFORMATION 22 13 Wireless Panic Button Installation Wireless Panic Button Battery Replacement 5 Ensure that the unit is operating by pushing any button except the red PANIC button to light the red LED in the upper left corner 03AAA_29 T E S T R E S E T LED will light ...

Page 196: ...Wireless Panic Button Battery Replacement Wireless Panic Button Installation 22 14 MAY CONTAIN U S AND INTERNATIONAL EXPORT CONTROLLED INFORMATION 80 J4866 2 Rev G ...

Page 197: ...r 23 3 Installation Verification 23 4 Return Material Authorization RMA Process 23 4 O Neil Printer Parts List 23 4 For general questions and technical support contact O Neil Product Development Inc In the United States and Canada call 800 796 6345 Outside these areas call 949 458 0500 To enable the printer function only contact Omnitracs Customer Support Customer Support is staffed 24 hours a day...

Page 198: ...Cables Keep away from sharp metal edges to avoid damage to cables Connect the printer to the vehicle and the MCP100 using the printer power cable and the printer data cable Printer Power Cable The power cable connects to the chassis ground wire and the ignition source Printer Data Cable The data cable connects the printer to the MCP100 standard full function accessory cable and provides the path f...

Page 199: ...bracket 4 Install the printer power cable a Run the printer power cable from the printer to the MCP100 power cable connections b Connect the printer GND wire to CHASSIS_GND c Connect the printer IGN wire to ignition source on the vehicle 5 Install the printer data cable a Run the printer interface cable from the printer to the MCP100 accessory cable connections b Connect data cable GND wire to vio...

Page 200: ...tion enabled Return Material Authorization RMA Process 1 Request an RMA from O Neil Printers 2 O Neil arranges shipment of a replacement component to you 3 Return the failed component to the address specified by O Neil O Neil Printer Parts List Order parts directly from O Neil Product Development Inc Call 800 796 6345 U S and Canada or 949 458 0500 Email info oneilprinters com Website www oneilpri...

Page 201: ...rating the Scanner 24 3 Sending a Scan 24 4 Cleaning the Scanner 24 5 Return Material Authorization RMA Process 24 5 For technical support contact BCS Solutions In the United States and Canada call 800 555 5555 For initial support only contact Omnitracs Customer Support Customer Support is staffed 24 hours a day 365 days a year In the United States call 800 541 7490 In Canada call 800 863 9191 Doc...

Page 202: ... 2 Clean the scanner bottom with an alcohol pad remove protective film and apply two dual lock pieces to the bottom ends of the scanner 3 Clean the vehicle s mounting surface with an alcohol pad 4 Remove protective film and apply two dual lock pieces to the desired mounting surface Holster Mounting Option 1 Select holster location 2 Clean the location with an alcohol pad and let dry 3 Carefully re...

Page 203: ...k tape 3 Go to Scanner Mounting Option on page 24 2 or Holster Mounting Option on page 24 2 for mounting options 4 Route and store the scanner cable where it will not be damaged and is out of harm s way and will not obstruct the driver or hinder truck performance Keep the cable away from sharp metal edges to avoid damage Note It may be necessary to route cable under the wells and truck interior mo...

Page 204: ... home screen Sending a Scan 1 On the Home screen tap the Scanner icon 2 Insert the paper face down It will go in about 1 2 If it s not 8 1 2 wide line it up with the right edge Note The small tooth in the slot must be covered 3 Tap the Scan Page button Note If the preview box is checked a preview page appears Tap the Accept button 4 After the page goes through insert another page and tap the Add P...

Page 205: ...the Yes button Cleaning the Scanner 1 Tap the Options tab 2 Insert the cleaning paper 3 Tap the Clean button Wait a few minutes while the scanner draws through the cleaning paper and cleans the scanner Return Material Authorization RMA Process 1 Request an RMA from BCS Solutions 2 BCS Solutions arranges shipment of a replacement component to you 3 Return the failed component to the address specifi...

Page 206: ...Return Material Authorization RMA Process In Cab Scanner Installation 24 6 MAY CONTAIN U S AND INTERNATIONAL EXPORT CONTROLLED INFORMATION 80 J4866 2 Rev G ...

Page 207: ...em TDM Cable 25 Pin Connector Callouts A 6 Satellite Data Modem SDM Cable 9 Pin Connector Callouts A 7 Standard Accessory Cable Pin Callouts A 8 Full Function Accessory Cable Pin Callouts A 9 Media Display Unit MDU Connector Pin Callouts A 10 Six pin Data Link Connector Pin Callouts A 11 Nine pin Data Link Connector Pin Callouts A 12 Radio Connector Pin Callouts A 13 CAN Converter Cable A 14 For t...

Page 208: ...ce Tab Q Caps 0 W E R T Y U I P Enter Shift Ctrl Alt Sym Delete Shift L K J H G F D S A M N B V C X Z V V Opt Back SDM CDU CDU RCD RCD MAS Com5 TX 485 Com5 RX 485 Com5 GND Speaker Switch Truck Spkr Truck Stereo Speaker Speaker Panic Sw Relay Harness PWR PWR Wireless Panic Panic Signal Pump Compressor PTOP PTOC 2 AMP PWR MSG Alert Can Converter Cable 7 Way AUX 5 AMP J1708 J1708 Mounted on Trailer P...

Page 209: ...R T Y U I P Enter Shift Ctrl Alt Sym Delete Shift L K J H G F D S A M N B V C X Z V V Opt Back CDU CDU RCD RCD MAS Com5 TX 485 Com5 RX 485 Com5 GND Speaker Switch Truck Spkr Truck Stereo Speaker Speaker Panic Sw Relay Harness PWR PWR Wireless Panic Panic Signal Pump Compressor PTOP PTOC 2 AMP PWR MSG Alert Can Converter Cable 7 Way AUX 5 AMP J1708 J1708 Mounted on Trailer Panic High Panic Low RPM ...

Page 210: ...e Application Server Full Function Power Cable Esc 4 5 6 7 8 9 0 Bac ksp ace Tab 0 E R T Y U I P Ent er Del ete Shif t L K J H G F D M N B V C V V Op t Bac k 1 2 3 Q Cap s W Shi ft Ctr l Alt Sym S A X Z Display Cable MediaDisplay Unit and Holster P a n ic _ H ig h PTOP PTOC J 1 7 0 8 J 1 7 0 8 T T R A C S CO M5 _RX _48 5 COM5_ GND CO M 5_ RX _4 85 RED VIO O RN VIO RE D VIO I OCable Power Cable 15 ...

Page 211: ...grams and Charts Power Cable Pin Callouts Power Cable Pin Callouts 1 BAT 12 VDC 2 BAT 12 VDC 8 BAT RTN 5 IGNITION Switched 12VDC 7 TAMPER 6 ID SIGNAL COLOR PIN 15 BAT RTN 14 BAT RTN 9 BAT 12 VDC YELLOW YELLOW YELLOW BLACK BLACK BLACK BLACK WHITE 8 15 7 14 6 5 2 9 1 06AAA_199A 3AMP Fuse 10AMP Fuse ...

Page 212: ...NATIONAL EXPORT CONTROLLED INFORMATION 80 J4866 2 Rev G Terrestrial Data Modem TDM Cable 25 Pin Connector Callouts P1 P2 1 6 9 5 13 25 14 1 2 2 1 MDM_TX COM1_TX 1 17 RTC_BACKUP SIGNAL 25 PWR 9 5 LOOP RTN 5 7 TAMPER 7 6 RTN 6 24 PWR 4 3 4 3 8 MDM_TX COM1_TX MDM_RX COM1_RX MDM_RX COM1_RX P2 P1 06AAA_130T To TDM To MAS ...

Page 213: ...ing Diagrams and Charts Satellite Data Modem SDM Cable 9 Pin Connector Callouts Satellite Data Modem SDM Cable 9 Pin Connector Callouts 06AAA_130 E RTN 5 F RTN 6 B TAMPER 7 P1 SIGNAL P2 V RX 3 N RX 4 R TX 1 T TX 2 L Drain PIN 7 4 C D PWR 9 9 11 5VDC PWR 9 9 11 5VDC 8 9 1 6 2 3 8 9 5 P1 P2 ...
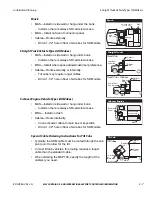
Page 214: ...and Charts A 8 MAY CONTAIN U S AND INTERNATIONAL EXPORT CONTROLLED INFORMATION 80 J4866 2 Rev G Standard Accessory Cable Pin Callouts VIO VIO RED VIO ORN BLU RED BRN GRN BLU BLK BLU RED BLU GRN 06AAA_125T1 BLU YEL BLU VIO RCD PANIC_LOW PANIC_HIGH MSG ALERT ...

Page 215: ...H DIGIN 3 DIGIN 2 MSG ALERT LSD1 LSD2 LSD3 LSD4 LSD5 LSD6 PTOP PTOC AXLE 1 AXLE 2 RPM 1 RPM 2 J1708 J1708 TTRACS COM5_TX_485 COM5_RX_485 COM5 GND CDU CAN1 SPKR SPKR BLU GRAY BLU GRN BLU RED BLU BLK YEL BLU YEL BRN GRN GRN WHT GRN BLU GRN YEL WHT RED WHT BLK GRN BRN GRN RED GRN ORN ORN ORN WHT GRY WHT GRY BRN RED BLU VIO ORN VIO RED VIO BLU YEL BLU VIO 06AAA 125C PIN 29 PIN 2 PIN 28 PIN 30 PIN 8 PI...

Page 216: ...NFORMATION 80 J4866 2 Rev G Media Display Unit MDU Connector Pin Callouts PIN SIGNAL COLOR 5 Red Ground 6 Green Ground 3 Blue TX 4 Yellow TX 1 Gray RX 2 Black RX Violet 9 9VDC 8 Orange 9VDC 06AAA_132A PIN SIGNAL 1 2 3 4 5 6 7 8 Ground TX TX 9 VDC 9 VDC RX RX Ground COLOR Green Yellow Blue Violet Orange Gray Black Red To MAS To MDU ...

Page 217: ...ATION A 11 Wiring Diagrams and Charts Six pin Data Link Connector Pin Callouts Six pin Data Link Connector Pin Callouts SIGNAL PIN J1708 J1587 DATA LINK A J1708 J1587 DATA LINK B 12VDC C PLUG P N 23507136 D BATTERY GROUND E PLUG P N 23507136 F A A C C D D B B F F E E 08AAA_050 ...

Page 218: ...NTERNATIONAL EXPORT CONTROLLED INFORMATION 80 J4866 2 Rev G Nine pin Data Link Connector Pin Callouts SIGNAL PIN BATTERY GROUND A 12VDC B J1939 DATA LINK C J1939 DATA LINK D J1939 SHIELD E J1708 J1587 DATA LINK F J1708 J1587 DATA LINK G PLUG H PLUG J J D E C F B A G H 08AAA_051 A C D B F E J G H ...

Page 219: ...r Wire B6 Note Connector tabs on this side 06AAA_179A Front Drivers Side Speaker Wire B5 1 2 3 7 8 4 1 2 3 5 7 8 4 6 5 6 Notches PIN SIGNAL A1 A2 A3 A4 A5 A6 A7 A8 N C N C PARK LIGHTS IGN CONTACT PWR ANT OUTPUT PWM ANALOG DIM BATTERY MAIN GROUND PIN SIGNAL B1 B2 B3 B4 B7 B8 RR SPEAKER RR SPEAKER RF SPEAKER RF SPEAKER LR SPEAKER LR SPEAKER B5 B6 LF SPEAKER LF SPEAKER A B Common Radio and Harness ...

Page 220: ...LUE BLACK 24 BLACK RED 22 3 BLACK 22 4 YELLOW GREEN 08AAA_045 PIN 4 PIN 4 PIN 4 PIN 1 PIN 1 PIN 1 PIN 6 PIN 6 PIN 6 PIN 3 PIN 3 PIN 3 J1939 CAN REPEATER R J1939 CAN REPEATER R J1939 CAN REPEATER R J1939 CAN REPEATER R J1939 CAN REPEATER R J1939 CAN BUS J1939 CAN BUS YEL 20 09AAA_043 WHT BLU 20 WHT BLU 20 YELLOW J1939 YELLOW J1939 BRN WHT 22 BRN WHT 22 WHT BRN 22 WHT BRN 22 CAN1_HI CAN1_HI 1 CAN1_L...

Page 221: ...ics in this appendix provide environmental and power requirements for the MCP100 and accessories MCP100 Environmental and Power Requirements B 2 For technical questions contact Omnitracs Customer Support Customer Support is staffed 24 hours a day 365 days a year In the United States call 800 541 7490 In Canada call 800 863 9191 ...

Page 222: ... get wet Not watertight Turn over immediately if liquids are spilled on it Not watertight Turn over immediately if liquids are spilled on it Power 9 to 32 Volts DC Operating at 12V using CDU RCD and speaker switch cable only no accessories MCP100 draws a maximum of 1 8 amps from the battery 24 W Operating at 12V without using CDU MCP100 draws a maximum of 1 5 amps Asleep using CDU RCD and speaker ...

Page 223: ...pment to Omnitracs at the following address Make sure that the RMA number is marked clearly on the outside of the box Omnitracs LLC RMA Receiving c o Baja Freight Forwarders Inc 8662 Siempre Viva Road San Diego CA 92154 RMA __________________ 800 541 7490 To prevent damage during shipment and handling carefully package all equipment being returned If the original shipping container and packing mat...

Page 224: ...Standard RMA Procedure C 2 MAY CONTAIN U S AND INTERNATIONAL EXPORT CONTROLLED INFORMATION 80 J4866 2 Rev G ...

Page 225: ...des need to be performed very quickly Topics in this appendix provide specific instructions for checking the software versions installed on the MCP100 and upgrading the MCP100 using SD cards Checking the Software Versions Installed D 2 SD Card Instructions D 3 Upgrading Only the MAS Software D 3 Upgrading the MAS Operating System and MAS Software D 5 Upgrading the SDM Software D 5 Upgrading the MD...

Page 226: ...80 J4866 2 Rev G Checking the Software Versions Installed Shortly after you power up the MCP100 the user interface screen displays 1 Scroll down to the System icon and tap the icon 2 Tap the System tab to access system information about the MCP100 MAS MAS Win OS SDM and MDU firmware version numbers are listed here 3 Tap the SDM tab to access the SDM version ...

Page 227: ...rtal or you can check with an Omnitracs representative for more information on where to get the software and how the files need to be organized Upgrading Only the MAS Software MAS should be powered ON ignition ON 1 Insert MAS SW SD card into slot on MAS with label side down metal strips facing up Soon after the MAS SW card is installed the MDU screen will display Verifying component xxx of XXY App...

Page 228: ... MAS SW will also need to be upgraded Before starting an upgrade ensure you have SD cards for the MAS operating system and the MAS software 1 You must disconnect power for 10 minutes or until all LEDs go out 2 Insert the SD card labelled MAS Operating System with label side down metal strips facing up 3 Ensure the MAS internal battery is installed and connected 4 Apply external power by connecting...

Page 229: ...the left of the SD card slot is blinking green MDU screen shows PLEASE WAIT LOADING 9 Keep the MAS SW SD card in the slot until the MDU screen shows the application icons or the driver warning screen When either of these appears the upgrade is complete Verify the software version on the System screen This should take 10 15 minutes 10 Remove the SD card and verify the S W versions on the System scr...

Page 230: ...d The upgrade is now complete Upgrading the MDU Software 1 Ensure the ignition is ON 2 Insert SD card into slot on MAS with label side down metal strips facing up 3 Approximately 30 seconds later TTS advises Setup card is supported Please remove card and stand by 4 Approximately 30 seconds later TTS advises Starting to display software update this will take 5 10 minutes Please do not turn off igni...

Page 231: ...S the media display unit MDU the terrestrial antenna and terrestrial data modem TDM the satellite data modem SDM and the Trailer Tracks system uHow Often Should Inspections Be Performed E 2 Inspecting the Mobile Application Server MAS E 2 Inspecting the Media Display Unit MDU E 4 Inspecting the Terrestrial Antenna and TDM and the Satellite Data Modem SDM E 6 Verifying Trailer Tracks System Connect...

Page 232: ...inches of space for servicing the backup battery 2 Make sure there are 4 to 6 inches of air space on the connector side to allow for cable bends and servicing 3 Make sure tire chains tools and other equipment are not stored on top of the MAS 4 Make sure the mounting hardware holding the MAS in place is tight and does not allow the MAS to vibrate Caution Do not use a pneumatic tool as this could da...

Page 233: ...pter 13 in the MCP100 Diagnostic Guide for other LED states 8 Check to make sure the cables are stored securely with tie wraps and are stored out of the way 9 Check the power connections such as at the power distribution panel to ensure they are tight and the wiring is secure Check all ground connections to make sure there is a good metal to metal contact and the wires are not strained or damaged ...

Page 234: ...icon Tap the Battery tab and tap the Test Battery button Warning It may take a few minutes to perform this test Check the Results of last test and verify that the battery is Good If the battery shows a failure Bad 12000 go to Chapter 16 in the MCP100 Diagnostic Guide 1 Verify proper MDU operation Turn IGN to the ON position and verify that the status is Good Turn the IGN to the OFF position and ve...

Page 235: ...t watertight Do not spray any liquid directly on the display screen Heavily soiled MDUs should be returned to Omnitracs using the RMA process for proper cleaning 3 Verify the display screen is readable in any lighting condition 4 Make sure the display cable has enough slack and is not being rubbed or cut by anything inside the cab 5 Remove the MDU from the holster and make sure the screws holding ...

Page 236: ...have no kinks or bends and are not being pulled tightly against metal edges that can rub or cut the cables 2 Make sure there are adequate service drip loops in the cables at the antenna and where they enter the vehicle 3 Make sure grommets are in place around any holes the cables pass through Make sure RTV sealant or refrigeration tar tape is intact and provides a good seal on any holes that lead ...

Page 237: ...r to Chapter 9 in the MCP100 Diagnostic Guide for other TDM light states Go to step 9 to complete the terrestrial antenna and TDM inspection 7 Make sure the SDM is securely attached to the SDM mount Check the mount hardware to make sure it is secure and does not show any signs of loosening 8 Twist SDM to verify that the SDM connector is hand tightened and secure The SDM mounting bolts should be ti...

Page 238: ...raps to make sure they are not brittle and do not break If a tie wrap is damaged or brittle replace it 1 Make sure all 7 way connection points have been cleaned inspected and greased Omnitracs recommends that you use dielectric grease on the connection points 2 Check the 7 way coil cord for nicks cuts or abrasions Replace the cord as necessary Twist tie wrap between fingers to make sure it doesn t...

Page 239: ...on at the tractor and at the trailer Receptacle Remove Plug 7 Way Receptacle 1 7 FLUKE 77 III 77 III MULTIMETER AUTO 0 0 10 20 30 RANGE OFF V mV A A HOLD FLUKE 77 III 77 III MULTIMETER AUTO 0 0 10 20 30 RANGE OFF V mV A A 300 300 mA 10 A COM V HOLD 300 300 mA 10 A COM V 7 Way Plug 1 7 04AAA_158T 7 Way Receptacle at the Trailer nose 7 Way plug at the Trailer end 7 FLUKE 77 III 77 III MULTIMETER AUT...

Page 240: ...th ends of the refrigeration cable for corrosion and clean if necessary Turn IGN to ON Verify the refrigeration connection and data transfer by accessing the Refrigeration Status screen With the refrigeration switch in the ON position verify the REFRIGERATOR STAT field is incrementing approximately once a minute The manufacturer code for the unit should appear at the end of the refrigerator status...

Page 241: ...100 components referred to in this guide MCP100 System Component MCNs Referenced in this Guide F 2 MCNs for Sealants and Lubricants Referenced in this Guide F 6 MCN for Omnitracs recommended Torque Wrench Referenced in this Guide F 6 BCS Solutions Scanner Parts List F 6 For technical questions contact Omnitracs Customer Support Customer Support is staffed 24 hours a day 365 days a year In the Unit...

Page 242: ...Diagnostic Guide 80 J4867 2 How to Use the Wireless Panic Button Remote Transmitter Visor Card 80 J6060 1 System component Illustration Latest MCN Alternate MCNs Notes Satellite data modem SDM 10 J8278 10 J9490 SDM2 Flat antenna 65 J9635 1 Vertical L mount for flat antenna 65 J9936 2 50 JB015 Media display unit MDU CV90 J4820 1 Media display unit MDU holster 10 J8407 1 Esc 1 2 3 4 5 6 7 8 9 0 Back...

Page 243: ...al 10 J3015 x satellite Backup battery CV90 J4341 2 Terrestrial data modem CA90 J9400 x Remote control device RCD CV90 J8640 Terrestrial data modem cable CV90 J9264 2 CV90 J9264 15 Media display unit MDU cable CV90 J4880 17 System component Illustration Latest MCN Alternate MCNs Notes 05AAA_043 I UI U D SP L D SP L M D M M D M PW R PW R I 0 I 0 US B SER US B SER Weight 3 25 lbs including battery 0...

Page 244: ...is cable is the standard cable Accessory cable full function with converter connector CV90 J8773 20 This cable is the full function cable Accessory cable standard with repeater connector CV90 J9956 20 Accessory cable full function with repeater connector CV90 J9953 20 Speaker switch cable CV90 J9204 8 CAN converter cable CV90 J9619 A42 System component Illustration Latest MCN Alternate MCNs Notes ...

Page 245: ...5 53011 1 Message waiting buzzer 65 3922 1 Remote message waiting light CV90 6414 1 Panic button and cable CV90 J1377 5 Kit Wireless Panic Spare XMTR Upgrade No picture available 65 J6070 1 Trailer Tracks system for reefer 10 53481 2 10 52525 6 Trailer Tracks system for dry van 10 53481 1 10 52525 4 System component Illustration Latest MCN Alternate MCNs Notes CAN BUS CAN BUS CAN BUS Blue TTRACS 5...

Page 246: ...bsite www bcssolutions com Protective Film Kit 10 pack MDU No picture available 64 J9040 1 Screen protector Sealant MCN Sealant Mastic Butyl Rubber 125 x 2 x 12 Black 755 12528 0003 Seal Coax Plastic 1 2 x 3 32 x 10 Strips OEM Pkg 755 01910 0001 Tool MCN Torque wrench for replacing the radome 800 01730 0017 Part Part Number BCS Scanner Kit contains scanner scanner cable and holster 65 J9630 1 BCS ...

Page 247: ...ormation Please provide this information or attach your business card Company Your Name Your title Phone Your primary job check one Mechanic Shop foreman Service writer How often do you use an Omnitracs manual Daily Weekly Monthly Never Only when I have questions If you don t use an Omnitracs manual on a regular basis please indicate the reason check all that apply Prefer calling customer service ...

Page 248: ...ganized Other ______________________________________________________________ 4 Please rate your level of satisfaction with the following areas in the manual 5 Very satisfied 4 Satisfied 3 Neither Satisfied nor Dissatisfied 2 Dissatisfied 1 Very Dissatisfied Diagnostic Procedures 5 4 3 2 1 Flowchart Information 5 4 3 2 1 Graphics pictures 5 4 3 2 1 5 Please rate your level of satisfaction in how th...

Page 249: ...or you to learn about the Omnitracs MCP100 Product training manual Computer based training Video tape Other ______________________________________________________________ 6 What do you like best about our manuals _____________________________________________________________________ _____________________________________________________________________ 7 If there is one thing you could change about ...

Page 250: ...Documentation Format Feedback Form G 4 MAY CONTAIN U S AND INTERNATIONAL EXPORT CONTROLLED INFORMATION 80 J4866 2 Rev G ...

Page 251: ...mbers to the MCP100 See RPM Calibration and Speed Distance Calibration CDU See Compact Display Unit C No Value Indicates the strength of the data satellite signal being received from or sent to the satellite FL C No indicates the forward signal strength RL C No indicates the return signal strength Compact Display Unit CDU The user interface device that can be used to display the Omnitracs provided...

Page 252: ...is bus are provided by a single electronic control unit ECU See J1939 Network and Traditional Sensors Network J1708 Enabled J1708 enabled means that the MCP100 has been set up to look at J1708 data via the J1708 1587 data link The dispatch computer operator must send a message to the MCP100 that tells it to understand input from the J1708 1587 bus and define driving thresholds J1939 Network The MC...

Page 253: ...ial data modem TDM and Terrestrial Antenna or Satellite Data Modem SDM Cables Network Management Computer NMC Computer at the Network Management Facility that receives and handles the information transmission traffic between the dispatch center and the fleet Network Operations Center NOC This facility is responsible for processing and managing the information transmission traffic between the dispa...

Page 254: ...tify the Omnitracs Network Management Computer and the company dispatcher when an emergency situation exists Positioning System See Global Positioning System Power Cable Connects the vehicle 12 24 volt power source and system ground to the mobile application server Printer Provides the driver with a hard copy of the MCP100 forward or return message screen display RCD See Remote Control Device Rece...

Page 255: ...accessory of the MCP100 that allows companies to collect vehicle trip and performance data Software Version See MCP100 System Screen Speed Distance Calibration Used to determine the road speed and or distance when the speed or distance data comes from the speed sensor instead of the J1708 1587 data link Standard Accessory Cable Connects the MCP100 to the J1708 1587 data link as well as other vehic...

Page 256: ...nce data in one of three ways Modern electronic truck engines provide distance data via the engine controller module ECM In some older electronic engines total distance is not available through the ECM and the MCP100 uses input from the speed sensor and the available J1708 1587 data to calculate distance In non electronic trucks the speed sensor provides both speed and distance data Traditional Se...

Reviews: