00042058.DOC, Version 1.0
20/24
6. CONNECTIONS
Prior to connecting or changing existing connections switch off the turntable.
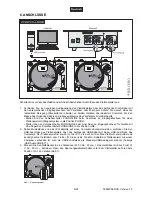
1 Connect the analog audio output of the turntable with the supplied RCA cable to the corresponding input
jacks at the amplifier or mixer. Make sure that the right/left occupation (plug color red/white) is the same
at both units. Connect the ground connection of the cable to the ground terminal of the amplifier or mixer.
• When connecting to input jacks for a turntable with magnetic system set the sliding switch
PHONO/LINE to position PHONO.
• When connecting to input jacks for units with line level set the sliding switch PHONO/LINE to position
LINE.
2 For copying music pieces from a record to a computer, connect the USB port of the turntable to a USB
port of the computer with the supplied USB connection cable. The turntable is compatible with both PC
and Mac computers and requires no installation procedure or drivers for the correct functioning. As soon
as the turntable is connected to a computer, it will be recognized as a generic USB audio device
(indication "USB Audio CODEC" ).
3 Connect the mains plug to a socket (230 V AC, 50 Hz ~). The unit can also be operated with 115 V AC,
60 Hz ~. For this purpose, set the voltage selector switch underneath the platter to the upper position
110-120 V (Fig. 7).
Fig
. 7: Voltage selection

