00042058.DOC, Version 1.0
21/24
If the device will be directly connected with the local power supply network, a disconnection switch with a
minimum opening of 3 mm at every pole has to be included in the permanent electrical installation. The device
must only be connected with an electric installation carried out in compliance with the IEC-standards. The
electric installation must be equipped with a Residual Current Device (RCD) with a maximum fault current of
30 mA.
7. OPERATION
7.1 Playing a record
1 Remove the protective cover of the stylus.
2 Switch on the turntable with the power switch. The stroboscope lamp lights up.
3 To select the speed, press the corresponding button (control LED lights):
• for
33
⅓
RPM the left button “33”
• for 45 RPM the right button “45”
4 Put on the record. For 7" records, use the adapter.
5 Open the locking lever for the tone arm to the right. To lift the tone arm, place the lever for the tone arm
lift to the rear position.
6 Seize the handle of the tone arm, and place the stylus above the beginning or the desired spot on the
record. Place the lever for the tone arm lift to the front position. The tone arm is slowly lowered onto the
record.
7 Press the button START/STOP. The turntable platter starts to rotate. While playing, the record can be
stopped at any place and be restarted with the button START/STOP.
8 To stop the playing, lift the tone arm with the tone arm lift and put it back onto the tone arm support by
hand. Stop the turntable platter with the button START/STOP.
9 After use of the turntable, secure the tone arm with the locking lever and switch off the unit with the
power switch. Fold down the protective cover as a protection against dust.
7.2 Adjusting the speed
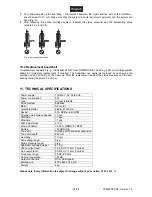
The speed of the turntable and thus the pitch of a title can be increased or reduced by up to 10 % with the
control PITCH. In mid-position (control locks into place), the speed is precisely adjusted and can be checked
on the stroboscope ring of the turntable platter. Wile the turntable is revolving, observe the part of the
stroboscope ring which is illuminated by the stroboscope lamp. If the speed is precisely adjusted, the
markings on the stroboscope ring seem to stand still:
• at 45 RPM on the upper ring with a power supply of 230 V, 50 Hz
• at 45 RPM on the second ring with a power supply of 115 V, 60 Hz
• at 33 RPM on the third ring with a power supply of 230 V, 50 Hz
• at 33 RPM on the lower ring with a power supply of 115 V, 60 Hz
CH


