background image


17 

 EN 

Audio player


The built-in audio player plays titles in MP3, WMA and WAV format from USB devices and SD(HC) memory 
cards. Make sure the 3.5 mm jack is not connected; otherwise the audio player will be muted. 

1) 

Set  the  INPUT  SELECT  switch  to  the  AUX  5  position  to  assign  the  signal  of  the  audio  player  to  the 
master signal. 

2) 

Insert a USB device into the USB port and/or a memory card into the card slot (notched corner to the 
left). 

3) 

After  loading  a  data  carrier,  it  is  selected  as  the  playback  medium  and  the  playback  will  start 
automatically.  The  display  indicates  the  playback  source  and  the  elapsed  time  of  the  current  title  in 
minutes and seconds.  

4) 

Shortly press the [MODE] button to switch between the data carriers and Bluetooth operation. 

5) 

By  long  actuation  of  the  buttons  [VOL‒/

]  and  [VOL+/

]  you  can  adjust  the  internal  volume  of  the 

audio player. There are 30 steps available (indication “U01-U30“). 

6) 

To interrupt the playback, press the button [►


].


The display indicates  . To start the playback again, 

press the button once again. 

7) 

By  short  actuation  of  the  buttons  [VOL‒/

]  and  [VOL+/

]  you  can  skip  titles  in  forward  or  backward 

direction.  

8) 

To remove a USB device, disconnect it from the USB port. To eject a memory card, slightly press it into 
the  slot  until  it  comes  out  and  can  be  removed.  Prior  to  removing  a  device,  always  terminate  the 
playback with the [►

II

] button. Otherwise damage or loss of data may occur.  


Setting up a Bluetooth connection with mobile devices 


The  audio  player  features  a  Bluetooth  receiver  allowing  you  to  stream  music  wirelessly  from  your  mobile 
devices such as smartphones, tablets and notebooks. 


1) 

Press the [

MODE

] button (repeatedly) until the display indicates “

bLUE

 “ 

and a beep sounds. The audio 

player will enter the pairing mode. 

2) 

Activate the Bluetooth function at the Bluetooth source. The DJP-900P is indicated by “

BLUETOOTH

“ on 

the display of the Bluetooth source. Pair the devices with each other. 

3) 

Now  play  music  at  the  Bluetooth  source  as  you  normally  would  and  the  sound  will  come  out  of  the 
amplifier. 

4) 

The Bluetooth source may also be operated via the audio player. To interrupt or continue the playback, 
press the button [► ].With the buttons [

] and [

] you can skip titles in forward or backward direction. 


Protective circuits 

The integrated protective circuits prevent damage to the speakers and the amplifier. To prevent distortions in 
case overload, the integrated level limiter reduces the input signal if the limit level is reached at the output. If 
one of the other protective circuits is activated, the speakers are electrically separated from the amplifier: 

• 

for a few seconds after switching-on until the speaker outputs are ready for operation 

• 

in case of overheating of the amplifier 

• 

in case of overload of the amplifier 

• 

in case of DC voltage at a speaker output


• 

in case of a short-circuit at a speaker output 

If the speakers are switched off during operation or if they are not ready for operation after switching on, the 
amplifier has to be switched off and the cause of the fault has to be removed. 


Summary of Contents for DJP-900P MK2

Page 1: ......

Page 2: ...n Sicherheit z B bei berlastung berhitzung und Kurzschluss Die Installation in ELA Anlagen muss durch Fachpersonal erfolgen Alle Funktionen und Merkmale im berblick Kompakter Stereo Mischverst rker 2...

Page 3: ...reproduziert werden Der Inhalt dieses Dokuments kann ohne vorherige Ank ndigung modifiziert werden wenn nderungen in Methodik Design oder Herstellung dies erforderlich machen Alle in diesem Dokument...

Page 4: ...sten ziehen erhitzen und nicht in die N he von Hitze oder K ltequellen bringen Bei Missachtung kann es zu Besch digungen der Netzleitung zu Brand oder zu t dlichen Stromschl gen kommen Die Kabeleinf h...

Page 5: ...bedienen die sich nicht mit dem Ger t auskennen Wenn Ger te nicht mehr korrekt funktionieren ist das meist das Ergebnis von unsachgem er Bedienung Bevor das Ger t eingeschaltet wird m ssen alle Fader...

Page 6: ...egler LOW und HIGH Regeln die B sse und H hen f r das Ausgangssignal 9 Regler MIC LEVEL Regelt die Mikrofonlautst rke 10 Eingang MIC IN Mikrofoneingangsbuchse Kombination XLR 6 3 mm Klinke R ckseite N...

Page 7: ...zum Anschluss Verwenden Sie bitte immer ausreichend dimensionierte Kabel min 2 5 mm Achten Sie beim Zusammenschalten mehrerer niederohmiger Lautsprecher darauf dass die Plus und Minusanschl sse richt...

Page 8: ...ntr ger um Sch den oder Datenverlust zu vermeiden Bluetooth Verbindung mit mobilen Ger ten herstellen Der Audioplayer verf gt ber einen Bluetooth Empf nger mit dem Musik kabellos von mobilen Ger ten w...

Page 9: ...6 Umweltschutz Informationen zur Entsorgung Bitte bergeben Sie das Ger t bzw die Ger te am Ende der Nutzungsdauer zur umweltgerechten Entsorgung einem rtlichen Recyclingbetrieb Ger te die mit diesem S...

Page 10: ...5 mm Stereoklinke Anschl sse Ausgang Master Cinch L R Lautsprecher Schraubklemmen Schaltung Class D Steuerelemente Netzschalter Quellen Umschalter Lautst rke Klangregler Betriebswahlschalter Stereo B...

Page 11: ...overload and overheating 100V PA installation must be made by skilled personnel only Overview of all features Compact stereo mixing amplifier 2 x 460 watts For quick access music playback control in...

Page 12: ...rt of this document may be reproduced in any form without the written permission of the copyright owner The contents of this document are subject to revision without notice due to continued progress i...

Page 13: ...er touch them with wet hands as this could lead to mortal electrical shock Never modify bend strain mechanically put pressure on pull or heat up the power cord Never operate next to sources of heat or...

Page 14: ...erating the device Most damages are the result of unprofessional operation Before the unit is switched on all faders and volume controls have to be set to zero or minimum position Turn the amplifier o...

Page 15: ...8 LOW and HIGH tone control Adjust the low and high frequencies for the output signal 9 MIC LEVEL control Adjusts the microphone volume 10 MIC IN input Microphone input jack combination XLR 6 3 mm ja...

Page 16: ...s for the connection Always use sufficiently dimensioned cables min 2 5 mm When interconnecting several speakers it is especially important to consider the correct connection to positive and negative...

Page 17: ...Bluetooth connection with mobile devices The audio player features a Bluetooth receiver allowing you to stream music wirelessly from your mobile devices such as smartphones tablets and notebooks 1 Pr...

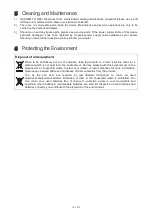
Page 18: ...isposal of old equipment When to be definitively put out of operation take the product to a local recycling plant for a disposal which is not harmful to the environment Devices marked with this symbol...

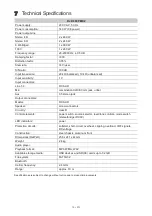
Page 19: ...3 5 stereo jack Output connectors Master RCA L R Speaker screw connectors Circuitry class D Control elements power switch source selector level tone controls mode switch stereo bridged 100V LED indic...

Page 20: ...Omnitronic is a brand of Steinigke Showtechnic GmbH Andreas Bauer Str 5 97297 Waldb ttelbrunn Germany D00138105 Version 1 0 Publ 26 04 2022...

Reviews: