background image

00030092.DOC, Version 1.0

17/27

If the device has been exposed to drastic temperature fluctuation (e.g. after transportation), do not switch it
on immediately. The arising condensation water might damage your device. Leave the device switched off
until it has reached room temperature.

Please make sure that there are no obvious transport damages. Should you notice any damages on the A/C
connection cable or on the casing, do not take the device into operation and immediately consult your local
dealer.

This device falls under protection-class II and features a protective insulation. The power plug must only be
plugged into a suitable outlet. The voltage and frequency must exactly be the same as stated on the device.
Wrong voltages or power outlets can lead to the destruction of the device and to mortal electrical shock.

Always plug in the power plug least. The power plug must always be inserted without force. Make sure that
the plug is tightly connected with the outlet.

Never let the power-cord come into contact with other cables! Handle the power-cord and all connections
with the mains with particular caution! Never touch them with wet hands, as this could lead to mortal
electrical shock.

Never modify, bend, strain mechanically, put pressure on, pull or heat up the power cord. Never operate next
to sources of heat or cold. Disregard can lead to power cord damages, fire or mortal electrical shock.

The cable insert or the female part in the device must never be strained. There must always be sufficient
cable to the device. Otherwise, the cable may be damaged which may lead to mortal damage.

Make sure that the power-cord is never crimped or damaged by sharp edges. Check the device and the
power-cord from time to time.

If extension cords are used, make sure that the core diameter is sufficient for the required power
consumption of the device. All warnings concerning the power cords are also valid for possible extension
cords.

Always disconnect from the mains, when the device is not in use or before cleaning it. Only handle the
power-cord by the plug. Never pull out the plug by tugging the power-cord. Otherwise, the cable or plug can
be damaged leading to mortal electrical shock. If the power plug or the power switch is not accessible, the
device must be disconnected via the mains.

If the power plug or the device is dusty, the device must be taken out of operation, disconnected and then be
cleaned with a dry cloth. Dust can reduce the insulation which may lead to mortal electrical shock. More
severe dirt in and at the device should only be removed by a specialist.

There must never enter any liquid into power outlets, extension cords or any holes in the housing of the
device. If you suppose that also a minimal amount of liquid may have entered the device, it must immediately
be disconnected. This is also valid, if the device was exposed to high humidity. Also if the device is still
running, the device must be checked by a specialist if the liquid has reduced any insulation. Reduced
insulation can cause mortal electrical shock.

There must never be any objects entering into the device. This is especially valid for metal parts. If any metal
parts like staples or coarse metal chips enter into the device, the device must be taken out of operation and
disconnected immediately. Malfunction or short-circuits caused by metal parts may cause mortal injuries.
Before the device is switched on all faders and volume controls have to be set to "0" or "min" position.

CAUTION:

 Turn the amplifier on last and off first!

Please note that damages caused by manual modifications on the device or unauthorized operation by
unqualified persons are not subject to warranty.
Keep away children and amateurs!

CAUTION:

 High volumes can cause hearing damage!

There are no serviceable parts inside the device. Maintenance and service operations are only to be carried
out by authorized dealers.

Summary of Contents for KVP-101

Page 1: ... Copyright Nachdruck verboten Reproduction prohibited Für weiteren Gebrauch aufbewahren Keep this manual for future needs BEDIENUNGSANLEITUNG USER S MANUAL KVP 101 Karaoke Video Player ...

Page 2: ......
Page 3: ... INTRODUCTION 16 2 SAFETY INSTRUCTIONS 16 3 OPERATING DETERMINATIONS 18 4 DESCRIPTION 18 4 1 Features 18 4 2 Front panel 19 4 3 Rear panel 19 5 INSTALLATION 20 5 1 Connection 20 5 2 Remote control 21 6 OPERATION 22 6 1 Setup 22 6 2 CD tray 22 6 3 LC display 22 6 4 Play Pause 22 6 5 Selecting a track 22 6 6 End of operation 22 6 7 General Setup Menu 23 6 8 Speaker Setup Menu 23 6 9 Dolby Setup Menu...

Page 4: ...s dass Sie sich für einen OMNITRONIC KVP 101 entschieden haben Wenn Sie nachfolgende Hinweise beachten sind wir sicher dass Sie lange Zeit Freude an Ihrem Kauf haben werden Nehmen Sie den KVP 101 aus der Verpackung 2 SICHERHEITSHINWEISE ACHTUNG Seien Sie besonders vorsichtig beim Umgang mit gefährlicher Netzspannung Bei die ser Spannung können Sie einen lebensgefährlichen elektrischen Schlag erhal...

Page 5: ...rlängerungsleitungen Gerät bei Nichtbenutzung und vor jeder Reinigung vom Netz trennen Fassen Sie dazu den Netzstecker an der Griffläche an und ziehen Sie niemals an der Netzleitung Ansonsten kann das Kabel und der Stecker beschädigt werden was zu tödlichen Stromschlägen führen kann Sind Stecker oder Geräteschalter z B durch Einbau nicht erreichbar so muss netzseitig eine allpolige Abschaltung vor...

Page 6: ... Die leeren Batterien können Sie fachgerecht im Elektrofachhandel in den dafür vorgesehenen Sammelbehältern entsorgen Achten Sie beim Einlegen der Batterien auf die richtige Polung Lassen Sie Batterien nicht offen herumliegen es besteht die Gefahr dass diese von Kindern oder Haustieren verschluckt werden Suchen Sie im Falle eines Verschluckens sofort einen Arzt auf Ausgelaufene oder beschädigte Ba...

Page 7: ... Open Close Taste können Sie das CD Schubfach öffnen und schließen Dazu muss sich der Audio Video Player im Pausemodus befinden 4 PLAY PAUSE TASTE Mit der Play Pause Taste können Sie die Wiedergabe starten und wieder stoppen Bitte beachten Sie die Hinweise unter 6 4 Play Pause 5 STOP TASTE Zum Stoppen der Wiedergabe 6 PREVIOUS TASTE Über die Previous Taste können Sie den gewünschten Titel auswähle...

Page 8: ...erden kann 5 Rackinstallation Dieser Audio Video Player ist für ein 19 Rack 483 mm vorgesehen Bei dem Rack sollte es sich um ein Double Door Rack handeln an dem sich sowohl die Vorder als auch die Rückseite öffnen lassen Das Rackgehäuse sollte mit einem Lüfter versehen sein Achten Sie bei der Standortwahl des Audio Video Players darauf dass die warme Luft aus dem Rack entweichen kann und genügend ...

Page 9: ...abel gelb rot weiß oder über ein S Video Kabel an den Audio Video Player an c Schließen Sie Ihre HiFi Anlage Aktivbox oder Verstärkeranlage über die Cinch Anschlüsse Left Right an Achten Sie darauf dass die rechts links Belegung Steckerfarbe rot weiß an beiden Geräten übereinstimmt Wählen Sie an Ihrem Fernseher den korrekten Videokanal und an Ihrer Hifi Anlage den passenden Eingang aus ...

Page 10: ...ete Schutzhandschuhe Legen Sie die Batterien ein und achten Sie auf die richtige Polung Setzen Sie den Batteriefachdeckel wieder auf und schieben Sie ihn zu bis er einrastet Bei längerer Nichtbenutzung entnehmen Sie bitte die Batterien um ein Auslaufen zu verhindern Im Interesse einer langen Batterielebensdauer sollten nur Alkaline Typen verwendet werden ACHTUNG Explosionsgefahr bei unsachgemäßem ...

Page 11: ...s ersten Titels kann durch Drücken der Play Pause Taste gestartet werden Im Play Modus läuft die Zeitanzeige im Display und die Play Pause LED leuchtet permanent 2 Wollen Sie die Wiedergabe unterbrechen drücken Sie Play Pause Taste und der Lesekopf bleibt an der entsprechenden Position stehen 6 5 Titelauswahl Über die PREVIOUS NEXT Tasten können Sie den gewünschten Titel auswählen Soll ein Titel v...

Page 12: ...ter TV Display Angle Mark ist ein Zusatzfeature das nicht alle DVDs bieten Stehen mehrere Aufnahmewinkel zur Verfügung können diese über die Angle Taste der Fernbedienung angewählt werden Unter Captions können Zusatztexte eingeblendet werden wenn die DVD das Feature Closed Caption CC unterstützt 6 8 Speaker Setup Menü ...

Page 13: ...nd RAW dass ein unmoduliertes Signal ausgegeben wird und PCM das Format Pulse Code Modulation ausgegeben wird 6 9 Dolby Setup Menü 6 10 Preferences Setup Menü Unter Video System können Sie PAL Europa MULTI universell oder NTSC USA einstellen Unter Parental Control können Sie den Grad der Kindersicherung einstellen 1 entspricht dem schärfsten Grad 8 enspricht keiner Kindersicherung Der Passwortschu...

Page 14: ...reten lesen Sie bitte nachfolgende Übersicht 1 Ist das Gerät korrekt angeschlossen 2 Stimmen die Einstellungen an Ihrer Endstufe und an Ihrem Mischpult 3 Haben Sie die Hinweise dieser Bedienungsanleitung beachtet SYMPTOM MÖGLICHE URSACHE LÖSUNG Gerät reagiert nicht beim Anschal ten Stromanschluss unterbrochen Überprüfen Sie den Netzstecker am Gerät Gerät liest nicht CD ist nicht richtig eingelegt ...

Page 15: ... über Cinch Buchsen Audio Ausgangspegel 2 Vp p Video Ausgangspegel 1 Vp p Maße 482 x 56 x 260 mm 19 Maße Gewicht 4 kg Zubehör EUROLITE VSD 104 Videoverteiler 1in4 Best Nr 81013010 EUROLITE VSD 108 Videoverteiler 1in8 Best Nr 81013015 EUROLITE AVS 402 Videoswitch 4in2 Best Nr 81013101 EUROLITE AVS 802 Videoswitch 8in2 Best Nr 81013102 Kabel AC 30 3 5mm Klinke stereo 2x Cinch Best Nr 30225151 Kabel ...

Page 16: ... the user manual from the Internet 1 INTRODUCTION Thank you for having chosen an OMNITRONIC KVP 101 If you follow the instructions given in this manual we are sure that you will enjoy this device for a long period of time Unpack your KVP 101 2 SAFETY INSTRUCTIONS CAUTION Be careful with your operations With a dangerous voltage you can suffer a dangerous electric shock when touching the wires This ...

Page 17: ...he device All warnings concerning the power cords are also valid for possible extension cords Always disconnect from the mains when the device is not in use or before cleaning it Only handle the power cord by the plug Never pull out the plug by tugging the power cord Otherwise the cable or plug can be damaged leading to mortal electrical shock If the power plug or the power switch is not accessibl...

Page 18: ...es are swallowed Leaking or damaged batteries can cause irritations when getting into contact with the skin In this case use appropriate protective gloves Make sure that the batteries cannot be short circuited thrown into the fire and be charged There is a danger of explosion Operate the device only after having familiarized with its functions Do not permit operation by persons not qualified for o...

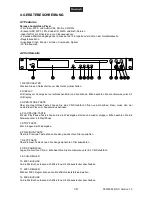
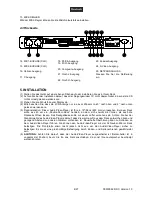
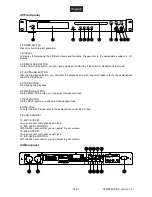
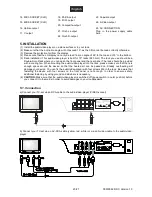
Page 19: ...top it again Please refer to the explanations under 6 4 Play Pause 5 STOP BUTTON For stopping the playback 6 PREVIOUS BUTTON Via the PREVIOUS button you can select the desired track 7 NEXT BUTTON Via the NEXT button you can select the desired track 8 DISC TRAY To enter the disc Please refer to the explanations under 6 2 CD tray 9 ECHO CONTROL 10 MIC1 SOCKET You can connect microphones with jack 11...

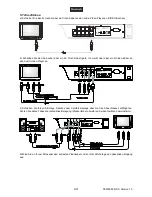
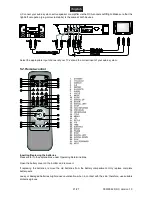
Page 20: ...or Rack where you can open the front panel and the rear panel The rack should be provided with a cooling fan When mounting the audio video player into the rack please make sure that there is enough space around the device so that the heated air can be passed on Steady overheating will damage your device You can fix the audio video player with four screws M6 in the rack Be aware that fastening the ...

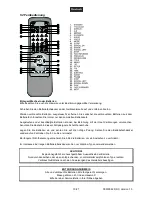
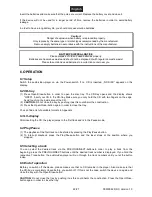
Page 21: ...V set and the correct input of your audio system 5 2 Remote control Inserting Replacing the batteries Please refer to the explanations under Operating Determinations Open the battery cover on the bottom and remove it If replacing the batteries remove the old batteries from the battery compartment Only replace complete battery sets Leaky or damaged batteries might cause cauterisation when in contac...

Page 22: ...e edge Avoid touching the inside area of the CD 2 CAUTION Do not close the tray by pushing it as this could harm the construction 3 Press the Open Close button again in order to close the tray You can find a list of available formats in Appendix 6 3 LC display After inserting the CD the player jumps to the first track and is in the Pause mode 6 4 Play Pause 1 The playback of the first track can be...

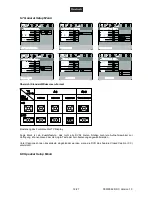
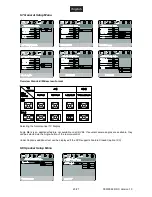
Page 23: ...formats under TV Display Angle Mark is an additional feature not available on all DVDs If several camera angles are available they can be selected via the Angle button of the remote control Under Captions additional text can be displayed if the DVD supports Feature Closed Caption CC 6 8 Speaker Setup Menu ...

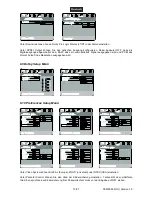
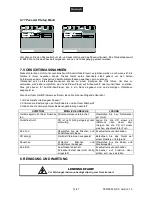
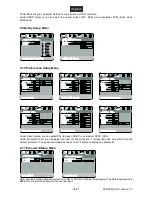
Page 24: ...enu Under Video System you can select PAL Europa MULTI universal or NTSC USA Under Parental Control you can adjust the level of child protection 1 corresponds with very strict 8 means without protection The password mode must be set to OFF before changing any parameter 6 11 Password Setup Menu Here you can set the password protection to ON or OFF and change the password The default password is 888...

Page 25: ...ation CD is badly positioned or dirty Reposition CD with label atop or clean with a dry and soft cloth No sound Check the mixer and amplifier connections Possibly exchange connections Does not read properly The device is exposed to vibrations Place the device on a more stable stand rack etc Pop noise Mixer or amplifier connections inapropriate Check cable and jack quality No picture Wrong connecti...

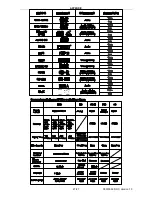
Page 26: ...tch 8in2 No 81013102 Cable AC 30 3 5mm jack plug stereo 2x RCA No 30225151 Cable SA 15 Scart cable 6x RCA 1 5m No 30209920 Cable CC 15 3x3 RCA plugs 1 5m HighEnd No 30209390 Cable CC 30 3x3 RCA plugs 3m HighEnd No 30209395 Cable CC 50 3x3 RCA plugs 5m HighEnd No 30209398 Akku Battery Micro AAA 1 2V 800mAh 1 P No 13108000 Akku Battery Micro AAA 1 2V 850mAh 1 P No 13108001 Akku Battery Micro AAA 1 2...

Page 27: ...APPENDIX 00030092 DOC Version 1 0 27 27 ...

Reviews: