background image

10304055_EF.DOC

6/20

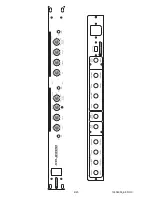
CONNECTION TO THE MAINS

Connect the OMNITRONIC XO-2300 only after having made sure that the right voltage (115/230 V) is
available. This device features a T 0,25 A, 250 V fuse.

STARTING UP

Make sure to power-up before your power amplifier is turned in order to avoid loud transients which could
damage your speakers or annoy your audience.

STARTERS' GUIDE TO CROSSOVERS

With an active crossover, you can separate the output signal of your mixer in different frequency ranges. In
this way you can define which signal portion will go to which amplifier.
The Omnitronic crossover can either be run in 2-way stereo or in 3-way mono mode.
Stereo operation is to be used in medium-sized and larger discotheques.
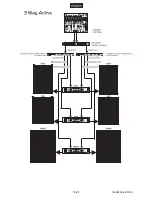
Mono-operation is to be used for larger PAs and requires 2 crossovers.
The crossover is delivered in 3-way mono mode. If you wish to run the crossover in 2-way stereo mode,
please press the stereo/mono switch.

OPERATION

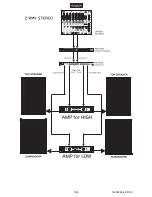
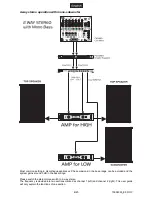
2-way stereo operation

Please switch the stereo/mono switch to 2-way stereo.
The frequency is devided into two sections marked as channel 1 (left) and channel 2 (right). This user guide
will only explain the functions of one section.

Example for setting the frequency ranges (depending on the system and the room):

Bass

Highs

100 Hz - 10 kHz

100 Hz - 10 kHz

The frequency can be adjusted via the Frequency-control, depending on the Range-switch between 100 Hz
and 1000 Hz or between 1 kHz or 10 kHz (LED lit).

With the Gain-control, you can boost the incoming signal level by up to 15 dB.

With the Low Level and High Level controls, you can attenuate the respective output level in order to avoid
amplifier distorsion.

In the stero mode, both channels should be adjusted the same way.

Summary of Contents for XO-2300

Page 1: ... S MANUAL MODE D EMPLOI XO 2300 Active crossover COPYRIGHT Nachdruck verboten All rights reserved Réproduction interdite Für weiteren Gebrauch aufbewahren Keep this manual for further needs Gardez ces instructions pour des utilisations ultérieurs ...

Page 2: ...10304055_EF DOC 2 20 ...

Page 3: ...ing chosen an OMNITRONIC XO 2300 You have acquired a reliable and powerful device If you follow the instructions given in this manual we can assure you that you will enjoy this device for many years Unpack your OMNITRONIC crossover Please make sure that there are no obvious transport damages Should you notice any damages on the A C connection cable or on the casing do not take the device into oper...

Page 4: ...vice technician before you operate it again Any damages caused by liquids having entered the device are not subject to warranty This device falls under protection class I The power plug must only be plugged into a protection class I outlet Never let the power cord come into contact with other cables Handle the power cord and all connections with the mains with particular caution Make sure that the...

Page 5: ...m only You can fix the crossover with four screws M6 in the rack When mounting the crossover into a rack please make sure that there is a proper air circulation Please make sure that there is enough space around the device so that the heated air can be passed on The rack should be provided with a cooling fan Be careful when mounting the crossover into the rack Put the heaviest devices into the low...

Page 6: ...or larger PAs and requires 2 crossovers The crossover is delivered in 3 way mono mode If you wish to run the crossover in 2 way stereo mode please press the stereo mono switch OPERATION 2 way stereo operation Please switch the stereo mono switch to 2 way stereo The frequency is devided into two sections marked as channel 1 left and channel 2 right This user guide will only explain the functions of...

Page 7: ...10304055_EF DOC 7 20 ...

Page 8: ...nces Phase erasions in the bass range can be avoided and the system gains around 3 dB in the bass range Please switch the stereo mono switch to 2 way stereo The frequency is devided into two sections marked as channel 1 left and channel 2 right This user guide will only explain the functions of one section ...

Page 9: ...switch the stereo mono switch to 3 way mono Please adjust the desired seperation frequency between mids and highs via the Frequency control mid high Make sure that the range switch is switched to 1 10 The frequency range ranges from 1 kHz to 10 kHz The portion of the mids can then be cut via the Mid Level control The portion of the highs can then be cut via the High Level control Example for setti...

Page 10: ...10304055_EF DOC 10 20 ...

Page 11: ...ove the old fuse from the fuseholder Step 3 Install the new fuse in the fuseholder Step 4 Replace the fuseholder in the housing Should you need any spare parts please use genuine parts If the power supply cable of this device becomes damaged it has to be replaced by a special power supply cable available at your dealer Should you have further questions please contact your dealer TECHNICAL SPECIFIC...

Reviews: