background image

4   Remote I/O

4 - 4

CompoNet Communications Unit User’s Manual (I582-E1)

4-2

Basic and Extended Speed I/O

Basic Speed I/O is a type of Remote I/O included as standard for CompoNet communications. 
This Remote I/O offers more limited functions than Extended Speed I/O.

Output Format (CS/CJ-series 

 Inverter)

Output Bit/Data Details

Precautions for Safe Use

For safety reasons, the FW, RV, and RS command must be output after the cause of fault/trip 
is removed.

Input Format (CS/CJ-series 

 Inverter)

4-2-1

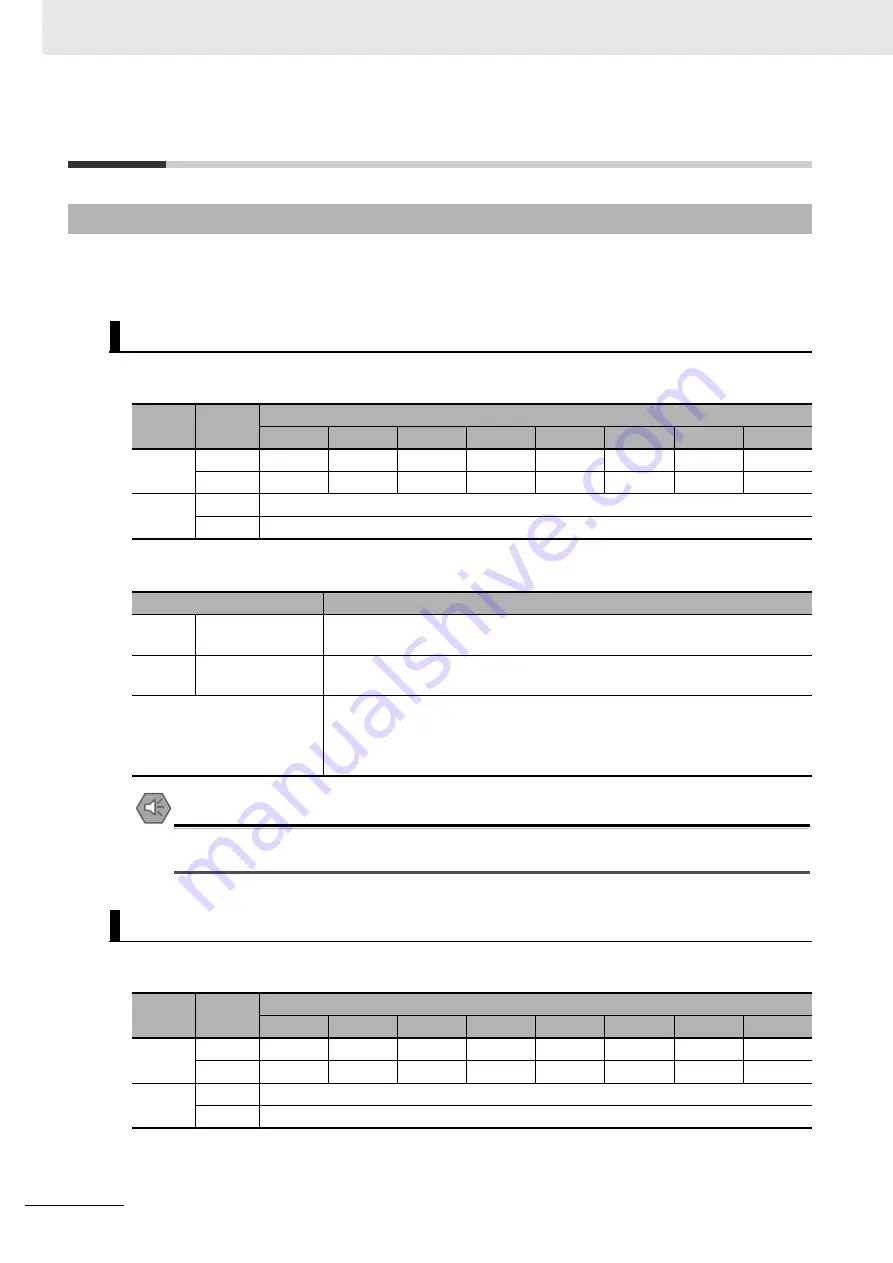
Basic Speed I/O (20/70)

Basic Remote Output  Assembly ID: 20 Dec (14 hex)

Word 

No.

Byte

No.

Bit Allocation

bit 7

bit 6

bit 5

bit 4

bit 3

bit 2

bit 1

bit 0

n

0

RS

FW

1

n + 1

2

Rotation Speed Reference (Low byte)

3

Rotation Speed Reference (High byte)

Name

Description

FW

Forward/Stop

0: Stop
1: Forward

RS

Reset

0: –
1: Fault reset

Rotation Speed Reference

If parameter P049 (Number of Poles for Rotation Speed Setting) is set appropri-
ately, the rotational speed unit is [min

-1

].

If parameter P049 (Number of Poles for Rotation Speed Setting) is set to 0, the 
frequency unit is [0.01 Hz].

Basic Remote Input  Assembly ID: 70 Dec (46 hex)

Word 

No.

Byte

No.

Bit Allocation

bit 7

bit 6

bit 5

bit 4

bit 3

bit 2

bit 1

bit 0

n

0

FWR

AL

1

n + 1

2

Rotation Speed Monitor (Low byte)

3

Rotation Speed Monitor (High byte)

Summary of Contents for 3G3AX-MX2-CRT-E

Page 1: ...Inverter MX2 RX Series CompoNet Communications Unit User s Manual I582 E1 04 3G3AX MX2 CRT E 3G3AX RX CRT E...

Page 2: ...ssumed with respect to the use of the information contained herein Moreover because OMRON is constantly striving to improve its high quality products the information contained in this manual is subjec...

Page 3: ...he equivalent Personnel in charge of introducing the control equipment Personnel in charge of designing the control systems Personnel in charge of installing and maintaining the control equipment Pers...

Page 4: ...ds Section 3 Network Startup This section describes inverter parameter settings and CompoNet set tings startup Section 4 Remote I O This section describes the configuration method and function of Remo...

Page 5: ...6 0 3 2 0 2 O I C 7 0 0 2 O I C 7 0 08 CIO 2008 Not allocatable CIO 2024 32 point Input Unit Node Address 8 1 3 2 3 Allocation to Special I O Unit Allocation Relay Area Communications Mode No 0 to 3...

Page 6: ...t to do and what not to do to ensure safe usage of the product Precautions for Correct Use Precautions for Correct Use Precautions on what to do and what not to do to ensure proper operation and perfo...

Page 7: ...ommunications Unit User s Manual I582 E1 1 2 3 4 5 6 A I 1 2 3 4 5 6 A I Outline CompoNet Communications Unit Mounting and Wiring Network Startup Remote I O Message Communications Troubleshooting Appe...

Page 8: ...2 1 Functions 1 5 1 2 2 Features 1 5 1 2 3 Configuration 1 9 1 2 4 Maximum Number of Inverter Connections 1 10 1 3 Specifications 1 11 1 4 Restrictions on Use 1 15 1 4 1 Supported Inverters 1 15 1 4...

Page 9: ...1 Remote I O Configuration 4 2 4 1 1 Remote I O Types 4 2 4 1 2 Remote I O Selection 4 3 4 2 Basic and Extended Speed I O 4 4 4 2 1 Basic Speed I O 20 70 4 4 4 2 2 Extended Speed I O 21 71 4 5 4 2 3 E...

Page 10: ...10 6 4 1 FINS Message Errors CS CJ series 6 10 6 4 2 Explicit Message Errors 6 11 6 5 Special I O Errors 6 12 6 6 Removing CompoNet Communications Unit 6 13 6 6 1 How to Remove CompoNet Communications...

Page 11: ...WILL SUITABLY MEET THE REQUIREMENTS OF THEIR INTENDED USE OMRON DISCLAIMS ALL OTHER WARRANTIES EXPRESS OR IMPLIED LIMITATIONS OF LIABILITY OMRON SHALL NOT BE RESPONSIBLE FOR SPECIAL INDIRECT OR CONSEQ...

Page 12: ...the products nor is it intended to imply that the uses listed may be suit able for the products Outdoor use uses involving potential chemical contamination or electrical interference or conditions or...

Page 13: ...our OMRON representative at any time to confirm actual specifications of purchased products DIMENSIONS AND WEIGHTS Dimensions and weights are nominal and are not to be used for manufacturing purposes...

Page 14: ...mation Meaning of Warning Indication Indicates an imminently hazardous situation which if not avoided is likely to result in serious injury or may result in death Additionally there may be severe prop...

Page 15: ...d ranges to cope with unintentional modification of input output data to control systems and equipment Checking the scope of data Checking validity of backups and preparing data for restore in case of...

Page 16: ...circuits may sometimes cause product damage or property damage Measures must be taken to prevent chips lead wire pieces or other metal waste from entering the product for example by installing a cove...

Page 17: ...In particular if configured to operate continu ously even in the event of a communications error the inverter may not stop resulting in equipment damage If the CompoNet Communications Unit is used in...

Page 18: ...nications error interrupting the communica tions function of other units Before participating in the network make sure that the communications configuration parameters are set properly Using a support...

Page 19: ...ations Unit is mounted on the inverter For the model 3G3AX RX CRT E the warning label is attached to the inverter Be sure to follow the instructions Note The appearance differs depending on the capaci...

Page 20: ...on of the inverter that can be used with the CompoNet Communi cations Unit Make sure that your inverter s unit version is 1 1 or later Make sure that your inverter is 3G3RX V1 series unit version 2 0...

Page 21: ...vice transac tion approval according to this law is required Therefore for the CompoNet Communications Unit which is an EC compliant product it is the user s responsibility to check and ensure the com...

Page 22: ...istered trademark of the Open DeviceNet Vendor Association ODVA Windows is a registered trademark of Microsoft Corporation in the United States and other countries Other company names and product name...

Page 23: ...s what you ordered In case that you find any problems with the product immediately contact your nearest local sales representative or OMRON sales office The product has a nameplate on its rear face Ch...

Page 24: ...ys keep this manual in a safe and handy place Manual Catalog Type Catalog Number 3G3AX MX2 CRT E 3G3AX RX CRT E User s Manual I582 E1 OMRON Corporation OMRON Corporation 2011 All Right Reserved CompoN...

Page 25: ...the related products Note For inverter operation please refer to the manual for the inverter Inverter Manuals Model and Name Catalog No Multi function Compact Inverter MX2 User s Manual I570 High func...

Page 26: ...bottom right hand corner of the front and back covers Example Revision Code Revision Date Revised Content 01 January 2012 Original production 02 April 2012 Corrected mistakes 03 October 2012 Descript...

Page 27: ...1 Outline of CompoNet Communications Unit 1 2 1 2 Overview of CompoNet Communications 1 5 1 2 1 Functions 1 5 1 2 2 Features 1 5 1 2 3 Configuration 1 9 1 2 4 Maximum Number of Inverter Connections 1...

Page 28: ...I O is a function that enables a Slave Inverter to exchange I O data with the CPU Unit that has no program running For example you can send inverter control inputs such as run stop auto matically from...

Page 29: ...ddress your inverter application Remote I O The Remote I O function is available in one of the following eight types Configure the function that suits your application Communications with CS CJ series...

Page 30: ...o monitor each inverter These communications functions also allow you to control whether to enable the control inputs from the communications line or the local control inputs The CompoNet Communicatio...

Page 31: ...0 I O points can be achieved at approximately 1 000 points per millisecond at 4 Mbps 1 This enables configuration of a CompoNet network system that replaces a system previously configured with Basic I...

Page 32: ...l in distributed devices such as sensors and other devices located over a wide area on conveyors or in warehouses Bit Slave Units are available in two types IP20 and IP54 There are five communications...

Page 33: ...ous value added infor mation in addition to the ON OFF signals I O data This enables preventive system maintenance by operation time monitoring and contact operation count monitoring and aids in quick...

Page 34: ...on is enabled only when a type of Remote I O that occupies IN 2 OUT 2 words is selected Stopping Communications at Communications Errors The DIP switches on the front of the Master Unit can be set to...

Page 35: ...k Line Subtrunk Line Subtrunk Line Subbranch Line Subtrunk Line Subtrunk Line Trunk Line Terminating Resistor Terminating Resistor Terminating Resistor Terminating Resistor Terminating Resistor Termin...

Page 36: ...I O Unit Alloca tion Relay Area Word Slave 8 words Word Slave 8 words 4 1 1 Communications Mode No 1 Word Slave IN 16 OUT 16 node addresses IN 256 OUT 256 points Word Slave 4 Word Slave 16 words Word...

Page 37: ...to 55 Hz Dielectric strength 500 VAC between isolated circuits Location of use 1 000 m above sea level indoor No corrosive gas or dust EC Directives EN61800 3 2004 2004 108 EC Second environment Cate...

Page 38: ...D Code Name of EDS File 3G3MX2 AB001 3G3MX2 A2001 3G3AX MX2 CRT AB001_A2001 1840 3G3AX MX2 CRT AB001_A2001 eds 3G3MX2 AB002 3G3MX2 A2002 3G3AX MX2 CRT AB002_A2002 1841 3G3AX MX2 CRT AB002_A2002 eds 3G...

Page 39: ...3G3AX RX CRT A2450 V1 2108 3G3AX RX CRT A2450 V1 eds 3G3RX A2550 3G3AX RX CRT A2550 V1 2109 3G3AX RX CRT A2550 V1 eds 3G3RX A4004 3G3AX RX CRT A4004 V1 2122 3G3AX RX CRT A4004 V1 eds 3G3RX A4007 3G3AX...

Page 40: ...ed on RX series Inverter 2 Dimension p gives the increase in the depth of the RX series Inverter when the CompeNet Communications Unit is mounted Dimensions of CompoNet Communications Unit Item Dimens...

Page 41: ...type label Please check that your inverter type label indicates Ver 2 0 or later in the position displayed in this illustration The MX2 series Inverters provide a safety function to perform a safe sto...

Page 42: ...tegrator editing of device parameters using the EDS file is disabled Because the Light Load mode disallows writing of some parameter data you cannot use the EDS file to download parame ters If you exe...

Page 43: ...nit Component 2 2 2 1 1 Name and Setting of Each Component 2 2 2 1 2 LED Indicators 2 4 2 1 3 Rotary Switches 2 5 2 2 Installation 2 6 2 2 1 Mounting Procedure of CompoNet Communications Unit on MX2 s...

Page 44: ...ons Unit User s Manual I582 E1 2 1 Name and Setting of Each CompoNet Communications Unit Component 2 1 1 Name and Setting of Each Component A Inverter connector B LED indicators MS NS C Warning label...

Page 45: ...h for the distance to the inverter s ground termi nal and the size of terminal block and crimp the crimp terminal For the position of ground terminal and the size of terminal block refer to Arrangemen...

Page 46: ...Communications Unit parameters are out of range or cannot be read CompoNet Communications Unit detected consecutive communication errors Not lit Power is not supplied to CompoNet Communications Unit...

Page 47: ...number between 0 and 63 Set the 10s digit on the left rotary switch and set the 1s digit on the right rotary switch The setting of the switches is updated when the Unit power supply is cycled Additio...

Page 48: ...with a mounted CompoNet Communications Unit do not hold the CompoNet Communications Unit Do not remove the cover of the CompoNet Communications Unit Tighten all unit fixation screws to the specified...

Page 49: ...close to power lines During installation wiring and network setting on the CompoNet Communications Unit please refer to applicable sections of this manual to ensure the correct connection and configu...

Page 50: ...ter with a mounting screw 4 If removed in Step 2 reinstall the terminal cover and tighten the screw 5 Push the CompoNet Communications Unit into the previous location of the CompoNet Communica tions U...

Page 51: ...rner of the Compo Net Communications Unit housing to ensure proper connection of the CompoNet Communications Unit connector 7 Check that there is no gap between the top edges of the CompoNet Communica...

Page 52: ...stance to the inverter s ground termi nal and the size of terminal block and crimp the crimp terminal For the position of ground terminal and the size of terminal block refer to Arrangement of Main Ci...

Page 53: ...over Make sure no sharp edges remain 3 Reinstall the front cover and tighten the screws 4 Connect the connector of inverter connection PCB of CompoNet Communications Unit to the connector of inverter...

Page 54: ...er of inverter As shown with A Precautions for Safe Use When mounting the CompoNet Communications Unit be sure that the flat cable is not pinched When mounting the CompoNet Communications Unit be care...

Page 55: ...Unit Be careful not to overtighten the screw 8 Connect the grounding cable of the CompoNet Communications Unit to the ground terminal of the inverter Make sure that the ground terminal is marked with...

Page 56: ...ompoNet Communications Unit Keep the spacer cover you removed in a safe place 11 Connect the Digital Operator via a straight Ethernet cable to the RJ45 connector in the inverter 12 Set the required in...

Page 57: ...le provide a suffi cient allowance to prevent it from being pulled or bent You can use several types of communications cables for CompoNet network Choose a flat cable or round cable that fits your app...

Page 58: ...2 CompoNet Communications Unit Mounting and Wiring 2 16 CompoNet Communications Unit User s Manual I582 E1...

Page 59: ...DS File Installation 3 14 3 2 2 CompoNet Communications Network Configuration 3 14 3 2 3 Allocation to Special I O Unit Allocation Relay Area Communications Mode No 0 to 3 3 16 3 2 4 Allocation Using...

Page 60: ...ation can be controlled using the Basic Speed I O or Extended I O function included as standard in CompoNet To set the acceleration deceleration time however you need to use OMRON s unique Extended Sp...

Page 61: ...ombination of output and input that fits your application requirements The settings for Basic Speed I O Extended Speed I O and Extended Speed and Acceleration Control are shown below Basic Speed I O P...

Page 62: ...Error Detec tion Timer Setting Monitors data exchange between the inverter and the Com poNet Communications Unit Normally this parameter is not required 0 to 9999 in units of 0 01 s Default 1 00 0 Di...

Page 63: ...es Inverter to enable the changes Precautions for Correct Use Precautions for Correct Use Be sure that the POWER LED indicator is not lit when cycling the power supply of the MX2 RX series Inverter No...

Page 64: ...Control Extended Control I O or Extended Control I O and Multi function I O Monitor Extended Speed and Torque Control P046 02 Extended Control I O P046 04 Extended Control I O and Multi function I O...

Page 65: ...ommunications Error Sets the inverter operation if an error such as a network error occurs 00 Trip Default 01 Trip after deceleration stop 02 Ignore 03 Free run stop 04 Deceleration stop P048 Operatio...

Page 66: ...the MX2 RX series Inverter User s Manual Configure the torque control parameters as follows if you want to use the Torque Reference or Torque Bias Mode on CompoNet Remote I O Torque Control Parameter...

Page 67: ...he rotary switches on the front of the Unit to set the node address in the range 0 to 63 Setting the rotary switches on the front of the CompoNet Communications Unit to 64 to 99 enables inverter param...

Page 68: ...on Timer Setting Monitors data exchange between the inverter and the Com poNet Communications Unit Normally this parameter is not required 0 to 9999 in units of 0 01 s Default 1 00 0 Disabled P045 Ope...

Page 69: ...ngs Frequency Reference RUN Command Settings Parameter Description Setting A001 1st Frequency Reference Selection 03 Modbus communication Modbus RTU A002 1st RUN Command Selection Parameter Descriptio...

Page 70: ...ocated to general purpose output word 2 P162 Output Register 3 Contents Modbus register allocated to general purpose output word 3 P163 Output Register 4 Contents Modbus register allocated to general...

Page 71: ...ion Set these parameters to use the inverter inputs as the PLC s inputs C002 Multi function Input 2 Selection C003 Multi function Input 3 Selection C004 Multi function Input 4 Selection C005 Multi fun...

Page 72: ...nstalled on a CX Integrator with a version lower than the following version Please update CX ONE or CX Integrator CX One Ver 4 26 CX Integrator Ver 2 55 CompoNet communications network can be configur...

Page 73: ...g with the I O area occupied by another Slave that occupies more than one node address Bit Slaves can be used only in communications mode 3 or 8 where Bit Slave allocation areas are supported An examp...

Page 74: ...supply of the inverter Then power on all network components Master Unit other Slaves communications power supply etc 3 Once the inverter s and all network components are powered on check that the Com...

Page 75: ...Connection Information window right click the CompoNet Communications Unit under the target PLC and select Connect 4 When connected to the Master Unit the Transfer dialog box is displayed prompting y...

Page 76: ...iguration window double click the Master Unit or right click and select Parameter Edit The Master Unit s Parameter dialog is displayed 7 On the General tab of the Parameter Configuration dialog box se...

Page 77: ...fline and power off the CompoNet Communications Unit CS CJ series 12 Power on the inverter s and configure the following settings according to 3 1 Inverter Configuration on page 3 2 Set the node addre...

Page 78: ...or a third party Master configure the network according to the Master Unit s configuration steps Additional Information The Master Unit checks the connection information on each slave and automaticall...

Page 79: ...h the REGA switch on the front of the Master Unit set to ON cycle the power supply of the inverter Then power on all network components Master Unit other Slaves and Communications power supply Then to...

Page 80: ...l I582 E1 6 In the Network Configuration window the network configuration transferred to the PC is displayed 7 In the Network Configuration window double click the Master Unit or right click and selec...

Page 81: ...urn to the General tab 12 On the General tab click the Transfer PC to Unit button The settings are now transferred to the Master Unit 13 At the end of the configuration steps restart the network cycle...

Page 82: ...lue double click the Value area for that parameter However you cannot edit the value of any read only parameter Upload inverter parame ters When CX Integrator is connected online clicking the Transfer...

Page 83: ...pload download process is interrupted try to avoid the following causes If these are hardly unavoidable change to editing parameters from CX Drive according to 3 4 Editing Parameters with CX Drive on...

Page 84: ...rom the Parameter Dialog check that the Remote I O setting parameter P046 Assembly Instance No is set correctly If a different parameter setting is transferred the number of words occupied by the Comp...

Page 85: ...B082 1st Frequency Lower Limit A062 Starting Frequency B082 Output Frequency Setting F001 1st Multi step Speed Reference 0 A020 Starting Frequency B082 Jogging Frequency A038 Output Frequency Setting...

Page 86: ...ection describes how to connect CX Drive via CompoNet to your inverter and provides a func tional outline of CX Drive For the functional details of CX Drive refer to the CX Drive Operation Manual Cat...

Page 87: ...In the Drive Type Settings window select the Installation type Option Voltage Class and Maxi mum Motor Capacity and in the Option Board Type section select CRT CompoNet Communi cations Unit After sel...

Page 88: ...roperties button and configure the following settings Device Type Select the model of the CPU Unit to which CX Drive is connected Network Type Select the network via which CX Drive is connected to the...

Page 89: ...nd select Drive Autodetect Options to open the Options window 2 On the Autodetect tab in the Drive Type Selection section select Inverter by clicking the Inverter check box Then in the Connection Type...

Page 90: ...t each node address of the CompoNet Master Unit and the inverter CompoNet Communications Unit Gateway PLC Click the Settings button in the Gateway PLC section and select the Device Type and the Networ...

Page 91: ...ftware versions match Software number of the inverter set in the CX Drive project Software number of the inverter actually connected If you cannot connect to the inverter due to a software number mism...

Page 92: ...ace to display only those parameters associated with it Edit the value set for each parameter in the Value field of the parameter list When a parameter is selected the functional description of that p...

Page 93: ...utputs Displays the current ON OFF status of digital outputs including the output settings of the connected inverter Inverter Status Drive Status 1 and Drive Status 12 Displays the status values of dx...

Page 94: ...3 Network Startup 3 36 CompoNet Communications Unit User s Manual I582 E1...

Page 95: ...xtended Speed and Acceleration Control 110 111 4 7 4 3 Remote I O with Torque Reference Support 4 10 4 3 1 Torque Control Configuration 4 10 4 3 2 Extended Speed and Torque Control 123 173 4 11 4 3 3...

Page 96: ...rence function Extended Control I O OMRON s unique Remote I O not defined in the CompoNet specifica tions This Remote I O is optimized for the input output function of inverters You can select the des...

Page 97: ...n the Remote I O is not updated even if parameter P046 is changed To update the Remote I O setting cycle the inverter s input power supply Using the CompoNet Communications Unit disables the inverter...

Page 98: ...t Assembly ID 20 Dec 14 hex Word No Byte No Bit Allocation bit 7 bit 6 bit 5 bit 4 bit 3 bit 2 bit 1 bit 0 n 0 RS FW 1 n 1 2 Rotation Speed Reference Low byte 3 Rotation Speed Reference High byte Name...

Page 99: ...peed unit is min 1 If parameter P049 Number of Poles for Rotation Speed Setting is set to 0 the frequency is monitored in units of 0 01 Hz 4 2 2 Extended Speed I O 21 71 Standard Remote Output Assembl...

Page 100: ...n RVR During reverse operation 0 During forward run Stopping 1 During reverse run IRDY Operation ready 0 Not ready 1 Ready CFN Ctrl from Net 0 Follow the setting of parameter A002 1 CompoNet reference...

Page 101: ...FW Forward Stop 0 Stop 1 Forward RV Reverse Stop 0 Stop 1 Reverse RS Reset 0 1 Fault reset FRS Free run Stop 0 Ignore 1 Free run stop CTR Net Ctrl 0 Follow the setting of parameter A002 1 Follow the...

Page 102: ...MI6 MI5 MI4 Name Description FWR During forward operation 0 During reverse run Stopping 1 During forward run RVR During reverse operation 0 During forward run Stopping 1 During reverse run AL Alarm ou...

Page 103: ...7 Restart Retry in process 8 Waiting for restart retry 10 Fault Trip 11 Undervoltage condition Rotation Speed Monitor If parameter P049 Number of Poles for Rotation Speed Setting is set appropri atel...

Page 104: ...of the motor parameters on the connected motor according to the MX2 RX series Inverter User s Manual After auto tuning save the motor parameters into inverter 3 Configure the torque control Configure...

Page 105: ...hex Word No Byte No Bit Allocation bit 7 bit 6 bit 5 bit 4 bit 3 bit 2 bit 1 bit 0 n 0 REF CTR RS RV FW 1 n 1 2 Rotation Speed Reference Low byte 3 Rotation Speed Reference High byte n 2 4 Torque Refe...

Page 106: ...During forward run RVR During reverse operation 0 During forward run Stopping 1 During reverse run IRDY Operation ready 0 Not ready 1 Ready CFN Ctrl from Net 0 Follow the setting of parameter A002 1...

Page 107: ...ation Speed Reference Low byte 3 Rotation Speed Reference High byte n 2 4 Torque Reference Low byte 5 Torque Reference High byte n 3 6 Torque Compensation Bias Low byte 7 Torque Compensation Bias High...

Page 108: ...bit 5 bit 4 bit 3 bit 2 bit 1 bit 0 n 0 AL WR IRDY FA1 RVR ZS FWR 1 MO4 MO3 MO2 MO1 MR CFN n 1 2 Rotation Speed Monitor Low byte 3 Rotation Speed Monitor High byte n 2 4 Torque Actual Low byte 5 Torqu...

Page 109: ...onitored in units of 0 01 Hz Torque Actual Actual torque monitor Unit Output Current Monitor Unit 0 1 A 4 3 4 Extended Control I O and Multi function I O Monitor 101 153 Extended Control I O Input Mul...

Page 110: ...the rotational speed unit is min 1 If parameter P049 Number of Poles for Rotation Speed Setting is set to 0 the frequency is monitored in units of 0 01 Hz Torque Actual Actual torque monitor Unit Out...

Page 111: ...the Function Code In addition you can also read write data to from more than one register by switching the Function Code Register No at fixed intervals using a host program In this case on the host c...

Page 112: ...Write data 1 word 03 Read data 1 word 50 Write data Consecutive 2 words 43 Read data Consecutive 2 words Register No Write the Register No corresponding to the inverter parameter Data 0 1 Set the data...

Page 113: ...input and output bit information Register No 1F01 hex for CompoNet output Inverter control input Error Code Name Description 01 hex Function Code Error A code other than 03 10 43 or 50 hex is set as f...

Page 114: ...Dir Rotation direction 0 Forward 1 Reverse AL Alarm output IRDY Operation ready FA3 Setting frequency only RUN During RUN OTQ Overtorque Undertorque FA1 Constant speed reached UV During undervoltage...

Page 115: ...s which are allocated to the output area of Remote I O If you set any of the following write prohibited parameters an error will be detected in the CompoNet Communications Unit In the output area of R...

Page 116: ...ward Stop or Reverse Stop must be input to the CompoNet Communications Unit in the following timing after communications are established Upon establishment of communications the CompoNet Communication...

Page 117: ...e CompoNet Communications Unit may not recognize the RUN command OFF state if nor mal communications are blocked due to noise or other problems since establishment of communications In this case take...

Page 118: ...4 Remote I O 4 24 CompoNet Communications Unit User s Manual I582 E1...

Page 119: ...en to Issue Read an Explicit Message 5 5 5 3 Outline of Message Function and Response 5 7 5 4 Parameter Read Write Class 64 hex 5 10 5 4 1 Supported Service Codes 5 10 5 4 2 Parameter Data Size 5 10 5...

Page 120: ...age It shows that this frame is for an Explicit Message request or a response to an Explicit Message This segment is set by CompoNet transparently to the user Node Address Request Set the node address...

Page 121: ...g an explicit message S First Word Address of Command Storage Area Set the first word address of the command data to transfer to the CompoNet Master Unit Previously set the data to transfer to consecu...

Page 122: ...ingle word 16 bit or double word 32 bit data Most inverter parameters take single word data except for the frequency reference output frequency and other parameters that take single word data Example...

Page 123: ...input conditions for issuing the CMND instruction is shown below Note that the CMND instruction can be executed only once per communications port Do not execute the CMND instruction when the Network C...

Page 124: ...ts Operation Manual W456 When to Read Response to an Explicit Message Flags Related to CompoNet Communications Type Flag Name Address Description Word Bit CS CJ series Unit s Flag Network Communi cati...

Page 125: ...as word in the Size column of the tables provided in A 1 General Object Specifications on page A 2 and A 2 AC Drive Object Specifications on page A 11 create attach ment data or read response data in...

Page 126: ...x which indicates an error will be returned Service Codes Class ID Command Specify the destination Class ID for the Explicit Message Instance ID Command Specify the destination Instance ID for the Exp...

Page 127: ...fi cations to a Slave Unit and receives a response For the Explicit Message Send Command unlike other FINS commands specify the CompoNet Master Unit as the destination of the control code in the CMND...

Page 128: ...s Most inverter parameters take single word data although some parameters take double word data Be sure to handle data as single word data even if it is a small value such as 0 or 1 Double word Parame...

Page 129: ...Write data is calculated according to the rules below and sent received as a hexa decimal value The set value is divided by the data resolution and converted into a hexadecimal value Precautions for...

Page 130: ...s a limitation in the number of overwrites approximately 100 000 times frequent use of the ENTER command may reduce the life expectancy of the inverter To specify each parameter of the register object...

Page 131: ...V 000D D00000 MOV 000A D00001 021 MOV 0001 D00002 021 MOV 05FE D00003 021 MOV 0000 D00004 021 Sets D10004 to 03BC Command data Shifts contents of word address 0000 one bit to left to turn 000001 ON Sh...

Page 132: ...ject are saved temporary in the inverter memory Be sure to execute the ENTER command at the end of the writing sequence to store the values in EEPROM Function Code F001 cannot be written using the Fun...

Page 133: ...hex Command Response Instance and Attribute are determined as Value 15 P x 1000 060 15060 which is converted to 3AD4 hex Please note the swapping of the byte order when setting the decimal value 12800...

Page 134: ...5 Message Communications 5 16 CompoNet Communications Unit User s Manual I582 E1...

Page 135: ...1 Error Codes Related to CompoNet Communications Error 6 5 6 3 2 Error Codes Related to CompoNet Communications Unit 6 7 6 3 3 Parameter Setting Error in CompoNet Communications Unit 6 8 6 4 Errors R...

Page 136: ...r according to the instructions provided in this section reset the inverter Example of LED indicators on MX2 series Precautions for Correct Use Precautions for Correct Use Do not clear the trip state...

Page 137: ...ult Hardware error occurred in CompoNet Communica tions Unit Unsupported inverter ver sion is used Cycle inverter s input power supply Replace CompoNet Communi cations Unit Replace the inverter with a...

Page 138: ...cupied by input output assembly in registration table correct it to match Remote I O setting and restart CompoNet Communications Unit 1 Power on Master Unit Red Lit Fatal communi cations error CompoNe...

Page 139: ...S NS LED indicators and the error code The table below shows the error and the corrective action 6 3 1 Error Codes Related to CompoNet Communications Error MX2 Error Codes Indicators RX Error Codes In...

Page 140: ...ster Unit does not send IDLE messages Connection timeout was detected Check and correct the following items Are wires connected to proper pins of CompoNet connector Are there any short circuits or lin...

Page 141: ...tions Unit is mounted properly and connector is sufficiently inserted and then restart CompoNet Communica tions Unit If problem persists replace CompoNet Communi cations Unit Inverter does not sup por...

Page 142: ...word Modbus register If so are high and low words specified in sequence by two con secutive parameters Is a specific Modbus register specified twice in output parameters P160 to P167 Is one of paramet...

Page 143: ...ter Setting Error in CompoNet Communications Unit Inverter settings are not compatible with this version of Compo Net Communications Unit Check P046 value is in range 0 to 7 and restart CompoNet Commu...

Page 144: ...tination node correctly to the net work 0204 Destination node is busy Destination node receives too much data Increase number of resends or review sys tem so that the destination node does not receive...

Page 145: ...code and resend 09FF Invalid Attribute was detected Correct Attribute value and resend 0CFF Requested service cannot be exe cuted in object mode state Stop inverter and resend 0EFF Request for changin...

Page 146: ...ications Unit and inverter Check if CompoNet Communica tions Unit is mounted properly if connector is sufficiently inserted If problem persists replace Compo Net Communications Unit 21 hex Data Settin...

Page 147: ...s configuration parameters are set properly Using a support tool to write all inverter parameters causes the CompoNet configuration parameters to be overwritten Before reconnecting to CompoNet make su...

Page 148: ...2 6 1 Loosen the CompoNet Communications Unit mounting screw 2 Pull the CompoNet Communications Unit straight out of the inverter while pushing down on the indi cated sides to release the snap fits 3...

Page 149: ...for replacement or inspection follow the steps below For the mounting steps refer to 2 2 Installation on page 2 6 1 Remove the Digital Operator by pushing the lip on the top 2 Remove the terminal cove...

Page 150: ...nications Unit by the indicated step Be careful not to stress the flat cable a Push up the CompoNet Communications Unit to have a space under the bottom b While pushing it up draw out the CompoNet Com...

Page 151: ...x A 4 A 1 3 Assembly Object Class 04 hex A 5 A 1 4 Connection Object Class 05 hex A 6 A 1 5 Discrete Input Point Object Class 08 hex A 7 A 1 6 Discrete Output Point Object Class 09 hex A 8 A 1 7 Unit...

Page 152: ...roduct Code Depends on the inverter model Refer to TableA 3 or A 4 Yes No UINT 04 Revision Indicates overall software revisions for the CompoNet Communications Unit and the inverter Note that this Att...

Page 153: ...T AB001_A2001 1840 3G3AX MX2 CRT AB001_A2001 eds 3G3MX2 AB002 3G3MX2 A2002 3G3AX MX2 CRT AB002_A2002 1841 3G3AX MX2 CRT AB002_A2002 eds 3G3MX2 AB004 3G3MX2 A2004 3G3AX MX2 CRT AB004_A2004 1842 3G3AX M...

Page 154: ...ds 3G3RX A2370 3G3AX RX CRT A2370 2107 3G3AX RX CRT A2370 eds 3G3RX A2450 3G3AX RX CRT A2450 2108 3G3AX RX CRT A2450 eds 3G3RX A2550 3G3AX RX CRT A2550 2109 3G3AX RX CRT A2550 eds 3G3RX A4004 3G3AX RX...

Page 155: ...ction as Special I O Output 00 00 00 00 00 00 00 00 Yes Yes byte x 8 65 03 Remote I O Data Same function as Extended Control I O Output 00 00 00 00 00 00 00 00 Yes Yes byte x 8 6E 03 Remote I O Data S...

Page 156: ...Status of the instance 1 Yes No USINT 02 Instance Type Type of the instance 1 Yes No USINT 03 Transport Class Trig ger Defines the communications type by code 83 hex Yes No byte 07 Produced Connection...

Page 157: ...on Default Con nection Path Yes Yes ARRAY 0F Consumed Connection Path Length Number of bytes for the con sumed connection path 3 Yes No UINT 10 Consumed Connection Path Specifies the allocation for t...

Page 158: ...ion output terminals P1 to P5 and the relay output terminal A 1 6 Discrete Output Point Object Class 09 hex Supported Service Codes Table A 11 Discrete Output Point Object Supported Service Codes Serv...

Page 159: ...it Parameter Object Supported Service Codes Service Code No hex Service Description 0E Reads Attribute data 10 Writes Attribute data Object Details Table A 14 Unit Parameter Object Object Details Inst...

Page 160: ...Range Default Read Write Size 01 01 MAC ID Node address N of CompoNet Communications Unit 0 63 0 Yes No USINT 02 Baud Rate Baud rate of CompoNet Com munications Unit 0 93 75 kbits s 1 Reserved 2 1 5 M...

Page 161: ...nous motor d060 3 7 Squirrel cage induc tion motor d060 3 7 Yes Yes USINT 06 Motor Rated Cur rent Motor rated current Unit 0 1 A Depends on the inverter type Yes Yes UINT 07 Motor Rated Volt age Motor...

Page 162: ...ce hex Attribute hex Name Description Setting Range Default Read Write Size 01 03 Forward Stop 0 Stop 1 Forward 0 Yes Yes BOOL 04 Reverse Stop 0 Stop 1 Reverse 0 Yes Yes BOOL 05 Net Control 0 Follow t...

Page 163: ...Inverter s External trip EXT input 0 Yes Yes BOOL 12 Force Status Communica tions External trip Input Status External trip EXT input sta tus 0 Communicating 1 Fault detected 0 Yes No BOOL 14 Net Idle...

Page 164: ...Power section E35 Thermistor error 7300 Sensor E36 Braking error 9000 External malfunction E37 Emergency disconnect 9000 External malfunction E38 Low speed overload protection 2221 Continuous overcur...

Page 165: ...reference Yes No BOOL 04 Net Reference Speed reference selection 0 Follow the setting of param eter A002 1 Network control 0 1 0 Yes Yes BOOL 06 Drive Mode 0 Vendor specific mode 0 0 Yes No USINT 07...

Page 166: ...Speed reference input selec tion monitor 0 Follow the setting of param eter A002 1 CompoNet 0 1 0 Yes Yes BOOL 77 Torque Actual Rel Actual torque monitor Unit Yes Yes INT 78 Torque Ref Rel Reference t...

Page 167: ...I 1 I CompoNet Communications Unit User s Manual I582 E1 Index...

Page 168: ...7 1 16 CX One 3 14 D Device Parameters 1 16 Digital Operator 3 2 3 6 3 9 Dimensions of CompoNet Communications Unit 1 14 Discrete Input Point Object A 7 Discrete Output Point Object A 8 Download 3 24...

Page 169: ...nce 4 5 RS 4 5 RV 4 5 RVR 4 6 WR 4 6 F FINS command 5 3 FINS Message Errors 6 10 Flexible Format 1 3 3 2 4 2 4 20 Flexible Format I O Allocation 4 20 Frequency Reference 4 17 Frequency reference selec...

Page 170: ...nse to an Explicit Message 5 6 REF 3 5 Register No 4 17 4 18 Registration Tables 1 8 3 20 Remote I O 1 3 Reset Mode 3 4 RJ45 Connector 1 16 rotary switches 2 5 RS485 Communications 1 16 RUN Command 4...

Page 171: ......

Page 172: ...1 847 843 7900 Fax 1 847 843 7787 OMRON CHINA CO LTD Room 2211 Bank of China Tower 200 Yin Cheng Zhong Road PuDong New Area Shanghai 200120 China Tel 86 21 5037 2222 Fax 86 21 5037 2200 OMRON EUROPE...

Reviews: