SIEPCYEUOQ2V01A Q2V Technical Manual
79
WARNING!
Electrical Shock Hazard. Do not remove covers or touch circuit boards while the drive is energized. If you touch the
internal components of an energized drive, it can cause serious injury or death.
NOTICE:
Do not let wire shields touch other signal lines or equipment. Insulate the wire shields with electrical tape or shrink
tubing. If you do not insulate the wire shields, it can cause a short circuit and damage the drive.
Note:
•
Use a Class 2 power supply to connect external power to the control terminals. If the power supply for peripheral devices is incorrect, it
can cause a decrease in drive performance.
•
Connect the shield of shielded cable to the applicable ground terminal. Incorrect equipment grounding can cause drive or equipment
malfunction from electrical interference.
•
Isolate wiring for contact output terminals NO, NC, CM, DO1, O1C, DO2, and O2C from other control circuit wiring. The drive and
connected equipment will malfunction or the drive can trip because of incorrect wiring.
•
Isolate control circuit wiring from main circuit wiring (terminals R/L1, S/L2, T/L3, L/L1, N/L2, B1, B2, U/T1, V/T2, W/T3, -, +1, +2)
and other high-power wiring. If control circuit wiring is adjacent to main circuit wiring, it can cause incorrect operation of the drive
and equipment from electrical interference.
1.
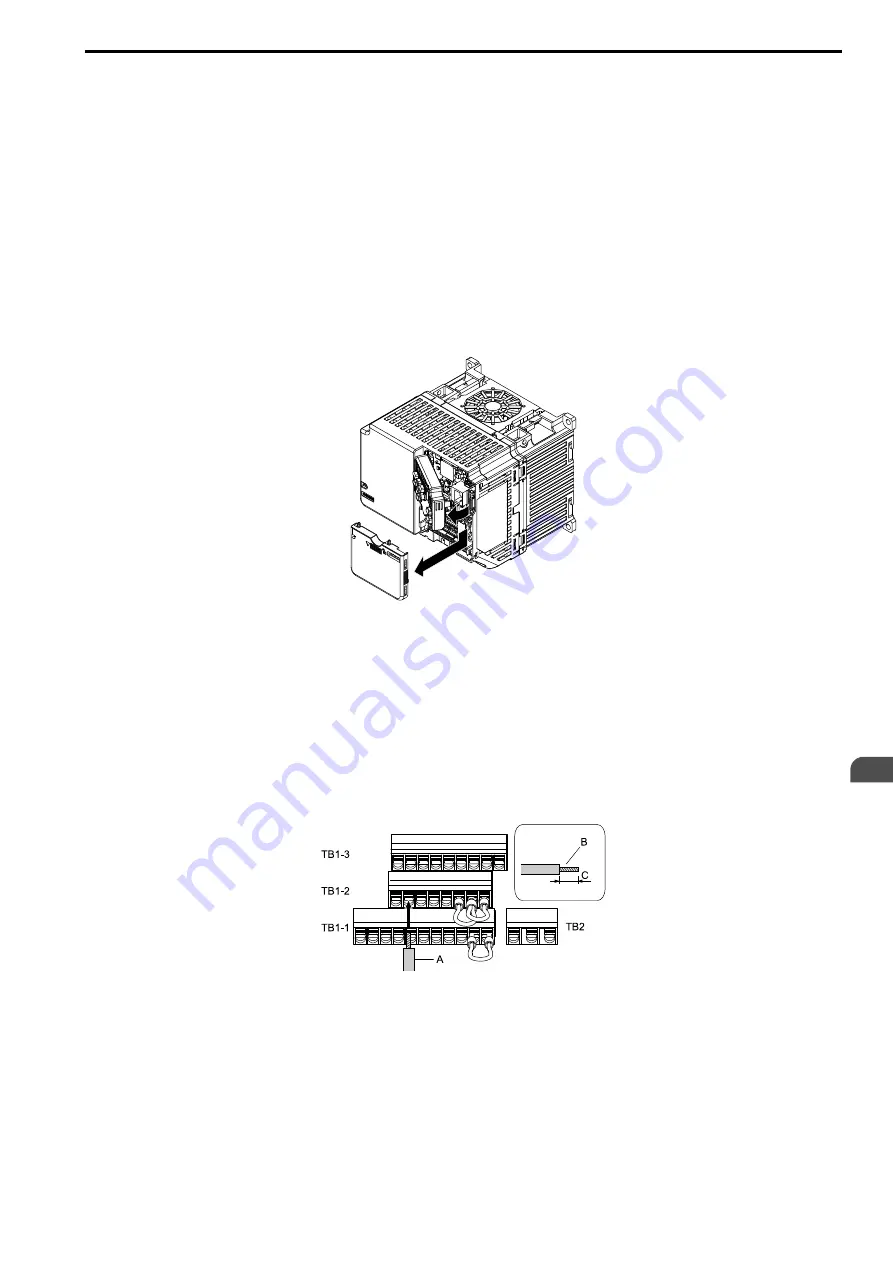
Remove the front cover from the drive.
To move Jumper S5, also remove the keypad.
Figure 3.23 Remove the Front Cover
2.
Refer to the following figure and wire the control circuit.
Use a flat bladed screwdriver with a blade width of 2 .5mm (0.1 in) or less and thickness of 0.4 mm (0.01
in) or less.
WARNING!
Fire Hazard. Tighten all terminal screws to the correct tightening torque. Connections that are too loose or
too tight can cause incorrect operation and damage to the drive. Incorrect connections can also cause death or
serious injury from fire.
Note:
• Use shielded, twisted-pair wires and ground the shield to the ground terminal of the drive. Incorrect equipment grounding
can cause drive or equipment malfunction from electrical interference.
• Do not use control circuit wiring that is longer than 50 m (164 ft) to supply the analog frequency reference from a remote
source. If the control circuit wiring is too long, it can cause unsatisfactory system performance.
A - Wire with a crimp ferrule
attached, or unsoldered wire with
the core wires lightly twisted
B - Pull back the shielding and lightly
twist the end with your fingers to
keep the ends from fraying.
C - Remove approximately 5.5 mm
(0.21 in) of the covering at the end
of the wire if you do not use crimp
ferrules.
Figure 3.24 Wiring Procedure for the Control Circuit
Note:
• Do not solder the core wire. Soldered wiring connections can become loose and cause the drive to malfunction.
• Prepare the wire ends of shielded twisted-pair wires as shown below to use an analog reference from an external frequency
setting potentiometer to set the frequency. Connect the shield to terminal GND of the drive.
Summary of Contents for Q2V Series
Page 2: ...This Page Intentionally Blank 2 SIEPCYEUOQ2V01A Q2V Technical Manual...
Page 12: ...12 SIEPCYEUOQ2V01A Q2V Technical Manual...
Page 18: ...i 2 Legal Information 18 SIEPCYEUOQ2V01A Q2V Technical Manual...
Page 26: ...1 2 Features and Advantages of Control Methods 26 SIEPCYEUOQ2V01A Q2V Technical Manual...
Page 38: ...2 8 Installation Methods 38 SIEPCYEUOQ2V01A Q2V Technical Manual...
Page 70: ...3 3 Main Circuit Wiring 70 SIEPCYEUOQ2V01A Q2V Technical Manual Models B006 B012...
Page 102: ...3 17 Motor Application Precautions 102 SIEPCYEUOQ2V01A Q2V Technical Manual...
Page 138: ...4 12 Test Run Checklist 138 SIEPCYEUOQ2V01A Q2V Technical Manual...
Page 144: ...5 2 European Standards 144 SIEPCYEUOQ2V01A Q2V Technical Manual...
Page 145: ...Standards Compliance 5 5 2 European Standards SIEPCYEUOQ2V01A Q2V Technical Manual 145...
Page 146: ...5 2 European Standards 146 SIEPCYEUOQ2V01A Q2V Technical Manual...
Page 266: ...7 10 Troubleshooting Without Fault Display 266 SIEPCYEUOQ2V01A Q2V Technical Manual...
Page 284: ...8 6 Storage Guidelines 284 SIEPCYEUOQ2V01A Q2V Technical Manual...
Page 312: ...10 10 Peripheral Devices and Options 312 SIEPCYEUOQ2V01A Q2V Technical Manual...
Page 430: ...11 21 Parameters Changed by PM Motor Code Selection 430 SIEPCYEUOQ2V01A Q2V Technical Manual...
Page 731: ...SIEPCYEUOQ2V01A Q2V Technical Manual 731 Z Z pulse Auto Tuning 125...


