background image

Section6

I/

O

Section6

Timing Charts

6-25

ZS-HL

User’s Manual

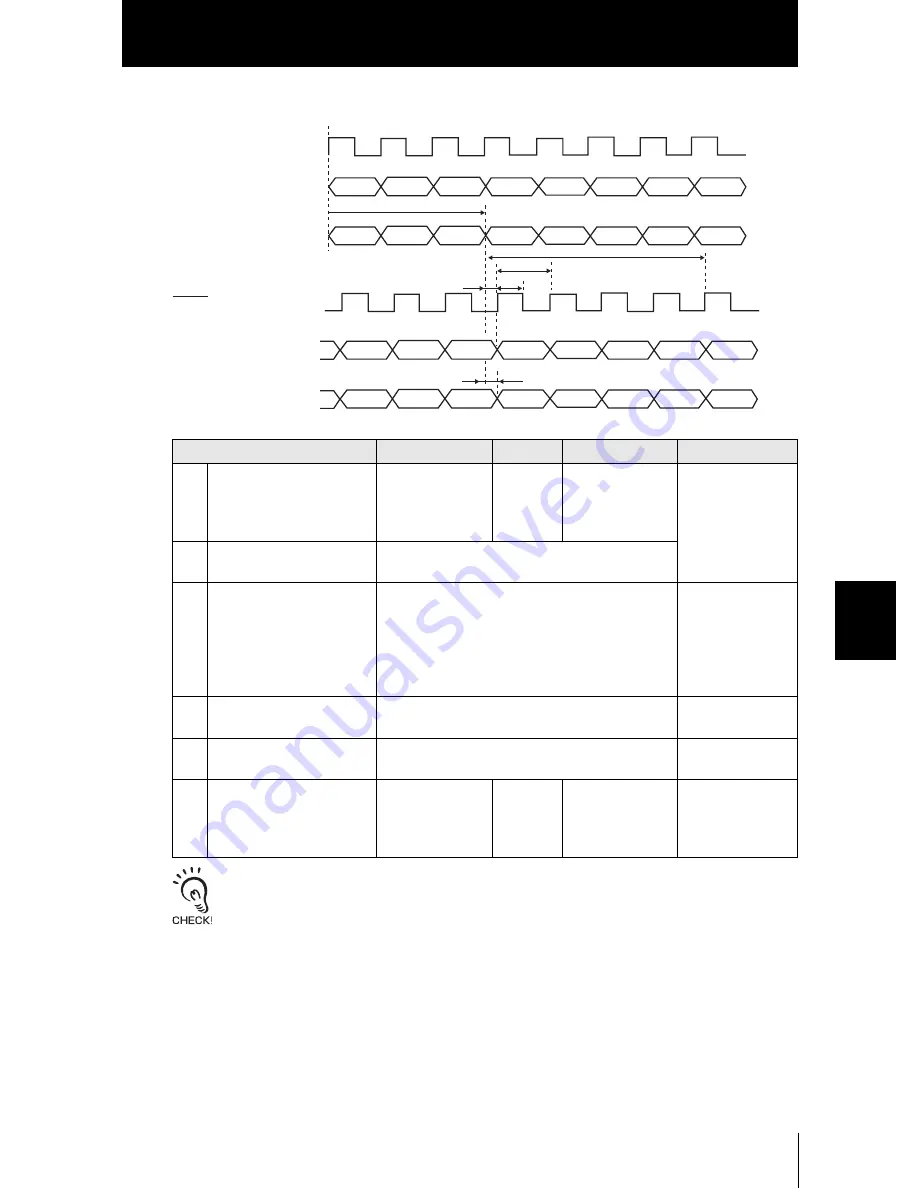
When Measured Value is Output Continuously

To the terminal block, only the result of the TASK for which the measurement is performed is output.
You can judge which TASK number it is by checking the lower 2 bits of the 16-bit output value.
To the linear output, only one selected TASK result is output.

Item

Minimum

Average

Maximum

Remarks

T1

Time during which the mea-
sured value is determined 
from the laser beam emis-
sion

-

Sampling cycle × 
3

The update cycle 
can be set in [I/
OSET]-[TERMI-
NAL BLOCK]-
[CYCLE].

T9

Update cycle of terminal 
block output

Sampling cycle × update cycle

T10 OFF time of GATE signal

68 µs

When the mea-
surement is per-
formed 
continuously and 
the amount of light 
is stable

T18 Update cycle of terminal 

block output 2

Sampling cycle × update cycle × (number of 
TASKs that have been performed)

T21 Response time of GATE 

signal

320 µs

T11 Response time of linear 

output

500 µs

It changes 
depending on the 
way the measured 
value fluctuates.

T1

T10

T21

T11

T9

TASK2

TASK3

TASK4

TASK1

TASK2

TASK3

TASK4

TASK1

TASK*

TASK*

TASK*

TASK*

TASK*

TASK*

TASK*

TASK*

T18

ON

OFF

OFF

ON

Laser beam emission

Internal processing

Judgment output

Terminal block output

Linear output

GATE signal

Summary of Contents for ZS--LD10GT

Page 1: ...Smart Sensor 2D CMOS Laser Type Cat No Z236 E1 02A ZS HL Series USER S MANUAL ...

Page 2: ...thoroughly to deepen your understanding of the product Please keep this manual in a safe place so that it can be referred to whenever necessary How to Switch the Display Language to English Turn the power ON with the MENU key held down This displays the display language selection screen When using the ZS HL Smart Sensor be sure to observe the following The Controller will start up with the message...

Page 3: ...ies INTRODUCTION SECTION 1 SECTION 2 SECTION 3 SECTION 4 SECTION 5 SECTION 6 SECTION 7 SECTION 8 SECTION 9 APPLICATION CONSIDERATIONS Please Read FEATURES INSTALLATION CONNECTION APPLICATION and SETTING EXAMPLES FUNCTIONS AND OPERATIONS USED DURING OPERATION SETTINGS FOR FUNCTIONS I O USB RS 232C COMMUNICATION SPECIFICATIONS AND EXTERNAL DIMENSIONS APPENDIX ...

Page 4: ... ALONE HAS DETERMINED THAT THE PRODUCTS WILL SUITABLY MEET THE REQUIREMENTS OF THEIR INTENDED USE OMRON DISCLAIMS ALL OTHER WARRANTIES EXPRESS OR IMPLIED LIMITATIONS OF LIABILITY OMRON SHALL NOT BE RESPONSIBLE FOR SPECIAL INDIRECT OR CONSEQUENTIAL DAMAGES LOSS OF PROFITS OR COMMERCIAL LOSS IN ANY WAY CONNECTED WITH THE PRODUCTS WHETHER SUCH CLAIM IS BASED ON CONTRACT WARRANTY NEGLIGENCE OR STRICT ...

Page 5: ...ems aviation systems medical equipment amusement machines vehicles safety equipment and installations subject to separate industry or government regulations Systems machines and equipment that could present a risk to life or property Please know and observe all prohibitions of use applicable to the products NEVER USE THE PRODUCTS FOR AN APPLICATION INVOLVING SERIOUS RISK TO LIFE OR PROPERTY WITHOU...

Page 6: ...proofreading errors or omissions PROGRAMMABLE PRODUCTS OMRON shall not be responsible for the user s programming of a programmable product or any consequence thereof COPYRIGHT AND COPY PERMISSION This document shall not be copied for sales or promotions without permission This document is protected by copyright and is intended solely for use in conjunction with the product Please notify us before ...

Page 7: ...t in serious injury or death Additionally there may be significant property damage Meanings of Alert Symbols Indicates general prohibitions for which there is no specific symbol Indicates the possibility of laser radiation Indicates prohibition when there is a risk of minor injury from electrical shock or other source if the product is disassembled Alert statements in this Manual This product is n...

Page 8: ... power devices 2 Power Supply and Wiring The supply voltage must be within the rated range DC24 V 10 Reverse connection of the power supply is not allowed Open collector outputs should not be short circuited Use the power supply within the rated load High voltage lines and power lines must be wired separately from this product Wiring them together or placing them in the same duct may cause inducti...

Page 9: ...ted make sure that the power supply voltage is correct there are no incorrect connections e g load short circuit and the load current is appropriate Incorrect wiring may result in breakdown of the product Before connecting disconnecting the Sensor Head make sure that the Smart Sensor is turned OFF The Smart Sensor may break down if the Sensor Head is connected or disconnected while the power is ON...

Page 10: ...ning lenses moistened with a small amount of alcohol Do not use excessive force to wipe off dust particles Scratches on the filter may cause errors 6 Sensing Objects The product sometimes cannot accurately measure the following types of objects Transparent objects objects with an extremely low reflection factor objects smaller than the spot diameter objects with a large curvature excessively incli...

Page 11: ...e value of the past 15 measured values is set as the measurement result at each sampling cycle default value Waveform when filter function is not set Displacement Smooth Displacement SMOOTH Average value Differentiation Spike like changes are removed Changes are smoothed out Changes are extracted to eliminate displacement value Abnormal values such as spiking that occur when the shape of the workp...

Page 12: ...CD screen and windows dialog boxes and other GUI elements displayed on the PC are indicated enclosed by brackets aa Visual Aids Indicates points that are important to ensure full product performance such as operational precautions and application procedures Indicates pages where related information can be found Indicates information helpful in operation ...

Page 13: ...n 1 FEATURES 1 1 Introduction of the ZS HL Series 1 2 System Configuration 1 3 Part Names and Functions 1 4 Sensor Head 1 4 Sensor Controller 1 5 Operation Modes 1 7 Setting Flow 1 8 Section 2 INSTALLATION CONNECTION 2 1 About Installation and Connection 2 2 Sensor Head 2 2 Measuring Range 2 3 Basic Precautions for Installation 2 4 Connecting the Sensor Head 2 5 Sensor Controller 2 7 Installation ...

Page 14: ...reshold Setting 4 7 Bank Switching change of device setup 4 10 Section 5 SETTINGS FOR FUNCTIONS 5 1 Basic Operations of Sensor Controller 5 2 Displays and Key Operations 5 2 Using the Multi Task Function 5 4 Switching to Multi Task Mode 5 5 Selecting Tasks 5 5 Setting for Sensing Conditions 5 6 Setting Measurement Mode 5 6 Setting GAIN 5 7 Setting Head Installation 5 8 Setting the Emitted Light Am...

Page 15: ...the Display Language 5 28 Changing the Way of Obtaining Banks 5 28 Saving the Settings Data 5 29 Clearing the Settings 5 29 Initializing All Settings 5 29 Clearing Banks 5 29 Section 6 I O 6 1 Overview 6 2 I O Cable 6 2 Terminal Block Output 6 2 Settings for Linear Output 6 3 Assignment of Linear Output 6 3 Setting Focus 6 4 Correcting Linear Output Values 6 5 Settings for Judgment Output 6 7 Oper...

Page 16: ...e 7 4 Connection Method 7 4 Setting the Communication Specifications 7 4 Connecting Using a RS 232C Cable 7 5 Connection Method 7 5 Setting the Communication Specifications 7 6 Settings for High Speed Digital Output 7 7 Timing Charts 7 8 Section 8 SPECIFICATIONS AND EXTERNAL DIMENSIONS 8 1 Sensor Head 8 2 Specifications 8 2 External Dimensions 8 7 Adjusting Mutual Interference 8 15 Spot Diameter 8...

Page 17: ... 9 APPENDIX 9 1 Troubleshooting 9 2 Error Messages and Countermeasures 9 3 Safety Precautions for Using Laser Equipment 9 4 Requirements from Regulations and Standards 9 6 Summary of Requirements to Manufactures 9 6 Summary of Requirements to User 9 10 Definitions of Laser Classification 9 13 Updating Firmware 9 15 Flow of Updating Firmware 9 15 Index 9 21 Revision History 9 25 ...

Page 18: ...5 8 OBJECT NORMAL PCB MIRROR GLASS MODE 1 MODE2 THICK MODE 1 MODE2 p 5 9 SYNC OFF ON timing A timing B p 5 11 FILTER SMOOTH OFF ON p 5 12 AVERAGE 1 2 4 8 16 32 64 128 256 512 1024 2048 4096 When the mode is set to HIGH SPEED mode the value is from 1 to 256 p 5 13 DIFF OFF ON p 5 13 OUTPUT SCALING OFF ON AUTO MAN p 5 14 HOLD TYPE OFF PEAK BOTTOM P P AVERAGE SAMPLE p 5 18 TRIGGER EXT SELF UP SELF DN...

Page 19: ...N p 6 16 INPUT ACTIVE IN0 to IN3 OFF ON p 6 17 MODE NORMAL BANK BANK CHANGE BANK1 BANK2 BANK3 BANK4 if you change the mode to THRESH you can select up to BANK32 p 4 10 MODE NORMAL THRESH p 5 28 CLEAR Initializes bank settings p 5 29 SYSTEM SAVE Saves Sensor Controller settings p 5 29 INIT Initializes Sensor Controller settings p 5 29 INFO CYCLE Displays the current sampling cycle p 5 27 VERSION Di...

Page 20: ...ask mode Pages TASK1 SENSING MODE HIGH SPEED is not displayed GAIN Same as Single Task mode SETTING LASER OBJECT THICK is not displayed SYNC Same as Single Task mode MEASURE TASKSET NONE AVERAGE PEAK BOT TOM THICK STEP K mX nY p 5 24 FILTER Same as Single Task mode OUTPUT Same as Single Task mode TASK2 to 4 MEASURE TASKSET NONE AVERAGE PEAK BOT TOM THICK STEP K mX nY p 5 24 FILTER Same as Single T...

Page 21: ...Single Task mode OUT TASK1 TASK2 TASK3 TASK4 None p 6 3 CLAMP LEVEL Same as Single Task mode TERMINAL BLOCK FOCUS Same as Single Task mode CYCLE Same as Single Task mode OUT NONE Measured value TASK1 to TASK4 REPEAT JUDGE p 6 10 CLAMP Same as Single Task mode DIGITAL TASK1 to TASK4 OFF ON p 7 7 CONNECT TASK1 TASK2 TASK3 TASK4 p 6 16 INPUT Same as Single Task mode Settings Option Range Difference w...

Page 22: ...de This is the mode for setting the threshold values Settings Option Range Pages DIGITAL DOT 0 to 5th Item whose default value varies according to the connected Sensor Head p 5 25 ECO NORMAL ECO OFF p 5 25 LCD ON OFF ON AUTOOFF OFF p 5 26 B LIGHT ON AUTOOFF OFF p 5 26 CUSTOM U ON OFF L ON OFF U CUSTM L CUSTM default value U OFF L OFF p 5 26 HELP p 5 25 Settings Option Range Pages TEACHING p 4 7 DI...

Page 23: ...TURES 1 1 ZS HL User s Manual Section 1 FEATURES Introduction of the ZS HL Series 1 2 System Configuration 1 3 Part Names and Functions 1 4 Sensor Head 1 4 Sensor Controller 1 5 Operation Modes 1 7 Setting Flow 1 8 ...

Page 24: ... a multi task function that holds up to a maximum of four kinds of measurement processing as a task Because you can measure any characteristic point for each task you can measure and judge multiple characteristic points simultaneously Example Measure the height and surface fluctuation simultaneously 3 Setting Support Software for Personal Computer SmartMonitor ZS It displays data and specifies the...

Page 25: ...ort software for personal computers This setting support software sets sensing conditions while monitoring the receiving status and allows a user to check the measured value in a time series graph 1 Accessory for the Sensor Controller ZS HLDC_1A 1 USB Peripheral devices Personal computer Programmable controller Programmable terminal High speed input board personal computer Communication using comm...

Page 26: ...on 3 Receiver section 4 Connector To be connected to the Sensor Controller ZS LD_ _ _ ZS HLDS2T ZS HLDS5T HLDS10 ZS HLDS60 HLDS150 ZS LD10GT LD15GT 1 Laser emitter receiver section 4 Connector 5 FAR indicator 6 NEAR indicator 3 Receiver section 2 Emitter section 5 FAR indicator 6 NEAR indicator 4 Connector 2 Emitter section 3 Receiver section 2 Emitter section 3 Receiver section 6 NEAR indicator 5...

Page 27: ...rned ON Both indicators go out for 15 to 25 seconds after the Sensor Head is turned ON to indicate that the laser beam is OFF Either of these indicators will light up or flash while the laser beam is being emitted Both indicators go off when the laser beam is OFF 6 NEAR Indicator Names Functions 1 Laser indicator The Laser indicator is lit while the Sensor Head is emitting a laser beam 2 Zero Rese...

Page 28: ...s satisfied 11 PASS indicator The PASS indicator is lit while the condition LOW threshold measured value HIGH threshold is satisfied 12 HIGH indicator The HIGH indicator is lit while the condition HIGH threshold measured value is satisfied 13 Sensor Head connec tor This connector connects the Sensor Head 14 Coupler This connector is used to connect two or more Sensor Controllers It is located on b...

Page 29: ...nt conditions you will be prompted to save the settings Save the settings as required If you turn off the Sensor Controller without saving these settings the newly set measurement conditions will be cleared from memory You can also save all the settings later on Saving the Settings Data p 5 29 Mode Description RUN Mode Normal operating mode TEACH Mode This mode is for setting the judgment threshol...

Page 30: ...cting Measurement Mode Change it when the received light amount is small or when you want to increase the processing speed Usually select HI RESO of the default values Single Task Multi Task Section2 INSTALLATION CONNECTION Setting the Scaling You can correct the display value of the measured value as desired Setting HOLD Set the hold conditions Selecting the Measurement Object Change it when you ...

Page 31: ... the LCD display HELP Setting the Filter Function Setting SMOOTH Setting AVERAGE Setting DIFF Adjusting and Setting Sensing Conditions Setting the Emitted Light Amount Setting Mutual Interference Prevention Setting GAIN Executing Zero Reset Threshold Setting Bank Switching When The Smart Sensor Does Not Operate Correctly Troubleshooting When An Error Message Appears Error Messages and Countermeasu...

Page 32: ...1 10 Section 1 FEATURES ZS HL User s Manual Section 1 Setting Flow MEMO ...

Page 33: ...ad 2 2 Measuring Range 2 3 Basic Precautions for Installation 2 4 Connecting the Sensor Head 2 5 Sensor Controller 2 7 Installation of Sensor Controller 2 7 Wiring the I O cable 2 10 I O Circuit Diagrams 2 12 SmartMonitor ZS 2 14 Operating Environment 2 14 Installation Uninstallation Method 2 15 Starting and Exiting SmartMonitor ZS 2 19 ...

Page 34: ...g of this manual and check the installation site About the power supply Before installing and connecting the Sensor Controller be sure to turn it OFF Also read Important Points on Safety and Notes on Use at the beginning of this manual and check the power supply and wiring Sensor Head Never look into the laser beam Doing so continuously will result in visual impairment Never look into the laser be...

Page 35: ... 1 mm 5 2 mm 1 mm ZS HLDS5T 44 mm 4 mm 50 mm 5 mm ZS HLDS10 94 mm 16 mm 100 mm 20 mm ZS HLDS60 600 mm 350 mm ZS HLDS150 1 500 mm 500 mm Regular reflection Diffusive reflection Measuring center distance Measuring range Measuring center distance Measuring range ZS LD10GT 10 mm 0 5 mm ZS LD15GT 15 mm 0 75 mm ZS LD20T 20ST 20 mm 1 mm 6 3 mm 1 mm ZS LD40T 40 mm 2 5 mm 30 mm 2 mm ZS LD50 50S 47 mm 4 mm ...

Page 36: ...aused by vibration of the rotating object and positional shifts by installing the Sensor Head with the line formed by the emission and reception axes parallel to the axis of rotation Rotating objects Do not install the Sensor Head in a place where strong light hits the laser emitter receiver section of the Sensor Head Also if a workpiece has a shiny surface the light from the lighting will be refl...

Page 37: ...ensor Controller until it locks in place Attach the ferrite core provided with the Sensor Head to both ends of the Sensor Head cable in advance If the ferrite core comes loose from the cable fasten the ferrite core in place with the Insure Lock supplied Disconnecting the Sensor Head Pull out the Sensor Head while pressing in the hooks on both sides of the Sensor Head connector Do not touch the ter...

Page 38: ...a robot cable type extension cable ZS XC5BR ZS XC_ _CR There are restrictions on the Sensor Head that can connect to ZS XC_ _CR ZS XC02D and ZS XEQ For details contact your OMRON representative H LD ON ZERO ENABLE P L Extension cable ZS XC_A_ 1 m 4 m 8 m ZS XC_B R 5 m 10 m Cable for the Sensor Head 0 5 m 2 m H LD ON ZERO ENABLE P L Extension cable ZS XC_B R 5 m 10 m Extension cable ZS XC_B R 5 m 1...

Page 39: ...he Sensor Controller may break down if it is connected or disconnected while the power is ON Installation of Sensor Controller Installing on the DIN track The following describes how to attach the 35 mm wide DIN track very quickly and eas ily In advance attach the ferrite core provided with the Sensor Controller to the input output cable of the Sensor Controller H LD ON ZERO ENABLE P L DIN track s...

Page 40: ...O cable end on the DIN track first may impair the mounting strength of the DIN track attach ment Removal procedure 1 Pull the hook on the I O cable end of the Sensor Controller downwards 2 Lift up the Sensor Controller from the I O cable end and remove it from the DIN track Mounting on a panel The optional Panel Mount Adapters ZS XPM1 can be used to mount the Sensor Con troller on a panel Panel cu...

Page 41: ...to the panel from the front Take care not to pinch the I O cable 5 Hook the hooks of the mounting fixture onto the two holes of the smaller Mount Adapters and tighten the screws 6 Make sure that the Sensor Controller is firmly fixed on the panel H LD ON ZE RO EN AB LE P L H LD ON ZE RO EN AB LE P L Panel Mount Adapter Panel Mount Adapter H LD ON ZE RO EN AB LE P L H LD ON ZE RO EN AB LE P L Panel ...

Page 42: ...ther or placing them in the same duct may cause induction resulting in malfunction or damage 2 GND The GND terminal is the 0 V power supply terminal When using a Sensor Controller with an NPN output the GND terminal is also the common I O terminal for all I O except for the linear output 3 OUT0 HIGH output This outputs judgment results HIGH 4 OUT1 PASS output This outputs judgment results PASS 5 O...

Page 43: ...er timing input Bank input A IN1 Reset input Bank input B IN2 LD OFF input LD OFF input IN3 Zero reset input Zero reset input Signal name Description External trigger timing input This timing input is for signal input from external devices Use it for hold function timing Reset input This resets all executing measurements and outputs While a reset is being input judgment output conforms to the non ...

Page 44: ...ink Gray Co axial black Shielded Load Load Load Load Load Load DC24 V OUT0 OUT1 OUT2 OUT3 OUT4 GND 0 V DC24 V Yellow Light blue Purple White IN0 IN1 IN2 IN3 Orange Linear output Linear GND Current output 300 Ω or less Voltage output 10 kΩ or more Current voltage output selector switch Current output 4 to 20 mA Internal circuits Voltage output 10 V 40 Ω ...

Page 45: ...Red Green Black Pink Gray OUT0 OUT1 OUT2 OUT3 OUT4 Blue GND 0 V Yellow Light blue Purple White IN0 IN1 IN2 IN3 Orange Load Load Load Load Load Co axial black Shielded Linear output Linear GND Load Current output 300 Ω or less Voltage output 10 kΩ or more Current voltage output selector switch Current output 4 to 20 mA Voltage output 10 V 40 Ω ...

Page 46: ... The following describes the operating environment for SmartMonitor ZS Please check them Windows is a trademark or registered trademark of Microsoft Corporation Celeron is a trademark or registered trademark of Intel Corporation or its subsidiaries Item Condition OS Windows 98 2000 XP CPU Celeron 500MHz or faster Memory At least 128 MB Display 1024 768 dots HighColor USB cable SmartMonitor ZS acce...

Page 47: ...rtup up Windows 2 Insert your SmartMonitor ZS CD ROM into the CD DOM drive on your per sonal computer 3 Auto run automatically displays the installation screen Follow the on screen instructions to install SmartMonitor ZS Uninstalling SmartMonitor ZS Before you uninstall SmartMonitor ZS quit all other programs that are running If virus detection software is enabled uninstallation may take time to c...

Page 48: ...eed to be re installed To install the USB driver log on as an Administrator or a user with system access rights Install SmartMonitor ZS before installing the USB driver The error message Failed to pass the Windows logo test is sometimes displayed at USBinstalla tion Press the Continue button to continue with the installation 1 Turn your PC ON and startup up Windows 2 Connect the Sensor Controller ...

Page 49: ...ed radio button and click the Next button 5 Mark the CD ROM drives checkbox and click the Next button When the Sensor Controller is not detected automatically Click the Browse button and select USB folder on the CD ROM To install on a personal computer not equipped with a CD ROM driveSelect Specify directory and specify the Program Files OMRON SmartMonitorZS usb folder ...

Page 50: ... sure that the optimum driver has been detected and click the Next button Installation begins When installation ends the completion message is displayed 7 Click the Finish button The same screen in step 2 is displayed Repeat the above procedure This completes installation of the USB driver ...

Page 51: ...e personal computer and Sensor Controller cannot be established Check the COM port No assigned on the personal computer in Device Manager 1 Right click My Computer on the Windows desktop and click Properties 2 Click Device Manager D on the Hardware tab 3 Open Port COM LPT and check which number COM in OMRON Smart Sensor USB COM is set to 4 Set this COM port No to the Communication Settings screen ...

Page 52: ...2 20 Section2 INSTALLATION CONNECTION ZS HL User s Manual Section2 SmartMonitor ZS MEMO ...

Page 53: ...1 ZS HL User s Manual Section3 APPLICATION and SETTING EXAM PLES Measuring Height basic 3 2 Measuring the Thickness of Transparent Objects 3 4 Measuring the Vertex 2 peak in the Line Beam 3 6 Measuring Multiple Items Simultaneously Multi Task 3 8 ...

Page 54: ... addition to the effect of HI RESO a measurement is stable even when the received light amount is insufficient black rubber PCB etc 3 Select the mounting status of the Head in SENSING SETTING 4 Select the material of the work piece in SENSING OBJECT NORMAL Usually select this menu PCB When a laser beam passes through an object like PCB and there is a diffused reflection effect MIRROR For a mirror ...

Page 55: ...n3 Measuring Height basic 3 3 ZS HL User s Manual Saving the Settings 5 Set the mode switch to RUN 6 Select Yes and save the settings Measurement 7 Check the measured value FUN RUN TEACH 1 YES 2 NO Is change saved Measurement center 0 Measured value ...

Page 56: ...easurement When you install the Sensor Head we recommend that you match the front side of the workpiece with the reference surface of the Sensor Head and then bring up the Sensor Head horizontally and install it Points for installation For regular reflection heads such as ZS HLDS2T and ZS LD20T For diffuse reflection heads LD POWER 1 0 SUB BRIGHT Adjust the position of the Sensor Head while checki...

Page 57: ...ss Saving the Settings 7 Set the mode switch to RUN 8 Select Yes and save the settings Measurement 9 Check the measured value When a measurement is not stable Select THICK MODE2 at the step 3 When you select MODE2 the mode is switched to 2 area mea surement mode that executes an adjustment for suitable received light amount for the front side and back side of the glass respectively When you use Sm...

Page 58: ...ring a small vertex 1 Set the mode switch to FUN 2 Select ON in SYSTEM MULTI TASK The confirmation message is displayed Select OK Setting peak TASK1 3 Press the MENU key to display the TOP menu 4 Press the ESC key to display the TASK switching menu and select TASK1 5 Select PEAK in MEASURE TASKSET Peak Line beam FUN RUN TEACH 1 OFF 2 ON 1 SENSING 2 MEASURE 3 FILTER 1 TASK1 2 TASK2 3 TASK3 4 TASK4 ...

Page 59: ...ZS HL User s Manual Saving the Settings 6 Set the mode switch to RUN 7 Select Yes and save the settings Measurement 8 Check the measured value You can measure the bottom or step using the same procedure Select BOTTOM or STEP at step 5 FUN RUN TEACH 1 YES 2 NO Is change saved Measured value Bottom Step ...

Page 60: ...e procedure for setting height for TASK1 and surface fluctuation for TASK2 1 Set the mode switch to FUN 2 Select ON in SYSTEM MULTI TASK The confirmation message is displayed Select OK Setting height TASK1 3 Press the MENU key to display the TOP menu 4 Press the ESC key to display the TASK switching menu and select TASK1 5 Select AVERAGE in MEASURE TASKSET Height TASK1 Surface fluctuation TASK2 FU...

Page 61: ...alue Setting surface fluctuation TASK2 10 Set the mode switch to FUN 11 Select Yes and save the settings 12 Press the ESC key to display the TASK switching menu and select TASK2 13 Select AVERAGE in MEASURE TASKSET 14 Select P P in OUTPUT HOLD TYPE 1 P P 2 AVERAGE 3 SAMPLE FUN RUN TEACH 1 YES 2 NO Is change saved H L Value Digit FUN RUN TEACH 1 YES 2 NO Is change saved 1 TASK1 2 TASK2 3 TASK3 4 TA...

Page 62: ...sure the workpiece while pressing the UP key Sampling is performed while the UP key is being pressed 19 Check the measured value You can check the measured value for each TASK by switching the display Switching the Display of the Measured Value p 4 2 When a measurement is performed using the actual line the Sensor Controller can start the measure ment by external input or self trigger p 5 19 FUN R...

Page 63: ... 4 1 ZS HL User s Manual Section4 FUNCTIONS AND OPERATIONS USED DURING OPERATION Switching the Display of the Measured Value 4 2 List of Key Operations in RUN Mode 4 4 Zero Reset Operation 4 5 Threshold Setting 4 7 Bank Switching change of device setup 4 10 ...

Page 64: ...ABLE P L TEACH RUN L 1 2 MENU ESC SET 3 4 FUN H TEACH RUN FUN Control keys Main Display Sub display LCD screen MAIN MEASURE SUB THRESH MAIN MEASURE SUB VORTAGE For Multi Task mode 2 1 TKx on the LCD screen indicates that the measured value of the current TASKx is displayed in the main display Switch TASK that is displayed in the main display by using the function keys 2 It is displayed only in Mul...

Page 65: ...t amount is as small as possible compared to the received light amount 1000 Inside of the Sensor Controller the emitted light amount is automatically adjusted in the range from 0 1 to 80 so that the received light amount reaches 1000 Even if the emitted light amount reaches the maximum 80 but the received light amount is not close to 1000 change the settings to switch the measurement mode to HI SE...

Page 66: ...on keys In Multi Task mode this key switches the task The key numbers from 1 to 4 correspond to the task numbers LEFT key RIGHT key Changes sub display content UP key DOWN key UP key Executes trigger input DOWN key Executes reset input MENU key Displays the display customize menu SET key Executes a zero reset ESC key Hold down for at least two seconds to cancel a zero reset ...

Page 67: ...ng measurement Example 1 Using the height of sensing object registered as the reference value and the tolerance output as the measured value Example 2 Using the height of sensing object as the measured value with an offset set to 10 Example 3 Using zero reset to measure steps in sensing object zero reset at each measurement 0 2 2 Sensor Head reference value Sensing object LOW threshold value HIGH ...

Page 68: ...ce sensing object in posi tion 2 Press the SET key The zero rest indicator illuminates and the current measured value is registered as 0 zero Executing Canceling by External Signal Input p 6 23 When a zero reset is executed the linear output becomes the voltage or current value at the cen ter of the two preset points Linear output becomes roughly 0 V 12 mA when focus is not set Canceling Zero Rese...

Page 69: ... In Multi Task mode you can select the task to be displayed The function keys correspond to the tasks Press the function key for the number of the task to be displayed The currently selected task is displayed as TKX on the LCD display Method Details TEACHING MENU key Performs measurement and uses the measurement results to set threshold values Position teaching is useful when threshold samples i e...

Page 70: ...The following describes the operation method using the procedure for setting the HIGH threshold value as an example 1 Set the mode switch to TEACH 2 Switch the threshold switch to H to set the HIGH threshold value 3 Set the workpiece 4 Press the MENU key to apply the set ting The applied threshold value will be displayed on the sub display Sensor Head Sensor Head Teaching point HIGH threshold valu...

Page 71: ...setting the HIGH threshold value by directly entering it 1 Set the mode switch to TEACH 2 Switch the threshold switch to H to set the HIGH threshold value 3 Enter the setting value you want to change The current measured value is displayed on the main display and the offset value is displayed on the sub display Change the digit Change the value 4 Press the SET key to apply the set ting If you want...

Page 72: ... SET Threshold value BANK The settings for measurement are held as one bank SENSING FILTER OUTPUT I O SET Threshold value BANK4 BANK3 BANK2 BANK1 BANK4 BANK3 BANK2 Setting for product class A Setting for product class B If you register settings of various classes Measuring operation with the contents set in BANK1 Register the different settings for changing the device setup Switch to BANK2 Measuri...

Page 73: ...main display Bank Switching by External Signal Input You need to change the function assignment for input signals Changing the Assignment of Input Signals p 6 17 Wiring p 2 10 You can also switch the bank by entering the CompoWay F or non procedural command from Smart Monitor ZS If the bank mode is set to JUDGMENT VALUE the bank cannot be switched at the external signal input because the number of...

Page 74: ...4 12 Section4 FUNCTIONS AND OPERATIONS USED DURING OPERATION ZS HL User s Manual Section4 Bank Switching change of device setup MEMO ...

Page 75: ... Function 5 4 Setting for Sensing Conditions 5 6 Setting the Filter Function 5 12 Setting Output Processing of Sensing Information 5 14 Setting for Measurement of Characteristic Points 5 24 Setting Display Method 5 25 Setting the System Environment 5 27 Changing the Way of Obtaining Banks 5 28 Saving the Settings Data 5 29 Clearing the Settings 5 29 ...

Page 76: ...LCD screen LEFT key RIGHT key The function changes depending on the settings Scrolls pages in list menus Selects the digit of numerical values UP key DOWN key Changes numerical values during input MENU key Displays the top menu SET key Applies the item you are setting up ESC key Returns to the previous menu A B C D E F G H I J K L M N O P Q R S T U V W X Y Z H LD ON ZERO ENABLE P L TEACH RUN L 1 2...

Page 77: ...ss function key 1 representing SENSING 2 Press function key 1 representing MODE The currently selected No is displayed flashing 3 Press function key 2 representing HI RESO The Complete message is displayed 4 Press the MENU key to return to the top menu Pressing the ESC key returns to the previous menu 1 SENSING 3 OUTPUT 2 FILTER 1 MODE 3 GAIN 2 SETTING 1 STAND 3 H SPEED 2 HI RESO MODE Complete HI ...

Page 78: ...n Multi Task mode four tasks are provided You can measure and judge multiple characteristic points simultaneously because you can measure the desired characteristic point such as peak bottom and average for each task Height TASK1 Surface fluctuation TASK2 Data flow of TASK1 Single Task Multi Task Data flow Output Linear output Select one TASK that you want to output Judgment output Select one TASK...

Page 79: ...ree according to the mode p 16 Selecting Tasks When you set MULTI TASK to ON select the task number and then specify the various settings The following describes the method of selecting the task number X FUN Mode 1 Press the MENU key to display the TOP menu 2 Press the ESC key The TASK selection menu will be displayed 3 Select the task number The currently selected task is displayed on the sub dis...

Page 80: ...becomes the maximum speed approx 110 µs Check the actual sampling cycle at INFO CYCLE from the top menu In High Speed mode the smooth function is changed to OFF In modes other than High Speed mode the smooth function is changed to ON Setting Description STAND This is the standard measurement mode sampling frequency approx 500 µs HI RESO Select this mode to measure workpieces with sensitivity set h...

Page 81: ... easily affected by ambient light X FUN Mode SENSING GAIN Setting Description CUSTOM LINE number of additional lines Set this item to make it mode difficult increase the number of additional lines for measurement to be influenced by the state of the workpiece surface or to measure at a single pinpoint on the workpiece reduce the number of addi tional lines Range 1 to 200 The maximum number of line...

Page 82: ...In this case narrow the adjustment range by setting RANGE If this does not increase the response speed to keep up with measurement select FIXED X FUN Mode SENSING LASER Setting Description DIFFUSE Select this item when the Sensor Head is installed for diffuse reflection sensing REGULAR Select this item when the Sensor Head is installed for regular reflection sensing Setting Description AUTO Automa...

Page 83: ...f glass having different reflection factors on the front side and the backside such as backside deposited glass This is not displayed in Multi Task mode When MODE2 is selected two areas are measured and the measured value that is closer to the Sensor Head is output as the result of the front side of the glass When MODE2 is selected the measurement area is set for the front side and back side of th...

Page 84: ...n the front side and the backside such as backside deposited glass This is not displayed in Multi Task mode When MODE2 is selected the measurement area is set for the front side and back side of the glass respectively and an adjustment is performed for a suitable received light amount for each area When you use SmartMonitor ZS you can adjust the area while checking the received light amount Settin...

Page 85: ...easurement cycle is also influenced by other settings Check the sampling cycle in FUN Mode SYSTEM INFO CYCLE The same sensing mode must be set to each controller when the mutual interference prevention mode is used When HI SPEED or CUSTOM is selected as the measurement mode the same conditions must be set Setting different conditions will result in a sampling cycle on each controller and mutual in...

Page 86: ...e FILTER SMOOTH When HI SPEED is set in the measurement mode OFF is set Setting Description OFF The smooth function is not used ON The intermediate value of the past 15 measured values is set as the measurement result at each sampling cycle default value 0 Waveform when filter function is not set Displacement Smooth Displacement SMOOTH Average value Differentiation Spike like changes are removed C...

Page 87: ...function detects changes between the present value and the measured value that is in effect just before the comparing pitch The coefficient of this comparing pitch is defined as the differentiation cycle Example Differentiation cycle 10 ms X FUN Mode FILTER DIFF Setting Description 1 2 4 8 16 32 64 128 256 512 1024 2048 4096 When the mode is set to High Speed mode the value is from 1 to 256 Sets t...

Page 88: ...ng and two point scaling that automatically set the correction values of a placed sensing object When GLASS mode is selected for the measurement object the menu used only for scaling is displayed Measuring the Thickness of Transparent Objects p 3 4 The settings listed below return to the default settings when scaling is set Set these items after scaling settings have been completed Zero reset Sett...

Page 89: ... deci mal point of the scaling setting The position of the decimal point on the display fol lows the DOT setting of the display setup in RUN mode 4 Press the SET Key to apply the setting 5 Press the SET key without entering any value for the second point 6 Select FORWARD or INVERS FORWARD The larger the distance between the Sensor Head and the sensing object the larger the measured value displayed...

Page 90: ...tual distances Separate the two specified points by at least 1 of the rated measurement range for the connected Sensor Head Example For the ZS LD80 diffuse reflection type The two measured points must be separated by at least 30 mm 0 01 0 3 mm as the measuring range is 30 mm 15 mm 4 0 3 0 2 8 3 8 3 0 4 0 Display value mm Measured value mm Sensor Head Actual distance 4 0 mm Display value 3 8 mm Sen...

Page 91: ...cond point Press the LEFT key The sub display blinks 3 Press the SET Key to apply the setting Manual Setting Enter numerical values for scaling correction values X FUN Mode OUTPUT SCALING ON MANUAL Setting Description SPAN Sets the inclination of the sensor characters as a coefficient Range 2 0 to 2 0 OFFSET Adds subtracts a fixed value to or from the measured value Range 999 99 to 999 999 INPUT P...

Page 92: ...mpling period BOTTOM Holds the minimum value during the sampling period The output changes at the end of the sampling period and is held until the end of the next sam pling period P P Holds the difference between the maximum and minimum values during the sampling period This option is selected mainly when detecting vibra tion The output changes at the end of the sampling period and is held until t...

Page 93: ...g will end after the specified sampling period has elapsed SELF UP The sampling period is the period at which the measured value is greater than the specified self trigger level Hold measurement is possible without a sync input When SELF UP is selected the following items are subsequently displayed TRG LEVEL Sets the desired self trigger level Range 999 99 to 999 999 TRG HYS Sets the hysteresis wi...

Page 94: ...er level Hold measurement is possible without a sync input When SELF DN is selected the following items are subsequently displayed TRG LEVEL Sets the desired self trigger level Range 999 99 to 999 999 TRG HYS Sets the hysteresis width for the self trigger Range 0 to 999 999 When a delay time is set the timing when the measured value becomes greater than the self trigger level and the end of the sa...

Page 95: ...N mode OUTPUT HOLD DELAY Setting Description OFF The delay time is not set default value ON Sets the delay time When ON is selected the following items are subsequently displayed T DELAY Sets the delay time Range 0 to 9000 ms T TIME Sets the sampling period Range 1 to 9000 ms Set so that the delay time sampling period is less than the timing input ON interval If the next timing input for measureme...

Page 96: ...scription REAL Sets the measured value when a zero reset is executed to zero default value HOLD Sets the measured value hold value when a zero reset is executed to zero This setting is enabled when hold measurement is performed Setting Description OFFSET Sets the reference value Range 999 999 to 999 999 default value 0 Setting Description ON When a zero reset input is received externally a zero re...

Page 97: ...e Sensor Controller non volatile memory EEPROM at each zero reset The EEPROM can be written a maximum of 100 000 times Writing the zero reset level for each measurement can therefore use up the life of the memory and lead to malfunctions Even if zero reset memory is enabled the zero reset level will be held also when it is saved Zero reset will continue after startup when these functions have been...

Page 98: ...measure the distance from the work piece default value PEAK Measures the peak position of the line beam You can measure the highest position in the line beam BOTTOM Measures the bottom position of the line beam You can measure the lowest position in the line beam THICK Measures the thickness of a transparent object such as glass STEP Measures between peak and bottom in the line beam You can detect...

Page 99: ...s are set the digits are disabled from the rightmost digit first X RUN Mode MENU key DIGITAL DOT Setting the ECO display Set the brightness of the main display and sub displays X RUN Mode MENU key DIGITAL ECO Displaying HELP Display Help for the functions assigned to the SET or ESC keys in RUN mode X RUN Mode MENU Key HELP Setting Description 5th 4th 3rd 2nd 1st 0 Sets the number of display digits...

Page 100: ... valid only in RUN mode Note however that pressing the MENU key displays the display customize menu Setting Description ON Turns the LCD screen backlight ON at all times default value AUTOOFF Turns the backlight OFF when no operations are performed for one minute OFF Turns the LCD screen backlight OFF Setting Description UPPER Set this item to ON to display characters set at U CUST on the upper se...

Page 101: ... Once the keys have been disabled no key input will be accepted until the lock is released This function is useful to prevent inadvertent changes to settings Moving to the key lock menu or moving between menu hierarchies by the MENU or ESC keys are possible even when the key lock function is ON X FUN Mode SYSTEM KEYLOCK Setting Description CYCLE Displays the current sampling cycle VERSION Displays...

Page 102: ...at the Sensor Controller is started up default value SAVE Data is not read from the Sensor Head when the Sensor Controller is started up if the same Sensor Head at the previous startup is connected When the combination of Sensor Controller and Sensor Head is fixed selecting SAVE sometimes results in the Sensor Controller starting up more stably depending on the operating environment Setting Descri...

Page 103: ... played if you change a mode without saving data after you have changed settings X FUN Mode SYSTEM SAVE Clearing the Settings Initializing All Settings Return all bank settings and system settings to their factory settings The settings of all banks and system settings are initialized regardless of the currently selected bank No X FUN Mode SYSTEM INIT Clearing Banks Clearing initializes the setting...

Page 104: ...5 30 Section5 SETTINGS FOR FUNCTIONS ZS HL User s Manual Section5 Clearing the Settings MEMO ...

Page 105: ... 7 Assignment of Judgment Output For Multi Task 6 8 Settings for Terminal Block Output 6 9 Real Time Parallel Output Unit 6 9 Assignment of Terminal Block Output 6 10 Output Format 6 11 Setting Focus 6 13 Setting the Update Cycle 6 14 Settings for Processing when Measurement Cannot be Performed 6 15 When Connecting ZS MDC and ZS DSU 6 16 Settings for Input Signal 6 17 Settings for the Active Direc...

Page 106: ...dgment value from the I O cable of the controller and inputs a measurement control signal or zero reset signal Wiring p 2 10 Terminal Block Output When you connect a real time parallel output unit the Sensor Controller outputs the measured value or judgment value in parallel Output of measured value linear output Settings for Linear Output Judgment output Input of control signal Settings for Judgm...

Page 107: ... linear output line Depending on the selected task mode the setting value differs X FUN mode I OSET ANALOG OUT For Single Task mode For Multi Task mode Setting Description ON Linearly outputs the measured value from the controller default value OFF Does not output linearly Setting Description TASK1 TASK2 TASK3 TASK4 The measured value of the task selected here is linear output from the controller ...

Page 108: ...ate the two specified points by at least 1 of the rated measurement range for the connected Sensor Head or 40µm or longer Example For the ZS HLDS5T diffuse reflection type The two measured points must be separated by at least 10 mm 0 01 0 1 mm as the measuring range is 5 mm 10 mm X FUN mode I O SET ANALOG FOCUS ON 1 Set the output value voltage or current value of point 1 The output value is displ...

Page 109: ...e values set on the Sensor Controller and the actual current or voltage values measured due to the conditions for the connected external device or other factors The linear output correction function can be used to correct this discrepancy The output values are corrected by entering the correction value for the current or voltage values for any two points default value OFF Range 999 to 999 Set the ...

Page 110: ...ue on the sub display so that the measured value of the ammeter or voltmeter and the output value shown on the main display are the same 4 Press the SET Key to apply the setting 5 Set point 2 in the same way as point 1 If the points are not set correctly check to see if the current or voltage values of points 1 and 2 are the same INPUT POINT 1 VAL SET OK DIG INPUT POINT 2 VAL SET OK DIG ...

Page 111: ...ZS LD80 15 µm 0 005 of 30 mm as measur ing range is 15 mm TIMER Set the timing for judgment outputs to match the operation of external devices OFF default value Outputs the judgment as soon as the judgment result has been applied OFF DLY After the measurement result has been applied delays turning OFF the PASS output for the time set to the timer Also delays turning ON the HIGH and LOW outputs for...

Page 112: ...r Also delays turning OFF the HIGH and LOW outputs for the timer time Range 1 to 5 000 ms 1 SHOT When the judgment result changes to PASS outputs the PASS output for the time set to the timer Neither the HIGH nor the LOW output is output Range 1 to 5 000 ms Setting Description TASK1 TASK2 TASK3 TASK4 The selected task result is output to the following output lines default value TASK1 HIGH PASS LOW...

Page 113: ...utput unit to the DIN track and attach it there Then connect the connector of the Sensor Controller to the RS 232C connector of ZS HLDC_1 and use the Sensor Controller Alignment of the Terminal Block ZS HLDC Connector 18 pole terminal block detachable Connect to the RS 232C connector of the ZS HLDC ZS RPD DIN track Type of Connectors Used ZS RPD body side SL 3 5 18 90F ORG made by Weidmuller Cable...

Page 114: ...measured value to the real time parallel output unit JUDGE Outputs the judgment result to the real time parallel output unit Setting Description NONE Does not output to the real time parallel output unit Compared to the case when the measured value or judgment is output the sampling cycle becomes short Default value MEASURE TASK1 The measured value of the task selected here is output to the real t...

Page 115: ...11 1111 1110 1110 1110 1111 1111 0000 0000 1111 0000 0000 0001 0001 0001 1111 0000 0000 0000 0000 0000 0001 0000 1111 0000 0000 0000 0000 0000 1111 0010 1000 1110 0100 1010 0000 0000 1111 0110 1100 0010 1000 1110 FAR side Measuring range At default data is output in 40 000 steps from 12 768 to 52 768 1111 0000 0000 0000 0000 0000 0000 1111 0101 0100 0011 0010 0001 0000 1111 0011 1100 0101 1110 011...

Page 116: ... FOCUS is set only the measurement that reflects the FOCUS setting is output 0 0 0 0 0 0 0 0 0 1 1 1 1 1 1 1 b15 b14 b13 b12 b11 b10 b9 b8 b7 b6 b5 b4 b3 b2 b1 b0 10000 10000 4 2500 Result rounded up to 2 bits 1 4 the value TASK No Turns ON when the judgment result is HIGH Turns ON when the judgment result is PASS Turns ON when the judgment result is LOW Turns ON when a measurement error occurs HI...

Page 117: ... HLDS5T The two measured points must be separated by at least 10 mm 0 01 0 1 mm as the measuring range is 5 mm 10 mm X FUN mode I O SET TERMINAL FOCUS ON 1 Set the binary output value of point 1 The output value is displayed on the main display 2 Press the SET Key to apply the setting 3 Set the measured value for point 1 The measured value is displayed on the sub display 4 Press the SET Key to app...

Page 118: ...e the first and second measured points separated by at least 1 of the rated measuring range Are the binary output values for the two points the same Setting the Update Cycle Sets the output cycle for the real time parallel output unit X FUN mode I OSET TERMINAL CYCLE Setting Description 1 to 100 Sets the update cycle default value 1 Outputs the measurement result or judgment result for each of sam...

Page 119: ...rformed set the clamp value to be output For linear output X FUN mode I O SET ANALOG CLAMP For terminal block output X FUN mode I O SET TERMINAL CLAMP Setting Outputs Linear Output Terminal Block Output Judgment Output KEEP The status immediately before measurement is stopped is held and output CLAMP default value Outputs the set CLAMP value abnormal value All OFF Setting When current is output MI...

Page 120: ...DSU the target to be transferred is only one task Select the task information to be transferred X FUN mode I O SET CONNECT For Single Task mode For Multi Task mode Setting Description ON Transfers to the connection target default value OFF Does not transfer Setting Description TASK1 TASK2 TASK3 TASK4 Select the task you want to transfer to the connection target ...

Page 121: ...of Banks With the combination of bank inputs A and B you can select any banks Bank switching is begun 0 5 seconds after the input state changes At most it takes about 30 seconds to switch banks During bank switching the BUSY output becomes ON If the bank mode is set to JUDGMENT VALUE the bank cannot be switched at the external signal input because the number of banks increases to 32 Setting Descri...

Page 122: ...am emis sion Sampling cycle 3 When the measure ment is performed con tinuously and the amount of light is stable T8 Update cycle of judgment output Sampling cycle T9 Update cycle of terminal block output Sampling cycle update cycle The update cycle can be set in I O SET TERMINAL CYCLE T10 OFF time of GATE signal 68 µs T21 Response time of GATE signal 320 µs T11 Response time of linear output 500 µ...

Page 123: ...es depending on the way the mea sured value fluctuates T12 Timing of starting and end ing the measurement after trigger input Sampling cycle 3 Sampling cycle 4 T13 Response time of judgment output and BUSY output Sampling cycle 4 Sampling cycle 5 OFF ON OFF ON Trigger input Trigger rest input Internal processing Judgment output BUSY output Linear output T2 T12 T12 T13 T13 T13 T11 OFF ON OFF ON T12...

Page 124: ...in diagonal line Item Minimum Aver age Maximum Remarks T2 Minimum time of trigger input Sampling cycle 4 T12 Timing of starting and end ing the measurement after trigger input Sampling cycle 3 Sampling cycle 4 T13 Response time of judgment output BUSY output and terminal block output Sampling cycle 4 Sampling cycle 5 When the terminal block output is in the update cycle 1 T10 OFF time of GATE sign...

Page 125: ...ng the measurement after trigger input Sampling cycle 3 Sampling cycle 4 T13 Response time of judgment output BUSY output and terminal block output Sampling cycle 4 Sampling cycle 5 When the terminal block output is in the update cycle 1 T10 OFF time of GATE signal 68 µs T21 Response time of GATE signal 320 µs T11 Response time of linear output 500 µs It changes depend ing on the way the measured ...

Page 126: ...ensor installation Regular reflection diffuse reflection T16 Time after the end of bank switching until the output of valid data Sampling cycle aver age number Sampling cycle 15 average num ber Time when the adjust ment of light amount is automatic Item Minimum Average Maximum Remarks T4 Time of receiving laser OFF input 500 ms T5 Response time of laser OFF input 500ms T17 Time after the canceling...

Page 127: ...ero reset input time 50 ms 0 8s T7 Cancel time of zero reset input 1s sam pling cycle 3 1s sam pling cycle 4 T22 Time after the input of zero reset until the data output after the zero reset Sampling cycle 3 Sampling cycle 4 OFF ON Zero reset input Judgment output Judgment output T6 T22 OFF ON Zero reset input T7 ...

Page 128: ... Sampling cycle 3 The update cycle can be set in I OSET TERMI NAL BLOCK CYCLE T9 Update cycle of terminal block output Sampling cycle update cycle T10 OFF time of GATE signal 68 µs When the mea surement is per formed continuously and the amount of light is stable T21 Response time of GATE signal 320 µs T11 Response time of linear output 500 µs It changes depending on the way the mea sured value fl...

Page 129: ... can be set in I OSET TERMI NAL BLOCK CYCLE T9 Update cycle of terminal block output Sampling cycle update cycle T10 OFF time of GATE signal 68 µs When the mea surement is per formed continuously and the amount of light is stable T18 Update cycle of terminal block output 2 Sampling cycle update cycle number of TASKs that have been performed T21 Response time of GATE signal 320 µs T11 Response time...

Page 130: ... FUN mode a clamp value is output until the measured value is deter mined Item Minimum Average Maximum Remarks T11 Response time of linear output 500 µs It changes depend ing on the way the measured value fluctuates T19 Response time of mode switching Sampling cycle T20 Determination time of valid data after mode switching Sampling cycle 15 average number Mode Laser beam emission Internal processi...

Page 131: ...verview 7 2 USB 7 2 RS 232C 7 3 Connecting Using a USB Cable 7 4 Connection Method 7 4 Setting the Communication Specifications 7 4 Connecting Using a RS 232C Cable 7 5 Connection Method 7 5 Setting the Communication Specifications 7 6 Settings for High Speed Digital Output 7 7 Timing Charts 7 8 ...

Page 132: ...nsor Controller receives a command externally but does not execute the setting commands USB The Sensor Controller can be connected to a personal computer and the settings can be changed from the personal computer using SmartMonitor ZS In addition the measurement can be monitored on the personal computer Also communication can be performed using non procedural or CompoWay F commands For details on ...

Page 133: ... simultaneously Note that there are restrictions as described below for communication in which two lines are used together The command entered first becomes valid and the command entered next is executed after process ing of the first command ends There are restrictions for commands that are allowed to be entered simultaneously from RS 232C and USB For details refer to the Communication Command Re...

Page 134: ...the controller 3 Insert one end of the USB cable into the USB connector of the external device The USB cable is an accessory of the Sensor Controller ZS HLDC_1A Attach ferrite cores to both ends of the cable Setting the Communication Specifications Set the communication specifications for the controller according to the communication specifications for external devices X FUN Mode SYSTEM COM Settin...

Page 135: ... of the RS 232C cable into the RS 232C connector of the external device RS 232C Cable for Connecting to Programmable Controller Programmable Terminal ZS XPT2 cable length 2 m 10 1 Fitting 1 2 3 4 5 6 7 8 9 1 NC 2 SD TXD 3 RD RXD 4 RS RTS 5 CS CTS 6 NC 7 NC 8 NC 9 SG GND Shell FG 1 NC 2 SD TXD 3 RD RXD 4 RS RTS 5 CS CTS 6 NC 7 NC 8 NC 9 SG GND NC 10 FG Shell Signal name Signal name Pin No Pin No Co...

Page 136: ...32C LENGTH 8 BIT 7 BIT default value 8 BIT PARITY NONE ODD EVEN default value NONE STOP STOP BIT 1 BIT 2 BIT default value 1 BIT BAUDRAT 9600 19200 38400 57600 115200 default value 38400 DELIMIT CR LF CR LF default CR NODE node No 0 to 16 The node No refers to the connection group No as seen from the host device PLC Not only the ZS Series but other multiple devices are con nected to the PLC The No...

Page 137: ...times the sampling cycle When a measurement mode other than High or Custom is selected this digital output setting does not cause the sampling cycle to change FUN mode I O SET DIGITAL In Multi Task mode set ON OFF for each TASK Setting Description ON default value Of the communication commands the command FlowDATA for high speed batch acquisition of data is enabled Set this to ON to batch acquire ...

Page 138: ... charac ters 1 10 communication baud rate Command Processing Time Measure ment related MEASURE Within 10 ms DATAGET Within 10 ms Setting related DATASET Approximately 500 ms Changes depending on the settings Item Average Remarks T19 Command transmission time Compoway F communication These times change according to the specifications of the communication processing on the personal computer side The...

Page 139: ...djusting Mutual Interference 8 15 Spot Diameter 8 19 Usage Width of Line Beam 8 20 Linearity Characteristic by Materials 8 21 Sensor Controller 8 38 Specifications 8 38 External Dimensions 8 40 Accessory 8 41 Panel Mount Adapter 8 41 Extension Cable 8 42 Extension Cable Long Distance Flexible Type 8 43 RS 232C Cable 8 45 Control Link Unit 8 46 Real Time Parallel Output Unit 8 47 ...

Page 140: ...mm 60 µm 3 5 mm 0 3 mm 16 mm 1 5 mm 40 mm Linearity 2 0 05 F S 0 1 F S 0 07 F S 250 mm to 750 mm 0 1 F S 750 mm to 950 mm 0 2 F S Resolution 3 0 25 µm average 256 0 1 µm average 512 1 µm average 64 8 µm average 64 at 250 mm 40 µm average 64 at 600 mm 500 µm average 64 Temperature char acteristic 4 0 01 F S C Sampling cycle 110 µs High Speed mode 500 µs Standard mode 2 2 ms High Resolution mode 4 4...

Page 141: ... less incandes cent light Illumination on received light sur face 1 000 lx or less incan descent light Illumina tion on received light sur face 500 lx or less incandes cent light Ambient tempera ture Operating 0 to 50 C Storage 15 to 60 C with no icing or condensation Ambient humidity Operating and storage 35 to 85 with no condensation Degree of protec tion IP64 IEC60529 When the cable length is 0...

Page 142: ...mm 0 75 mm 1 mm 2 5 mm 2 mm Light source Visible semiconductor laser wavelength 650 nm 1 mW max Class 2 Beam type Line beam Spot beam Line beam Beam diameter 1 25 900 µm 25 900 µm ø 25 µm 35 2 000 µm Linearity 2 0 1 F S 0 1 F S Resolution 3 0 25 µm 0 4 µm Temperature character istic 4 0 04 F S C 0 02 F S C Sampling cycle 110 µs High Speed mode 500 µs Standard mode 2 2 ms High Resolution mode 4 4 m...

Page 143: ... mm Light source Visible semiconductor laser wavelength 650 nm 1 mW max Class 2 Beam type Line beam Spot beam Line beam Beam diameter 1 60 900 µm ø 50 µm 60 900 µm 600 70 µm Linearity 2 0 1 F S 0 25 F S Resolution 3 0 8 µm 2 µm 3 µm Temperature character istic 4 0 02 F S C 0 01 F S C 0 02 F S C Sampling cycle 110 µs High Speed mode 500 µs Standard mode 2 2 ms High Resolution mode 4 4 ms High Sensi...

Page 144: ... beam Beam diameter 1 100 900 µm ø 240 µm Linearity 2 0 1 F S 0 25 F S 0 1 F S Resolution 3 5 µm 20 µm Temperature character istic 4 0 02 F S C 0 04 F S C Sampling cycle 110 µs High Speed mode 500 µs Standard mode 2 2 ms High Resolution mode 4 4 ms High Sensitivity mode Indica tors NEAR indicator Lit near the measurement center distance and nearer than the measurement center distance inside the me...

Page 145: ...65 20 57 0 1 Mounting hole dimensions 2 M4 Reference surface Receiver section Emitter section Operation indicator Emission axis Reception axis Reference surface Measuring center 30 1 42 Vinyl insulated round cable 6 8 mm Standard length 0 5 m 2 m 2 4 5 mm mounting hole Unit mm 51 7 0 1 24 1 0 1 78 4 13 8 51 7 77 2 49 3 24 1 4 7 5 0 5 2 2 M4 Mounting hole dimensions Emission axis Reception axis Mea...

Page 146: ...unting hole Operation indicator Optical axis Reference surface Emitter section L Note 1 A Note 1 Note 1 In the case of ZS HLDS5T L 50 A 30 In the case of ZS HLDS10 L 100 A 25 80 72 70 45 1 16 9 9 5 4 Receiver section 3 M4 22 7 70 0 1 69 0 1 9 5 0 1 13 8 92 1 46 25 25 69 100 82 5 15 9 5 18 36 16 4 30 1 42 Unit mm 3 M4 Mounting hole dimensions 3 4 5 mm mounting hole Reception axis Measuring center E...

Page 147: ...2 109 6 15 6 94 1 37 7 9 3 23 5 65 3 15 2 68 3 12 5 Unit mm Operation indicator Optical axis Reference surface Emitter section Receiver section Reference surface Reception axis Emission axis Measuring center Mounting hole dimensions Vinyl insulated round cable 6 8 mm Standard length 0 5 m 2 m 22 7 L Note 1 A Note 1 75 65 28 47 8 65 0 1 45 0 1 3 M4 5 13 115 06 16 4 46 19 45 120 102 5 88 75 9 5 25 3...

Page 148: ... 30 30 8 5 42 85 56 12 50 17 50 25 45 55 1010 Mounting hole dimensions 40 26 4 16 36 90 3 M 4 Receiver section Emitter section Reception axis Connector Vinyl insulated round cable 6 2 mm Standard length 0 5m 2m Measuring center Emission axis Reference surface 3 4 5 mounting hole 96 0 1 26 0 1 46 0 1 76 0 1 Unit mm ...

Page 149: ...M 4 5 0 45 2 C 5 84 30 20 8 40 74 55 44 11 5 15 11 5 16 5 24 44 42 35 4 8 counter bored 4 Connector 4 4 5 mounting hole Vinyl insulated round cable 6 2 mm Standard length 0 5 m 2 m Receiver section Emitter section Reception axis 20 0 1 29 0 1 Mounting hole dimensions Measuring center Emission axis Reference surface 30 0 1 Unit mm ...

Page 150: ... 1 L Note 1 Mounting hole dimensions Receiver section Reception axis Emission axis Emitter section Measuring center 4 27 1 Range indicator 30 8 4 5 8 65 A Note 1 Note 1 In the case of ZS LD20T LD20ST L 20 A 45 In the case of ZS LD40T L 40 A 32 Unit mm Unit mm 73 2 30 3 6 3 77 8 4 7 37 6 15 3 73 2 30 3 19 3 56 4 2 M4 45 2 2 5 3 0 20 Mounting hole dimensions Reception axis Measuring center Emission ...

Page 151: ... 56 0 1 56 0 1 2 M4 Mounting hole dimensions Measuring center Note 1 In the case of ZS LD50 LD50S L 50 A 28 In the case of ZS LD80 L 80 A 15 In the case of ZS LD130 L 130 A 12 In the case of ZS LD200 L 200 A 8 In the case of ZS LD350S L 350 A 5 A Note 1 L Note 1 Unit mm Unit mm 66 8 42 6 47 1 1 16 7 55 4 71 4 4 6 41 2 42 6 66 8 1 610 2 5 1 2 5 0 12 50 2 M4 Reference surface Reception axis Measurin...

Page 152: ...workpiece with regular reflection is attached make sure to perform scaling and use the Sensor Controller 2 M4 49 8 61 6 6 1 2 11 128 5 6 58 4 10 4 35 2 4 5 49 8 61 5 66 1 Mounting hole dimensions Measuring center Reception axis Emission axis Reference surface 2 4 5mm mounting hole Unit mm 59 8 52 1 1 4 200 4 8 8 4 4 5 64 3 35 59 2 59 8 0 1 52 0 1 Reference surface Reception axis Measuring center E...

Page 153: ...n using two or more Sensor Heads next to each other mutual interference will not occur if other beam spots are outside the shaded areas in the following diagrams ZS HLDS2T ZS HLDS5T Unit mm 2 1 2 2 2 2 2 1 3 2 3 2 11 4 8 2 9 44 5 55 5 Unit mm ZS HLDS10 ZS HLDS60 3 42 20 4 28 79 121 Unit mm 8 10 770 65 23 275 215 985 Unit mm 26 ...

Page 154: ...ECIFICATIONS AND EXTERNAL DIMENSIONS ZS HL User s Manual Section8 Sensor Head 280 Unit mm 75 23 625 1000 2000 33 1000 40 1000 ZS HLDS150 3 5 2 1 5 3 5 18 22 Unit mm 4 3 5 6 2 35 45 Unit mm 4 10 ZS LD20T LD20ST ZS LD40T ...

Page 155: ...TERNAL DIMENSIONS Section8 Sensor Head 8 17 ZS HL User s Manual ZS LD50 LD50S ZS LD80 2 5 2 11 9 5 42 59 4 Unit mm 17 2 41 13 2 18 61 102 Unit mm 6 ZS LD130 ZS LD200 165 22 3 107 12 8 14 5 58 Unit mm 275 36 4 142 10 3 20 133 Unit mm ...

Page 156: ...8 18 Section8 SPECIFICATIONS AND EXTERNAL DIMENSIONS ZS HL User s Manual Section8 Sensor Head ZS LD350S 590 84 11 201 30 389 Unit mm 26 15 45 201 ...

Page 157: ...260 1 000 500 3500 1600 32 000 5 000 60 000 Beam diameter beam width µm LD10GT LD15GT LD20T LD40T LD50 LD80 LD200 LD130 Near 65 900 50 900 60 900 90 2 000 90 900 300 900 430 900 220 620 Measurement center 25 900 25 900 25 900 35 2 000 60 900 60 900 100 900 70 600 Far 65 900 50 900 60 900 100 2 000 230 900 330 900 430 900 200 570 LD20ST LD50S LD350S Near ø 50 µm ø 110 µm ø 370 µm Measurement center...

Page 158: ...00 lines 80 lines 70 lines EXPOSE 11 2 ms 4 48 ms 5 6 ms 4 48 ms 3 92 ms Beam width LD10GT LD15GT LD20T LD40T LD50 Entire width of beam mea surement center 900 µm 900 µm 900 µm 2 000 µm 900 µm Width of beam in actual use High Speed mode 2 lines 10 µm 12 µm 12 µm 20 µm 26 µm Standard mode 9 lines 45 µm 55 µm 55 µm 90 µm 120 µm High Resolution High Sen sitivity mode 40 lines 200 µm 240 µm 240 µm 400...

Page 159: ...ation angle Vertical 0 5 Glass Mirror Inclination angle 0 5 Glass Mirror Inclination angle Vertical 0 5 Inclination angle 0 5 0 6 0 2 0 4 0 0 0 2 0 4 0 6 19 0 19 5 20 0 20 5 21 0 Distance mm Error F S Inclination angle 0 Glass Mirror Inclination angle 0 Inclination angle Horizontal 0 5 0 6 0 2 0 4 0 0 0 2 0 4 0 6 19 0 19 5 20 0 20 5 21 0 Distance mm Error F S 0 6 0 2 0 4 0 0 0 2 0 4 0 6 19 0 19 5 ...

Page 160: ...Distance mm Error F S Inclination angle Horizontal 30 Distance mm Error F S Inclination angle Horizontal 30 0 3 0 2 0 1 0 0 0 1 0 2 0 3 4 2 4 7 5 2 5 7 6 2 1 2 0 6 0 9 0 3 0 0 0 3 0 6 0 9 1 2 4 2 4 7 5 2 5 7 6 2 1 2 0 6 0 9 0 3 0 0 0 3 0 6 0 9 1 2 4 2 4 7 5 2 5 7 6 2 0 3 0 2 0 1 0 0 0 1 0 2 0 3 4 2 4 7 5 2 5 7 6 2 Inclination angle 30 White ceramic Black rubber SUS304 Aluminum Inclination angle 30...

Page 161: ...04 Aluminum Inclination angle 45 Distance mm Error F S 0 4 0 2 0 0 0 2 0 4 45 0 47 0 49 0 51 0 53 0 55 0 White ceramic Black rubber SUS304 Aluminum Inclination angle 45 0 4 0 2 0 0 0 2 0 4 45 0 47 0 49 0 51 0 53 0 55 0 Distance mm Error F S Inclination angle Horizontal 45 White ceramic Black rubber SUS304 Aluminum Inclination angle 45 Distance mm Error F S Inclination angle Horizontal 45 0 4 0 2 0...

Page 162: ...zontal 0 5 Distance mm Error F S Distance mm Error F S Inclination angle Horizontal 0 5 Glass Mirror 0 4 0 2 0 0 0 2 0 4 40 0 42 0 44 0 46 0 48 0 Inclination angle 0 5 0 4 0 2 0 0 0 2 0 4 40 0 42 0 44 0 46 0 48 0 Glass Mirror Inclination angle 0 5 Glass Mirror 0 4 0 2 0 0 0 2 0 4 40 0 42 0 44 0 46 0 48 0 Inclination angle 0 5 0 4 0 2 0 0 0 2 0 4 40 0 42 0 44 0 46 0 48 0 Glass Mirror Inclination an...

Page 163: ...S304 Aluminum Inclination angle 0 Distance mm 81 0 91 0 101 0 111 0 121 0 0 4 0 2 0 0 0 2 0 4 Error F S White ceramic Black rubber SUS304 Aluminum Inclination angle 45 81 0 91 0 101 0 111 0 121 0 0 4 0 2 0 0 0 2 0 4 Distance mm Error F S White ceramic Black rubber SUS304 Aluminum Distance mm Error F S 81 0 91 0 101 0 111 0 121 0 0 4 0 2 0 0 0 2 0 4 White ceramic Black rubber SUS304 Aluminum Inclin...

Page 164: ...Mirror Inclination angle 0 5 0 4 0 2 0 0 0 2 0 4 78 0 83 0 88 0 93 0 98 0 103 0 Distance mm Error F S Glass Mirror Inclination angle 0 5 0 4 0 2 0 0 0 2 0 4 Distance mm Error F S Glass Mirror Inclination angle 0 5 78 0 83 0 88 0 93 0 98 0 103 0 0 4 0 2 0 0 0 2 0 4 Distance mm Error F S Glass Mirror Inclination angle 0 5 78 0 83 0 88 0 93 0 98 0 103 0 Inclination angle Horizontal 0 5 Inclination an...

Page 165: ... 2 0 0 0 2 0 4 250 450 550 650 850 950 Distance mm Error F S White ceramic Black rubber SUS304 Aluminum Inclination angle 45 0 4 0 2 0 0 0 2 0 4 250 450 650 850 950 Distance mm Error F S White ceramic Black rubber SUS304 Aluminum 0 4 0 2 0 0 0 2 0 4 250 450 650 850 950 Distance mm Error F S White ceramic Black rubber SUS304 Aluminum Inclination angle 45 Inclination angle Horizontal 45 Inclination ...

Page 166: ...S 1 2 0 6 0 0 0 6 1 2 1000 1200 1400 1600 1800 2000 Distance mm White ceramic Black rubber SUS304 Aluminum Inclination angle 45 Distance mm Error F S 1 2 0 6 0 0 0 6 1 2 1000 1200 1400 1600 1800 2000 White ceramic Black rubber SUS304 Aluminum Inclination angle 45 1 2 0 6 0 0 0 6 1 2 1000 1200 1400 1600 1800 2000 Distance mm Error F S White ceramic Black rubber SUS304 Aluminum Inclination angle 0 I...

Page 167: ...ss Mirror Inclination angle vertical 0 5 Inclination angle horizontal 0 5 Inclination angle horizontal 0 Inclination angle horizontal 0 5 5 3 5 8 6 3 6 8 7 3 0 4 0 2 0 0 0 2 0 4 5 3 5 8 6 3 6 8 7 3 0 4 0 2 0 0 0 2 0 4 5 3 7 3 5 8 6 3 6 8 0 4 0 2 0 0 0 2 0 4 5 3 7 3 5 8 6 3 6 8 0 4 0 2 0 0 0 4 0 2 Distance mm Error F S Distance mm Inclination angle 0 Inclination angle Horizontal 15 Distance mm Erro...

Page 168: ... 2 0 3 0 1 Error F S 0 0 0 2 0 1 0 3 0 4 0 4 0 2 0 3 0 1 19 0 19 5 20 0 20 5 21 0 19 0 19 5 20 0 20 5 21 0 19 0 19 5 20 0 20 5 21 0 5 3 5 8 6 3 6 8 7 3 5 3 5 8 6 3 6 8 7 3 5 3 5 8 6 3 6 8 7 3 5 3 5 8 6 3 6 8 7 3 Distance mm Inclination angle 0 Inclination angle Horizontal 15 Distance mm Distance mm Distance mm Inclination angle horizontal 0 White ceramic Black rubber SUS304 Aluminum White ceramic ...

Page 169: ...irror Inclination angle vertical 0 5 Inclination angle horizontal 0 5 Inclination angle horizontal 0 Inclination angle horizontal 0 5 Distance mm Error F S Distance mm Inclination angle 0 Inclination angle Horizontal 15 Distance mm Error F S Error F S Error F S Distance mm Inclination angle Horizontal 15 Inclination angle Vertical 15 28 0 29 0 30 0 31 0 32 0 0 2 0 0 0 2 0 4 28 0 29 0 30 0 31 0 32 ...

Page 170: ...izontal 15 Inclination angle horizontal 0 Inclination angle horizontal 15 White ceramic Black rubber SUS304 Aluminum White ceramic Black rubber SUS304 Aluminum White ceramic Black rubber SUS304 Aluminum White ceramic Black rubber SUS304 Aluminum Distance mm Error F S Distance mm Inclination angle 0 Inclination angle Horizontal 0 5 Inclination angle Vertical 0 5 Inclination angle Horizontal 0 5 Dis...

Page 171: ...ontal 0 Inclination angle horizontal 15 Inclination angle horizontal 15 Inclination angle vertical 15 0 0 0 2 0 1 0 3 0 4 0 4 0 2 0 3 0 1 0 0 0 2 0 1 0 3 0 4 0 4 0 2 0 3 0 1 0 0 0 2 0 1 0 3 0 4 0 4 0 2 0 3 0 1 0 0 0 2 0 1 0 3 0 4 0 4 0 2 0 3 0 1 43 0 45 0 47 0 49 0 51 0 43 0 45 0 47 0 49 0 51 0 43 0 45 0 47 0 49 0 51 0 43 0 45 0 47 0 49 0 51 0 Distance mm Inclination angle 0 Inclination angle Hori...

Page 172: ... mm Error F S 0 6 0 4 0 2 0 0 0 4 0 6 0 2 White ceramic Black rubber SUS304 Aluminum Inclinationanglehorizontal 15 Inclination angle vertical 15 Inclination angle horizontal 15 Inclination angle 0 2 0 1 6 1 2 0 8 0 4 0 0 0 4 0 8 1 2 1 6 2 0 64 68 72 76 80 84 88 92 Glass Mirror Distance mm Error F S 2 0 1 6 1 2 0 8 0 4 0 0 0 4 0 8 1 2 1 6 2 0 64 68 72 76 80 84 88 92 Distance mm Error F S Inclinatio...

Page 173: ...clination angle horizontal 15 Inclination angle horizontal 15 Inclination angle vertical 15 0 0 0 2 0 1 0 3 0 4 0 4 0 2 0 3 0 1 Error F S 0 0 0 2 0 1 0 3 0 4 0 4 0 2 0 3 0 1 Error F S 0 0 0 2 0 1 0 3 0 4 0 4 0 2 0 3 0 1 Error F S 0 0 0 2 0 1 0 3 0 4 0 4 0 2 0 3 0 1 Error F S 1 0 0 5 0 0 0 5 1 0 1 0 0 5 0 0 0 5 1 0 118 123 133 128 138 143 118 123 133 128 138 143 118 123 133 128 138 143 118 123 133 ...

Page 174: ...mm Error F S 0 6 0 4 0 2 0 0 0 4 0 6 0 2 White ceramic Black rubber SUS304 Aluminum Inclinationanglehorizontal 15 Inclination angle vertical 15 Inclination angle horizontal 15 Inclination angle 0 152 168 184 200 216 232 248 152 168 184 200 216 232 248 152 168 184 200 216 232 248 152 168 184 200 216 232 248 2 0 1 6 1 2 0 8 0 4 0 0 0 4 0 8 1 2 1 6 2 0 Glass Mirror Glass Mirror Glass Mirror Glass Mir...

Page 175: ...0 0 0 2 0 1 0 3 0 4 0 0 0 2 0 1 0 3 0 4 Distance mm Error F S Inclination angle 0 Inclination angle Horizontal 15 Inclination angle Vertical 15 Inclination angle Horizontal 15 Distance mm Error F S Distance mm Error F S Distance mm Error F S White ceramic Black rubber SUS304 Aluminum White ceramic Black rubber SUS304 Aluminum White ceramic Black rubber SUS304 Aluminum White ceramic Black rubber SU...

Page 176: ...age current 0 1 mA max Zero reset input exe cute or cancel zero reset Timing input sample cycle specified when hold function is enabled Reset input reset of hold state Status indicators HIGH orange PASS green LOW orange LDON green ZERO green ENABLE green Segment dis play Main display 8 segment red display 6 digits Sub display 8 segment green display 6 digits LCD 16 digits 2 rows color of character...

Page 177: ...erials Case Polycarbonate PC Cable sheath PVC Cable length 2 m Weight Approx 280 g excluding packing materials and accessories Measure ment mode Status Display Output Input RS 232C USB 7 seg ment display Linear output Judg ment out put Terminal block out put Trigger trigger reset laser OFF Zero reset RUN TEACH Normal measure ment Measure ment result Output according to the measure ment result Judg...

Page 178: ...ONS AND EXTERNAL DIMENSIONS ZS HL User s Manual Section8 Sensor Controller External Dimensions ZS HLDC11 HLDC41 23 20 24 20 13 10 32 90 18 4 61 10 80 3 90 90 60 4 30 52 50 Heat resistant PVC 5 2 Standard length 2 m 11 7 Unit mm ...

Page 179: ...ve 10 to 150 Hz 0 7 mm double amplitude 80 min each in X Y and Z directions Shock resistance destructive 300 m s2 3 times each in six directions up down left right forward backward Materials Polycarbonate PC etc Weight Approx 50 g Note 1 60 n 12 60 n 122 90 3 13 140 2 37 5 116 1 60 n 8 Panel DIN track Panel Panel Mount Adapter Note 1 Dimensions are shown for a panel thickness of 2 0 mm Panel cutou...

Page 180: ...mbient humidity Operating and storage 35 to 85 with no condensation Connection method Double end connector Materials Case Polycarbonate PC Weight Approx 150 g Approx 320 g Approx 550 g Approx 350 g Approx 620 g Approx 350 g Cable length 1 m 4 m 8 m 5 m 10 m 5 m Note 1 ZS XC_A L 1 m 4 m and 8 m ZS XC_B L 5 m and 10 m ZS XC_BR L 5 m Note 2 Color of seal ZS XC_A Black ZS XC_B R Silver Mounting hole M...

Page 181: ...ach in X Y and Z directions Shock resistance destructive 300 m s2 3 times each in six directions up down left right forward backward Materials Cable sheath PVC Weight excluding packing materi als and accessories Approx 1 4 kg Approx 1 0 kg Item ZS XC02D Applicable Sensor Head Controller ZS Series 1 Ambient temperature Operating 0 to 50 C Storage 15 to 60 C with no icing or condensa tion Ambient hu...

Page 182: ...on Ambient humidity Operating and storage 35 to 85 with no condensation Vibration resistance destructive 10 to 150 Hz 0 7 mm double amplitude 80 min each in X Y and Z directions Shock resistance destructive 300 m s2 3 times each in six directions up down left right forward backward Materials Case Aluminum die cast Degree of protection IEC60529 IP20 Weight excluding packing materi als and accessori...

Page 183: ...esistance destructive 10 to 150 Hz 0 7 mm double amplitude 80 min each in X Y and Z directions Shock resistance 300 m s2 3 times each in six directions up down left right forward backward Materials Cable sheath PVC Weight Approx 50 g Vinyl insulated round cable 3 89 core Conductor cross sectional area 0 013 m2 Insulator diameter 0 38 24 99 15 8 70 9 pin square connector 10 pin square connector Not...

Page 184: ...ge 15 to 60 C with no icing or condensation Ambient humidity Operating and storage 35 to 85 with no condensation Vibration resistance destructive 10 to 150 Hz 0 7 mm double amplitude 80 min each in X Y and Z directions Shock resistance destruc tive 300 m s2 3 times each in six directions up down left right forward backward Materials Polycarbonate PC etc Weight Approx 10 g 4 60 11 50 18 13 40 39 50...

Page 185: ...6 bits Gate output signal name GATE total 16 bits Circuit specifica tion NPN open collector 30 VDC max 50 mA max residual voltage 1 2 or less delay time at OFF ON change less than 0 5 µs at 24 V 20 mA PNP open collector 20 mA max residual voltage 1 2 V or less delay time at OFF ON change less than 0 5 µs at 20 mA RS 232C 1 port max 115 200 bps Status indicators PWR indicator lit color green Lit wh...

Page 186: ...nd Z directions Shock resistance destructive 300 m s2 3 times each in six directions up down left right forward backward Ambient temperature Operating 0 to 50 C Storage 15 to 60 C with no icing or condensation Ambient humidity Operating and storage 35 to 85 with no condensation Materials Case ABS Weight Approx 130 g excluding packing materials and accessories Item ZS RPD11 ZS RPD41 ...

Page 187: ...ountermeasures 9 3 Safety Precautions for Using Laser Equipment 9 4 Requirements from Regulations and Standards 9 6 Summary of Requirements to Manufactures 9 6 Summary of Requirements to User 9 10 Definitions of Laser Classification 9 13 Updating Firmware 9 15 Flow of Updating Firmware 9 15 Index 9 21 ...

Page 188: ...al computer and controller Has the USB driver been installed Is operation of the controller normal Are you using a personal computer that meets the operating envi ronment p 7 2 Strange linear output levels Is the voltage current switch on the bottom of the Sensor Control ler set to the correct position Has the correct selection voltage current been made in the focus settings Linear output levels c...

Page 189: ...rfaces currently being mea sured is 2 or more Alternatively when GLASS is set for the measurement object the number of surfaces currently being measured is 4 or more For a workpiece with regular reflection glass Check the angle at which the Sensor Head is attached For a workpiece with diffuse reflection Set to GLASS mode Using SmartMonitor ZS set the measurement area to the surface you want to mea...

Page 190: ...ntroller in the United States This product is subject to the U S FDA Food and Drug Administration laser regula tions and is classified to Class 2 stipulated in these regulations ZS LD20T LD40T LD50 LD80 LD200 have been already applied for CDRH Center for Devices and Radiological Health ZS D20ST LD50S LD130 LD350S LD10GT LD15GT HLDS2T HLDS5T HLDS10 HLDS60 are scheduled to be applied for CDRH Center...

Page 191: ... Exporting to a country other than the U S For countries other than Japan and the U S warning labels must be replaced by English ones supplied with the product Laser emitter section label Laser emitter section label Warning label Warning label Certification label Certification label ZS LD_ _ _ HLDS2T HLDS5T HLDS10 ZS HLDS60 HLDS150 ...

Page 192: ...he panel until accessible emission values are below that for Class 3R Designed to prevent removal of the panel until accessible emission values are below that for Class 3B Remote control Not required Permits easy addition of external interlock in laser installation Key control Not required Laser inoperative when key is removed Emission warning device Not required Give audible or visible warning wh...

Page 193: ...6 1 1993 Section 2 Wavelength range label Required for certain wavelength ranges LED label Make required word substitutions for LED products User information Operation manuals must contain instructions for safe use Additional requirement apply for Class 1M and Class 2M Purchasing and ser vice information Promotion brochures must specify product classification service manuals must contain safety in...

Page 194: ... R Viewing optics R R R R R R Scanning safeguard R R R R R R Performance laser systems Remote control connector N A N A N A N A R R Key control N A N A N A N A R R Emission indicator N A N A R R R see note 10 R see note 10 Beam attenuator N A N A R R R R Reset N A N A N A N A N A R see note 13 Performance specific purpose products Medical S S S S see note 8 S see note 8 S see note 8 Surveying leve...

Page 195: ...ways necessary when housing is open Note 4 Interlock requirements vary according to Class of internal radiation Note 5 Wording depends on level wavelength of laser radiation within protective housing Note 6 Warning statement label Note 7 CAUTION logotype Note 8 Requires means to measure level of laser radiation intended to irradiate the body Note 9 CAUTION if 2 5 mW cm2 or less DANGER if greater t...

Page 196: ...ble emission Required Remote interlock Not required Connect to room or door circuits Key control Not required Remove key when not in use Beam attenuator Not required When in use prevents inadvertent exposure Emission indicator device Not required Indicates laser is ener gized for non visi ble wave lengths Indicates laser is ener gized Warning signs Not required Follow precautions on warning signs ...

Page 197: ...is required if 4 3 1 and 4 3 2 fulfilled Remote Interlock Connector 4 3 7 X Beam Stop or Attenuator 4 3 8 X Activation Warning Systems 4 3 9 X Emission Delay 4 3 9 1 X Indoor Laser Controlled Area 4 3 10 X NHZ X NHZ Class 3b Laser Controlled Area 4 3 10 1 X Class 4 Laser Controlled Area 4 3 10 2 X Laser Outdoor Controls 4 3 11 X NHZ X NHZ Laser in Navigable Airspace 4 3 11 2 Temporary Laser Contro...

Page 198: ...orce the control of laser hazards and to effect the knowledgeable evaluation and control of laser hazards For your reference see ANSI Z136 1993 Section 1 3 Laser Optical Fiber Systems 4 5 2 MPE MPE MPE MPE X X Laser Robotic Installations 4 5 3 X NHZ X NHZ Eye Protection 4 6 2 MPE X MPE Protective Windows 4 6 3 X NHZ X NHZ Protective Barriers and Curtains 4 6 4 Skin Protection 4 6 5 X MPE X MPE Oth...

Page 199: ...ewing of these lasers is always hazardous Viewing diffuse reflections is normally safe see note Class 4 Lasers which are also capable of producing hazardous diffuse reflections They may cause skin injuries and could also constitute a fire hazard Their use requires extreme caution Class FDA definition ANSI description Class I 1 Limits applicable to devices that have emis sions in the ultraviolet vi...

Page 200: ...ces that emit in the ultraviolet visible and infrared spectra Class IIIb products include laser systems ranging from 5 to 500 milliwatts in the visible spectrum Class IIIb emission levels are ocular hazards for direct exposure through out the range of the Class and skin hazards at the higher levels of the Class Class IV 4 Exceeding the limits of Class IIIb and are a hazard for scattered reflection...

Page 201: ...e contact your OMRON representative While updating do not turn off the power of the controller The controller will not start normally To install the USB driver log on as an Administrator or a user with system access rights Flow of Updating Firmware Connecting Controller to a personal computer Normal Starting warp engine ZS Setting the firmware information Performing update of firmware Normal end P...

Page 202: ...ating the controller breaks down and does not run normally Make sure that you turn on the power of the controller only when it is not connected to other control lers If you connect two or more controllers Warp Engine ZS does not start Installing SmartMonitor ZS 3 Install SmartMonitor ZS to a personal computer Warp Engine ZS that is used for updating the firmware will be simultaneously installed In...

Page 203: ...message appears Go to Set the connection port Setting the firmware information 5 Click the Controller information button as required The model and version of the controller that is being connected currently are displayed 6 Click the Loading button and select the file in which you want to write The model and version of the controller that is held in the file are displayed Performing Update of Firmw...

Page 204: ...ppears it takes a few minutes to complete the update An error may occur on the controller during update however please wait If the progress bar stops while update is being performed or update does not finish normally even after 10 minutes there is a possibility that update may have failed In this case contact an OMRON sales representative about the firmware version before update and the one in the...

Page 205: ...enu in the personal com puter and double click System The System Properties screen is displayed 2 Click Device Manager on the Hardware tab The Device Manager screen is displayed 3 Open Port COM LPT and check the COM number in OMRON Smart Sen sor USB COM Drivers WDM COMxx The COMxx part indicates the connection port for the controller 4 Select the connection port for the controller in COM Port and ...

Page 206: ...9 20 Section9 APPENDIX ZS HL User s Manual Section9 Updating Firmware MEMO ...

Page 207: ...5 CYCLE 5 27 6 14 D DELAY 5 21 DIFF 5 13 DIFFUSE 5 8 DIGITAL 7 7 Digital Display CUSTOM 5 25 digital output 7 7 DIRECT IN 4 7 DOT 5 25 E ECO 5 25 emitted light amount display 4 2 emitter section 1 4 ENABLE indicator 1 6 OUTPUT 2 10 EXPOSE 5 7 Extension Cable 2 6 8 42 8 43 EXTERNAL 5 19 F FAR Indicator 1 5 Ferrite core Sensor Controller 2 7 Sensor Head 2 5 USB 7 4 FILTER 5 12 FIXED 5 8 FOCUS TERMIN...

Page 208: ... 6 10 P panel mount adapter 8 41 PASS indicator 1 6 OUTPUT 2 10 PCB 5 9 PEAK hold types 5 18 MEASURE 5 24 P P 5 18 R RANGE 5 8 received light amount display 4 2 receiver section 1 4 REGULAR 5 8 resolution display 4 2 RS 232C cable external dimensions 8 45 cable wiring 7 5 7 6 communication settings 7 6 connector 1 6 RUN mode 4 2 S SAMPLE 5 19 SAVE 5 29 saving 5 29 SCALING 5 15 SELF DOWN 5 20 SELF ...

Page 209: ... Switch 1 6 threshold value display 4 2 TIMER 6 7 timing A B 5 11 timing charts 6 18 AVERAGE HOLD 6 21 bank switching 6 22 basic operation 6 18 BOTTOM HOLD 6 21 laser OFF 6 22 NORMAL 6 19 PEAK HOLD 6 21 P P HOLD 6 21 RS 232C 7 8 sample hold 6 20 terminal block output 6 24 USB 7 8 zero reset 6 23 TRIGGER 5 19 U USB communication settings 7 4 driver 2 16 port 1 6 V VERSION 5 27 voltage display 4 2 V...

Page 210: ...9 24 ZS L User s Manual Section9 Index Section9 APPENDIX MEMO ...

Page 211: ...emitter sections Page 6 17 Added CHECK in middle of page Page 7 6 Added note in middle of page Pages 8 3 to 8 6 Added typical example Pages 8 7 to 8 9 8 12 8 13 and 8 40 Added cable length Page 8 19 Changed measurement center value in five locations Page 8 29 to 8 37 Changed high resolution to standard Page 8 29 Changed scale in top four charts Page 8 39 Added section on export and trade control o...

Reviews: