background image

30

ES

B

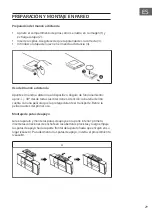
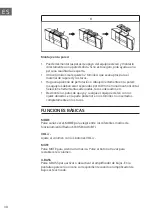
Montaje en la pared

•  Puede desmontar las patas de apoyo del equipo estéreo y montarlo 

directamente a una pared sólida. Si no está seguro, pida ayuda a una 

persona cualificada o experta.

•  Utilice tornillos (se requieren 2 tornillos) que sean aptos para el 

material de la pared y los tacos.

•  Haga una plantilla de perforación o dibuje directamente en la pared: 

los agujeros deben estar separados por 160 mm en una línea horizontal. 

Seleccione herramientas adecuadas, tacos adecuados, etc.

•  Desmonte las patas de apoyo y cuelgue el equipo estéreo con los 

ojales ubicados en la parte posterior en los tornillos no insertados 

completamente en los tacos.

FUNCIONES BÁSICAS

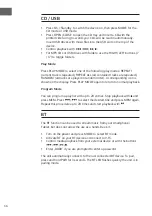
MODE

Pulse varias veces MODE para elegir entre los diferentes modos de 

funcionamiento (Radio/CD/USB/AUX/BT).

VOL+/-

Ajuste el volumen con los botones VOL+/-.

MUTE

Pulse MUTE para silenciar la música. Pulse el botón otra vez para 

restablecer el volumen.

X-BASS

Pulse X-BASS para activar o desactivar el amplificador de bajos. En la 

pantalla aparecerá un icono correspondiente cuando el amplificador de 

bajos esté activado.

Summary of Contents for 10029363

Page 1: ...V 15 Stereo System Equipo est reo US 10029363 US 10029364 V355...

Page 2: ...ICH BIN EIN BERLINER John F Kennedy on June 26 1963 in his speech in Berlin on the occasion of the 15th anniversary of the Berlin Airlift...

Page 3: ...ulations on your purchase Please read the following instructions carefully for the connection and use of this product It is important to carefully follow these instructions to prevent serious personal...

Page 4: ...10029364 Power supply 120 V 60 Hz FM Radio 87 5 108 MHz BT frequency 2402 2480 MHz BT radio frequency power max 4 793 dBm Made in China Berlin Brands Group Inc 1 01 Montgomery Street Suite 2050 in San...

Page 5: ...duct s enclosure that may be of sufficient magnitude to constitute a risk of electric shock to persons Triangle with exclamation point plus explanation as follows ATTENTION The exclamation point withi...

Page 6: ...accept any interference received including interference that may cause undesired operation These FCC rules are designed to provide reasonable protection against harmful interference in a residential...

Page 7: ...ch in the opinion of the Company has suffered or been damaged through alteration improper installation mishandling misuse neglect accident or by removal or defacement of the factory serial number bar...

Page 8: ...long periods Any actions to the contrary shall be construed as a neglect as set forth herein When servicing only use identical replacement parts as specified by the manufacturer Usage of any other pa...

Page 9: ...openings shall be construed as neglect as set forth herein Only use accessories recommended by the manufacturer or a specialist dealer Usage of any unauthorized accessories shall be construed as an a...

Page 10: ...10 CONTROLS 1 Left speaker 4 IR sensor 2 CD tray 5 Right speaker 3 Stand 6 Display 7 USB slot 12 VOL 8 On Standby 13 OPEN CLOSE 9 MODE 14 VOL 10 Play Pause 15 11 Stop 16...

Page 11: ...11 EN 17 FM antenna 19 AC IN 18 AUX IN 3 5mm...

Page 12: ...tandby 11 MODE 2 SLEEP 12 PLAY MODE ST FM MONO 3 EQ 13 4 MEM CLK 14 Play Pause 5 15 FOLDER ON OFF 6 X BASS 16 Stop Pair 7 Previous Preset Folder 17 Next Preset Folder 8 MUTE 18 VOL 9 OPEN CLOSE 19 VOL...

Page 13: ...Push in the holder to the original position See 4 Using the remote control Hold the remote control towards the unit Operating angle Approx 30 in any direction Caution The lithium battery has a foil t...

Page 14: ...lled on a horizontal line at a distance of 160 mm from each other Make sure that you choose the appropriate tools suitable suitable dowels etc Remove the stand and hang the stereo system with the eyel...

Page 15: ...ODE to select radio mode Use TUNE button and TUNE button to search the frequency band for stations manually press and hold for an automatic search in the respective direction Save the current station...

Page 16: ...corresponding icon is shown on the display Press PLAY MODE again to return to normal playback Program Mode You can program a play list with up to 20 entries Stop playback with and press MEM Press to s...

Page 17: ...set the hour and press CLOCK to confirm Repeat for setting the minutes Note The clock will be reset when the device is disconnected from the AC outlet Set timer Press TIMER to activate the timer func...

Page 18: ......

Page 19: ...equipo La empresa no se responsabi liza de los da os ocasionados por un uso inde bido del producto o por haber desatendido las instrucciones de este manual En este caso us ted asume toda responsabilid...

Page 20: ...0029364 Alimentaci n 120 V 60 Hz Radio FM 87 5 108 MHz BT BT frecuencia 2402 2480 MHz BT potencia de radiofrecuencia max 4 793 dBm Made in China Berlin Brands Group Inc 1 01 Montgomery Street Suite 20...

Page 21: ...clamaci n m s la siguiente explicaci n ATENCI N el signo de exclamaci n dentro de un tri ngulo equil tero indica al usuario que en esta gu a existen instrucciones importantes de operaci n y mantenimie...

Page 22: ...onamiento est sujeto a las siguientes dos condiciones 1 que el dispositivo no cause una interferencia perjudicial y 2 que el dispositivo acepte toda interferencia que reciba incluida la interferencia...

Page 23: ...o pieza de este que en opini n de la Compa a haya sufrido da os por alteraci n mala instalaci n mal manejo uso indebido descuido accidente o porque se haya retirado o alterado su n mero de serie de f...

Page 24: ...raria a la descrita se interpretar como negligencia tal y como se establece en el presente documento Al realizar reparaciones utilice nicamente piezas de repuesto id nticas a las originales El uso de...

Page 25: ...nterpretado como negligencia tal y como se establece en el presente documento Utilice nicamente los accesorios recomendados por el fabricante o un proveedor cualificado El uso de accesorios no autoriz...

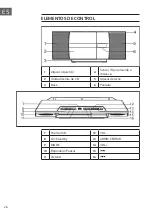
Page 26: ...NTROL 1 Altavoz izquierdo 4 Sensor IR para mando a distancia 2 Unidad lectora de CD 5 Altavoz derecho 3 Base 6 Pantalla 7 Puerto USB 12 VOL 8 On Standby 13 ABRIR CERRAR 9 MODE 14 VOL 10 Reproducir Pau...

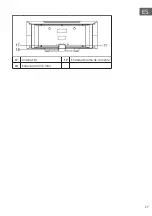
Page 27: ...27 ES 17 Antena FM 19 Entrada de toma de corriente 18 Entrada AUX 3 5 mm...

Page 28: ...ndby 11 MODE 2 SLEEP 12 PLAY MODE ST FM MONO 3 EQ 13 4 MEM CLK 14 Play Pause 5 15 FOLDER ON OFF 6 X BASS 16 Stop Acoplar 7 Pista Emisora anterior 17 Siguiente pista emisora 8 MUTE 18 VOL 9 OPEN CLOSE...

Page 29: ...positivo ngulo de funcionamiento aprox 30 desde todas las direcciones Atenci n la bater a de litio cuenta con una pel cula que la protege durante el transporte Retire la pel cula antes del primer uso...

Page 30: ...ione herramientas adecuadas tacos adecuados etc Desmonte las patas de apoyo y cuelgue el equipo est reo con los ojales ubicados en la parte posterior en los tornillos no insertados completamente en lo...

Page 31: ...a seleccionar el modo de radio Utilice los botones TUNE y TUNE para buscar emisoras manualmente en la banda de frecuencias mantenga pulsado para una b squeda autom tica en la direcci n correspondiente...

Page 32: ...E de nuevo para volver a la reproducci n normal Modo Program Puede programar una lista de reproducci n con hasta 20 pistas Detenga la reproducci n con el bot n y pulse MEM Seleccione con los botones l...

Page 33: ...te paso para configurar los minutos Nota La hora no se guarda si desconecta el aparato de la red el ctrica Configurar el temporizador Despertador Pulse TIMER para activar la funci n de temporizador En...

Page 34: ......

Page 35: ......

Page 36: ......

Reviews: