30
EN
Inserting the batteries in the remote control
• Push down the battery compartment cover and slide the cover off to open
the compartment.
• Insert one CR2025 battery according to the polarity markings (+ and -) in
the compartment and on the battery.
• Place the lid in the compartment, press it down gently and slide it inwards
until it clicks into place.
Note:
If the remote control is not used for a long time, the battery may
become weak and the remote control may not work. If this happens,
replace the battery with a new one. Do not expose the battery of the
remote control to excessive heat such as sunshine, fire or the like.
Setting the time
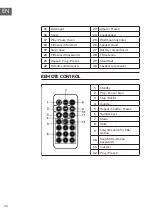
In standby mode, press and hold the TIME key and the time display flashes.
Press the VOL- /Hour and /MINUTE buttons to set the current
time.
RADIO
Note:
When searching for stations or listening to radio stations, no
frequency is shown on the display.
Automatic station search
You can use the Scan function to automatically search for new digital radio
stations and remove inactive stations.
Press and hold the PLAY / PAUSE / FM SCAN button on the stereo system or
on the remote control for 2 seconds to select [Scan]. The number of stations
found is displayed during the automatic station search. When the automatic
station search is finished, the last station listened to is tuned in. If the last
station listened to is no longer available, the first station in the alphabetical list
is set.
To set a particular radio station manually, press the
/
button on the
stereo system or on the remote control repeatedly.
Summary of Contents for Stereoanlage 10006663
Page 2: ......
Page 9: ...9 DE MONTAGE Standfu Verbindung zwischen Lautsprechern und Haupteinheit...
Page 10: ...10 DE Wandmontage...
Page 20: ......
Page 27: ...27 EN MOUNTING Pedestal Connection between speakers and main unit...
Page 28: ...28 EN Wall mounting...
Page 38: ......
Page 45: ...45 ES MONTAJE Pie Conexi n entre los altavoces y la unidad principal...
Page 46: ...46 ES Montaje en la pared...
Page 56: ......
Page 63: ...63 FR MONTAGE Pied Connexion entre les enceintes et l unit principale...
Page 64: ...64 FR Montage mural...
Page 74: ......
Page 81: ...81 IT MONTAGGIO Piedistallo Collegamento tra gli altoparlanti e l unit principale...
Page 82: ...82 IT Montaggio a parete...
Page 92: ......
Page 99: ...99 NL MONTAGE Standvoet Verbinding tussen luidsprekers en basiseenheid...
Page 100: ...100 NL Wandmontage...
Page 110: ......
Page 111: ......
Page 112: ......


