16 Oneida Air Systems
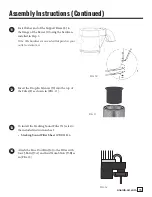
Position the Drum (H) under the Cone (D) and
repeat the process to attach the opposite end of
the Hose (F) onto the collared inlet of the Drum
Lid (G).
15
Unclamp the drum’s Lid (G) and test to see if the
drum (H) is easy to remove from underneath
the cone (D).
If there is insufficient clearance for removing the
drum, you may trim the Flex Hose (F) using a
razor knife and diagonal cutter to cut through
the clear lining and reinforcing wire.
Note:
Be careful to only remove 0.5” at a time so
as not to over trim.
16
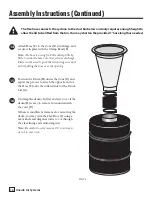
Attach Hose (F) to the Cone’s (D) discharge, and
secure it in place with the Clamp Band (E).
Note:
The hose is a snug fit. Pull ends up little by
little to work the hose onto the cyclone’s discharge.
Pliers can be used to grab the reinforcing wire and
aid in pulling the hose over the opening.
14
Assembly Instructions (Continued)
The flex hose connects the cyclone to the dust bin below and only requires enough height to
allow the lid to be lifted from the bin. You may shorten the provided 1’ hose length as needed.
FIG. 13
Summary of Contents for Dust Gorilla Pro
Page 2: ......
Page 25: ...23 oneida air com Notes ...


