7
Oneida Air Systems, Inc.
Assembly Instructions (Continued)
2
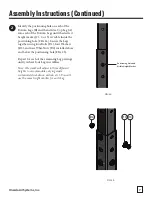
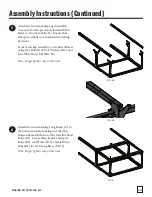
Identify the positioning hole on each of the
Bottom Legs (B) and then slide a Top Leg (A)
into each of the Bottom Legs until the desired
height marker (#1, 2, or 3) is visible inside the
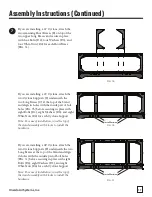
positioning hole [FIG. 2a]. Secure the Legs
together using four Bolts (D2), four Washers
(D3), and four Whiz-Nuts (D4) installed above
and below the positioning hole [FIG. 2b].
Repeat for each of the remaining Leg pairings
until you have four Leg Assemblies.
Note: The stand will adjust to three different
heights to accommodate varying waste
containers (dual-drum, airlock, etc.). You will
use the same height marker for each Leg.
FIG. 2a
FIG. 2b
D4
D2
D3
Positioning Hole and
Visible Height Marker


