IX. Filter Assembly
Caution:
If exhaust air is vented outside you must provide make up / return air.
Flue gases (carbon monoxide) can be drawn into the shop from furnaces,
water heaters or other appliances.
1. Exhaust air to exterior of building.
Mount directly at the hole in exterior
wall or use a square-to-round transition
and ductwork to vent air to exterior.
External Filter Assembly
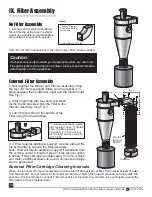
2. Attach cartridge with four bolts and black
thumb knobs provided. Bolt the Filter to the
Plenum Assembly. See Fig. 2.
3. Latch the Dust Bin to the bottom of the
Filter using the draw latches.
1. Bolt together the Blower and Plenum assembly using
the four 3/8 bolts supplied. Make sure the gasket is in
place between the Fan/Blower outlet and the Plenum Inlet.
See Fig. 1
Fig. 1
External Filter Cartridge Cleaning Intervals
When unit is turned off, use compressed air to blow dust off from exterior of filter. Hold nozzle at least 8 away
from filter pleats*. Do not remove bottom dust pan before or during the blow-off process! Let dust settle into
dust pan. Unclip and dump out dust. Filter removal is not required. You can also run your fingers around the
filter pleats to knock material down.
C rated spun bonded polyester
filter contains 130 sq. ft. of filter
area. The filter captures
between 0.2 - 2.0 microns of
test material at a face velocity
of 11 FPM.
Draw latches
3/8 bolts
No Filter Assembly
Note: Do not return exhaust air to the shop unless filter media is added.
* Exhaust Diverter -
Can be used either
up or down
Option -
* Only usable on No Filter.
Do not
remove
bands.
Fig. 2
4. If Filter requires additional support. Use the plate at the
top of the filter to support the filter assembly.
Note: Filter will require additional support if separated from
the cyclone unit by a length of pipe or if the silencer option
is added. If filter cartridge is located away from the cyclone
and motor, additional square-to-round connectors and pipe
can be purchased.
2HP Commercial Wood Dust Collector Owners Manual
O.A.S. 2002
c
10


