background image

Comfort Products, Inc. 
122 Gayoso Avenue, Suite 101 
Memphis, TN 38103

email: customerservice@comfortproducts.net

www.comfortproducts.net

• 


DO NOT stand on the table. Do not use the table as a stepladder.

• 


• 


Every 6 months, check all bolts and screws to ensure they are tight.

• 


This products is California 93120 Compliant for Formaldehyde.

6 of 6

PLEASE VISIT WWW.COMFORTPRODUCTS.NET  FOR WARRANTY INFORMATION 

Comfort Products  warrants this  product to be free from  defects in material and workmanship for one (1) year. This  warranty is made by 

Comfort Products only to the original end-user customer acquiring the product  directly from  Comfort Products' authorized dealers 

as shown by the original  sales receipt. The end-user customer  remedy pursuant to this  warranty is limited to repair or replacement of 

parts at Comfort Products' option within a reasonable amount of time.  Comfort Products reserves the right  to require  damaged parts 

to be  returned  to Comfort Products  upon  request.  Consent from  Comfort  Products  must  be  obtained before  any  warranty  work  is 

performed.  This  warranty  applies  under  conditions of normal use and  is  not  subject to defects  caused by  improper  assembly or 

disassembly;  defects  occurring  after purchase due to product modi cation, intentional damage,  re,  misuse, negligence, or exposure 

to  the  elements; labor  or  assembly cost. This  warranty does not  cover the cost of transportation or  labor. In no event shall  Comfort 

Products be liable in either tort or contract for any loss or direct, special, incidental, consequential or exemplary damages. This Limited 

Warranty is NOT applicable   to end user customers  who  use Comfort Products  for rental purposes. This warranty applies only  to end-

user customers in the United States. All warranties are limited to the original purchaser for normal use. The weight capacity is de ned as 100 

pounds  (unless otherwise speci ed). For claims  or questions concerning  this warranty, please visit  www. comfortproducts.net /support. e-

mail : customerservice@comfortproducts.net 

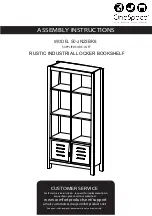
MODEL : # 50-JN23BK8


table

Summary of Contents for 50-JN23BK8

Page 1: ...comfortproducts net support e mail customerservice comfortproducts net Keep your sales receipt as documentation of your ownership CUSTOMER SERVICE t a e t i s b e w r u o t i s i v e s a e l p s n o...

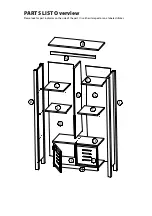
Page 2: ...PARTS LIST Overview Please look for part indicator on the side of the part It is either stamped or on a labeled sticker...

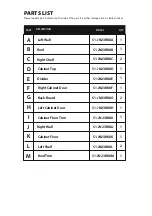
Page 3: ...I J K Left Wall Roof Right Shelf Cabinet Top Divider Right Cabinet Door Back Board Left Cabinet Door Cabinet Floor Trim Right Wall Cabinet Floor Left Shelf Roof Trim L M 51 JN23BK8A 51 JN23BK8B 51 JN...

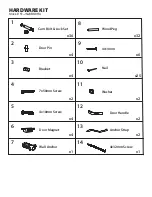
Page 4: ...14 Cam Bolt Lock Set Door Pin x36 x4 x4 Bracket 7x50mm Screw x2 4x18mm Screw x4 Door Magnet x4 x1 Wall Anchor Wood Peg x32 4x14mm x6 x25 x2 x2 x2 Nail Washer Door Handle Anchor Strap 4x32mm Screw x1 H...

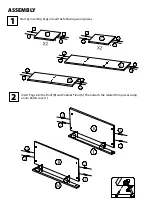
Page 5: ...Start by inserting Pegs into all the following wood pieces Insert Pegs into the Roof B and Cabinet Floor K Then attach the related Trim pieces using a Cam Bolt Lock 1 2 ASSEMBLY 1...

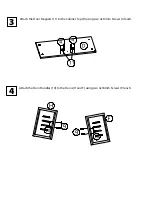
Page 6: ...Attach the Door Magnets 11 to the Cabinet Top D using two 4x14mm Screws 4 each Attach the Door Handles 10 to the Doors H and F using two 4x18mm Screws 9 each 4 3...

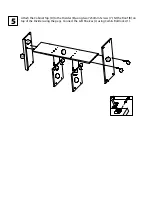
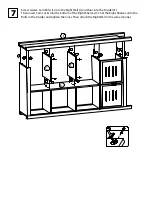
Page 7: ...Attach the Cabinet Top D to the Divider E using two 7x50mm Screws 7 Sit the Roof B on top of the Divider using the pegs Connect the Left Shelves L using Cam Bolt locks 1 5...

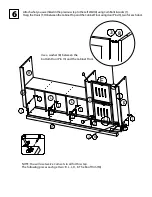
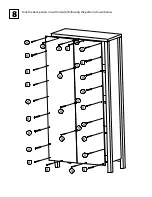
Page 8: ...heDoors F H betweentheCabinetTopandtheCabinetFloorusingdoorPins 3 twoforeachdoor 6 3 8 3 8 Use a washer 8 between the bottom Door Pin 3 and the Cabinet Floor NOTE You will use twelve Cam sets in all f...

Page 9: ...the Right Wall J and four into the Divider E Then insert Cam Locks into the bottom of the Right Shelves C Set the Right Shelves onto the Bolts in the Divider and tighten the locks Then attach the Righ...

Page 10: ...8 5 6 6 6 6 6 6 6 6 6 6 6 6 6 6 6 6 6 6 5 5 5 6 6 6 6 6 6 6 6 Tack the back panels on with nails 6 following the pattern shown below...

Page 11: ...ed parts to be returned to Comfort Products upon request Consent from Comfort Products must be obtained before any warranty work is performed This warranty applies under conditions of normal use and i...

Reviews: