background image

3

2

9

10

10

9

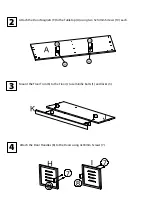
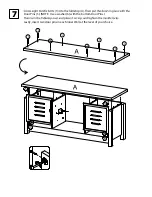
Attach the Door Magnets (9) to the Tabletop (A) using two 3x14mm Screws (10) each.

Mount the Floor Trim (K) to the Floor (J) use minifix bolts (1) and locks (3).

4

Attach the Door Handles (8) to the Doors using 4x18mm Screws (7).

7

7

Summary of Contents for 50-JN23TV

Page 1: ...w comfortproducts net support e mail customerservice comfortproducts net Keep your sales receipt as documentation of your ownership CUSTOMER SERVICE t a e t i s b e w r u o t i s i v e s a e l p s n o...

Page 2: ...A PART DESCRIPTION STOCK QTY B C D E F G H I J K Tabletop Left Wall Right Inner Wall Left Inner Wall Shelf Backboard Right Wall Left Door Right Door Floor Floor Trim 51 JN23TVA 51 JN23TVB 51 JN23TVC...

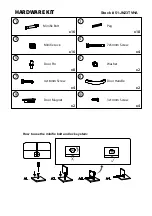
Page 3: ...0 Minifix Bolt Minifix Lock Door Pin 4x18mm Screw Door Magnet Peg 7x50mm Screw Washer Door Handle 3x14mm Screw x16 x16 x8 x4 x2 x18 x4 x2 x2 x4 HARDWARE KIT Stock 51 JN23TVHA How to use the minifix bo...

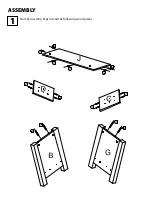
Page 4: ...Start by inserting Pegs into all the following wood pieces ASSEMBLY 1...

Page 5: ...Attach the Door Magnets 9 to the Tabletop A using two 3x14mm Screws 10 each Mount the Floor Trim K to the Floor J use minifix bolts 1 and locks 3 4 Attach the Door Handles 8 to the Doors using 4x18mm...

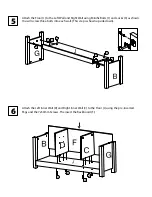
Page 6: ...Minifix Bolts 1 and Locks 3 as shown You will screw three bolts into each wall This step is shown upside down J 6 Attach the Left Inner Wall D and Right Inner Wall C to the Floor J using the pre inse...

Page 7: ...7 Door Pins 5 NOTE Use a washer 6 with the bottom Door Pins Lastly insert two door pins in each Inner Wall at the level of your choice 1 1 1 1 1 1 1 1...

Page 8: ...WEIGHT CAPACITY 110 LBS...

Page 9: ...ged parts to be returned to Comfort Products upon request Consent from Comfort Products must be obtained before any warranty work is performed This warranty applies under conditions of normal use and...

Reviews: