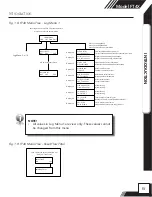
background image

106796

Rev D

Model FT4X

Fox Thermal

www.foxthermal.com   |  

399 Reservation Road Marina, CA.  93933

THERMAL MASS FLOW METER 

& TEMPERATURE TRANSMITTER

Precision Mass Flow Measurement

An ON

I

CON Brand

Summary of Contents for Fox Thermal FT4X

Page 1: ...106796 Rev D Model FT4X Fox Thermal www foxthermal com 399 Reservation Road Marina CA 93933 THERMAL MASS FLOW METER TEMPERATURE TRANSMITTER Precision Mass Flow Measurement An ONICON Brand ...

Page 2: ...HONE 831 384 4300 FAX 831 384 4312 EMAIL SERVICE FOXTHERMAL COM Download Technical Data Sheets from our website www foxthermal com Fox Thermal Instruments Inc Fox Thermal believes that the information provided herein is accurate however be advised that the information contained herein is NOT a guarantee for satisfactory results Specifically this information is neither a warranty nor guarantee expr...

Page 3: ...ation Option Page 33 d Pulse Alarm Wiring optional feature Page 36 e RS485 Wiring Page 38 f HART Handheld Wiring Page 39 g Remote Wiring Page 40 4 Operation Standard Operation Page 42 a Start Up Page 42 b Programming Page 44 c CAL V Page 65 d Gas SelectX Page 68 e Data Logger Page 72 5 Communication Protocols Page 79 a Modbus RTU RS485 Page 80 b HART with DDL Page 91 6 Maintenance Page 98 a Safe R...

Page 4: ...r through the front panel of the display or by using the FT4X View software tool Record the settings in the spaces given for items A F on the following page Use the table below as a guide while using the worksheet on the next page to record your notes NOTE Please read the entire quick start procedure before beginning installation ID OUTER DIAMETER FLOW 4X INLINE 10X INSERTION 8X INLINE 15X INSERTI...

Page 5: ...essing the meter settings either through the front panel of the meter s display or by using the FT4X View software tool A Which flow units have been set in meter SCFM KG H etc B Correct values for reference temperature and pressure Y N Y N Y N Y N C Confirm the pipe ID listed above same as Pipe_id D Verify the 1st 4mA and 20mA meter settings 4mA 20mA 4mA 20mA 4mA 20mA 4mA 20mA E Verify the 2nd 4mA...

Page 6: ... by scolling to display 4 and entering the password mA Fault Not use NXT OK Not use 3 6 mA 21 mA Communication Level 2 only I O MENU I O COM 420 EXIT Comm Hart OK Address 0 CHG OK 0 63 Modbus Only HART Only SET 4 20 mA CH1 CH2 EXIT 20 mACnt 3265 CHG OK 4 mACnt 367 CHG OK 20 mA 2345 6 SCFM CHG OK 4 mA 0 SCFM CHG OK mA Fault Not use NXT OK Not use 3 6 mA 21 mA Level 2 only Display Menu p 10 Flow Men...

Page 7: ...Alarm Low Flow Alarm High Temp Alarm Low Temp Alarm Select 1 of 3 methods to scale the pulse output Pulse OUT HiFloAlm NXT OK OUT LoFloAlm NXT OK OUT HiTempAlm NXT OK OUT LoTempAlm NXT OK Set I O OUT INP EXIT Alarm output MAIN MENU I O FLO DSP EXIT Inp Not Used NXT OK Not used Tot Reset I O MENU I O COM 420 EXIT See Flow Menu 2 p 9 for more alarm settings i NOTE A value of 0 disables the alarms 7 ...

Page 8: ... S NLPH NLPM MMSCFD LBS D SLPM NLPS MSCFD SM3 H MT H NM3 D MMSCFM SCFD MCFD SM3 M SM3 D TMP UNT F NXT OK Deg F Deg C TmpRef 60 F CHG OK PRES UNT Psia NXT OK PresRef 14 73 CHG OK mmHG Psia bara Simulate Flow YES NO Simulate Temp YES NO MAIN MENU I O FLO DSP EXIT Flow Menu 2 Menu p 9 CAL V Menu p 11 8 Model FT4X DISCLAIMER 8 INTRODUCTION Introduction Fig 1 3 FT4X Menu Tree Flow Menu 1 ...

Page 9: ...m 0 F CHG OK Level 2 RESTORE DATABASE YES NO MAIN MENU I O FLO DSP EXIT FLOW MENU 1 DGN UNT FM2 EXIT These alarms can be used without the digital output assigned to the alarm If that is the case the alarm status will only be shown on the display through serial communication or FT4X View If the digital output is assigned to an alarm changing the value here will change that setting A value of 0 disa...

Page 10: ... log On NXT OK On Off Date Time Review NXT 10 12 17 10 33 CHG OK Year Set 17 CHG OK Month Set 10 CHG OK Day Set 12 CHG OK Hour Set 12 CHG OK Min Set 51 CHG OK Sec Set 0 CHG OK Set Date Time YES NO Contr time 12 59 CHG OK Contr Hour 12 CHG OK Contr Min 59 CHG OK Set Contr Time YES NO Contract time for 24 hour total i 10 Model FT4X DISCLAIMER 10 INTRODUCTION Introduction Fig 1 5 FT4X Menu Tree Displ...

Page 11: ...CAL V 0 911 Warning OK CAL V 2 321 Fail OK FLOW MENU 1 DGN UNT FM2 EXIT MAIN MENU I O FLO DSP EXIT Flo Hold Value NXT EXIT OK Hold Value Go to zero Take Control off line EXIT OK CAL V Fail Greater than 1 0 CAL V Pass Less than 0 80 CAL V Warning Between 0 80 to 1 0 Choosing Hold Value will retain the last flow value while test is being performed 11 Model FT4X INTRODUCTION Introduction Fig 1 6 FT4X...

Page 12: ... 0 CHG OK O G Mix 100 CHG OK Ethane 0 CHG OK Shows only if gas mix does not equal 100 0 i Butane 0 CHG OK n Butane 0 CHG OK Err Mix 99 9 CHG Methane 45 5 CHG OK Nonanes 0 CHG OK Octanes 0 CHG OK Propane 54 4 CHG OK Shows only if no error is detected Pressing OK allows exit to menu OR Hexanes 0 CHG OK CO2 0 CHG OK Nitrogen 0 CHG OK Nonanes Total of all gases C9 and greater Methane CO2 Nitrogen Air ...

Page 13: ...off in hours Reset Total NO YES Resetting Total Fig 1 8 FT4X Menu Tree Log Menu 1 NOTE All values in Log Menu 1 are view only These values cannot be changed from this menu 3124 6 SCFM csv 0 3432 Volt Enter Log Menu Press F1 F2 at the same time Press F4 to return to normal mode Display 10 Display 11 Display 12 Display 13 Pulse 1234 5 cnt mA_420 234 cnt Display 14 Elp 12 5 HR Stat hex 2800 Display 1...

Page 14: ... 00 SCFM NXT PRV EXIT TmpHi 0 0 F NXT PRV EXIT TmpLo 0 0 F NXT PRV EXIT RefP 14 73 psia NXT PRV EXIT RefT 60 00 F NXT PRV EXIT Kfact 0 0 NXT PRV EXIT Cutoff 12 5 SCFM NXT PRV EXIT PipeID 4 03 In NXT PRV EXIT Flt 0 80 Sec NXT PRV EXIT MTR_Sn 123456 NXT PRV EXIT FT4X V6 0 NXT PRV EXIT Release 11_30_17 PRV EXIT CAL V 0 1 NXT PRV EXIT CAL V Pass NXT PRV EXIT P CAL V 0 14 NXT PRV EXIT P CAL V Pass PRV E...

Page 15: ...hich measure volumetric flow rate Volumetric flow is incomplete because temperature and pressure are unknown and must be measured separately For example the mass flow of a gas depends on its temperature and pressure As temperature and pressure changes the gas volume changes but not its mass Therefore a device measuring mass flow is independent of temperature and pressure changes The Model FT4X pro...

Page 16: ...on The FT4X features two galvanically isolated 4 20mA analog outputs HART communication a pulse output switch input and Modbus RTU RS485 There is also a USB port for interfacing with a laptop or computer The first 4 20mA output can be used for HART communication The second 4 20mA output can be configured for flow rate or process gas temperature and can be scaled by the user The pulse output can be...

Page 17: ...rd 2 line x 16 character backlit LCD display shows flow rate total flow elapsed time process gas temperature and alarms The display is also used in conjunction with the Configuration Panel for field configuration of flow meter settings such as gas selection 4 20mA scaling pulse output scaling pipe area flow cutoff flow filtering display configurations diagnostics communication parameters data logg...

Page 18: ...pplication 3 The enclosure cover must be closed except during configuration or at times during installation 4 Mounting FT4X in direct sunlight can cause the temperature inside the enclosure to increase beyond design limits resulting in failure of LCD display and reduced component life It is recommended that a sunshade be installed to avoid direct sunlight see maximum enclosure operating temperatur...

Page 19: ...low Meter Lateral Placement Install the Model FT4X flow meter so that it is far enough away from bends in the pipe obstructions or changes in line sizes to ensure a consistent flow profile See Fig 2 1 below for your meter type Fig 2 1 Upstream and Downstream Pipe IDs for Insertion and Inline Flow Meters NOTE Pipe ID Inside Diameter The probe diameter is An irregular flow profile will affect sensor...

Page 20: ...ay have moisture or condensation if the gas may have moisture or condensation if possible Contact Fox for further Contact Fox for further recommendations recommendations Fig 2 2 Fig 2 2 Tilt Installation at 180 Tilt Installation at 180 Alternate Installations Vertical Pipes or Restricted Installation Spaces When restricted physical installation space exists the FT4X can also be installed at other ...

Page 21: ...aligned to the center of the pipe and the hole is centered in the NPT fitting see Figure 2 4 5 To verify that the correct hole position has been achieved carefully slide the 0 75 inch sensor in and out of the NPT female fitting and 0 781 inch hole WARNING Do not force the 0 75 inch sensor through the 0 781 inch hole Forcing it through the 0 781 inch hole can damage the probe 6 Verify that the temp...

Page 22: ...own in Fig 2 4 the end of the sensor window should be 0 73 18 5 mm past the center line of the pipe Review the dimensional drawing below with the following equation to calculate insertion depth L D 2 73 insertion depth Insertion depth is measured from the top of the compression fitting to the bottom end of the probe CAUTION For a 1 pipe do not tighten compression fitting without 0 2 distance from ...

Page 23: ... first loosen the two set screws near the Flow Direction Indicator Then rotate the enclosure into the desired position and tighten the set screws Do not rotate the enclosure more than 360 degrees Direction of Flow and Orientation of the Probe Install the meter with the flow direction indicator pointing in the direction of flow and centered on the middle of the pipe The rotational misalignment of t...

Page 24: ...h the display board from the metal shield by loosening the three screws on the back of the round shield Rotate the display board to the desired orientation Ensure that the display cable is routed flat and straight through the display hinge to prevent binding Reattach the display board to the metal shield by tightening the three screws Close the display assembly and secure it to the enclosure with ...

Page 25: ...e opposite wall and pull back 0 2 Tighten the compression fitting nut While holding the fitting body steady tighten the nut one and one quarter 1 turns to the 9 o clock position See Figure 2 8 Fig 2 8 Proper Tightening of the Compression Fitting Nut CAUTION For a 1 pipe do not tighten compression fitting without 0 2 distance from wall or damage to probe will occur CAUTION Once the stainless steel ...

Page 26: ...tor assembly and leave the ball valve open Keep the collar spacer on the probe so it is not misplaced 3 Install the valve assembly on the pipe by tightening the Hex Nipple with a 1 3 8 wrench Fig 2 9 Retractor Assembly With and Without Probe Installed Hex Nipple Collar clamp Collar spacer 26 Model FT4X INSTALLATION Installation ...

Page 27: ...e to see if there is interference by touching the pipe wall with the end of the probe on the far side or until the probe cannot go deeper Remove the probe Remove the retractor and rework the hole if required Fig 2 10 Verify Probe Insertion 27 Model FT4X INSTALLATION Installation ...

Page 28: ... 36R RC DIMENSION 5 Using the equation L D 2 0 73 from Figure 2 11 calculate the insertion depth and mark on the probe while measuring from the end of the probe 6 The Retractor Clearance table of Figure 2 11 lists the space required to remove the meter from the retractor Use the model code of your meter to determine the dimension Fig 2 11 Determining and Marking Insertion Depth 28 Model FT4X INSTA...

Page 29: ...s on p 25 10 Install collar clamp back on probe just below the collar spacer Install collar so that the cable mounting hole is in line with the mounting hole on the bracket i NOTE For instructions on how to properly remove and replace the meter from a retractor please refer to Instructions for Removing and Inserting the Meter from a Pressurized Pipe using the Retractor on page 99 Compression nut f...

Page 30: ...n panel and remote sensor wiring terminals TS2 Terminals Switch input Pulse Communications TS1 Terminals Power 4 20mA CH 1 4 20mA CH 2 Display front panel Rear of display Wiring Instructions To wire the FT4X connect the power and signal wires to the terminal blocks according to the label and instructions on the following pages Fig 3 1 FT4X Wiring Access i NOTE Cut all wires as short as allowable f...

Page 31: ...l and serial communication wiring the recommended wire gauge is 18 to 22 AWG Always use twisted pair shielded cable Modbus Cable Specs A shielded 22 to 18 gauge three conductor cable is recommended for Modbus communication wiring Two of the wires in the cable should be twisted pair and used for the Modbus transmit and receive signals The third wire is for the Modbus common signal The shield drain ...

Page 32: ...m With 12VDC power the FT4X can use up to 500mA With 24VDC power the FT4X can use up to 250mA A 20 Watt or greater power supply is recommended to ensure it can provide enough current under all temperature ventilation and power on conditions The enclosure must be properly grounded with a quality earth ground Sixteen 16 gauge stranded wire is recommended for earth ground Connect the power wiring as ...

Page 33: ...mmended Bring the wiring in through either conduit hub Connect the 4 20mA flow rate 4 20mA temperature and HART communication option wiring as shown in the diagram below Fig 3 3 4 20mA Output Wiring for Isolated Customer Supplied Power Source NOTE When using a 12 volt power supply the load resistor on the 4 20mA output must be 125 ohms or less to operate properly When using 24 volt power the load ...

Page 34: ... wiring in through either conduit hub Connect the 4 20mA flow rate 4 20mA temperature and HART communication option wiring as shown in the diagram below Fig 3 4 4 20mA Output Wiring for Loop Power Provided by FT4X NOTE When using a 12 volt power supply the load resistor on the 4 20mA output must be 125 ohms or less to operate properly When using 24 volt power the load resistor is typically 250 ohm...

Page 35: ...nking a maximum of 20mA of current Pulse or alarm selection is programmed using the display or FT4X View Only one option pulse or alarm can be active at a time Fig 3 5 Pulse Alarm Output Isolated Recommended NOTE The FT4X Pulse Alarm output is typically used to drive digital circuitry or solid state relays The output of a solid state relay may in turn operate loads such as electromechanical relays...

Page 36: ...the Pulse Alarm output is 20mA Choose a load resistance that provides approximately 10mA with the power supply operating voltage When the output is configured for Alarm and an alarm is not active the output will be on 0 volts output When an alarm is active the output will be off 12 to 28 volts output Pulse Alarm Output Wiring Power Provided by FT4X Bring pulse alarm wiring in through either condui...

Page 37: ...F1 J1 USB 0 75A W1 TERMINATION TP1 TP2 FT4X Customer PLC or DCS Remote Switch Switch Input Wiring A remote switch can be used to reset the Totalizer and elapsed time if enabled in the programming settings Connect the switch input wiring as shown in the diagram below Fig 3 7 Switch Input Wiring 37 Model FT4X WIRING Wiring Model FT4X WIRING ...

Page 38: ...ication Common Termination Resistor Jumper detail Terminated No Termination Open Shield RS485 Wiring for Modbus RTU RS485 Wiring connections are made as shown in the diagram below for Modbus communication Termination Resistor Connect a termination resistor across the receive transmit signals of the last device on the communication line To connect the 121 ohm termination resistor on the FT4X set ju...

Page 39: ...FT4X Customer PLC or DCS 4 20mA see note for Fig 3 3 HART Handheld Communicator 39 Model FT4X WIRING Wiring HART 4 20mA Output Wiring Handheld Communicator The 4 20mA current loop and HART modem connections are shown on p 33 and p 34 A handheld HART communicator can be connected to test points TP1 and TP2 with clip leads or to the 4 20mA terminal block Fig 3 9 HART 4 20mA Output Wiring Handheld Co...

Page 40: ...t connect the cable shield at the electronics enclosure end Connect the cable shield at the remote sensor terminal NOTE The enclosures must be properly grounded with a quality earth ground 16 gauge stranded wire is recommended Use an extension cable to connect the terminals of the remote sensor enclosure to connector TS3 located behind the front panel of the electronics enclosure as shown in Figur...

Page 41: ...r Wiring i NOTE Wire colors listed here represent the wire colors of cables supplied by Fox Thermal Colors may vary if customer is supplying their own cable Table 3 1 Remote Sensor Cable Wiring Wiring 41 Model FT4X WIRING Electronics Enclosure Terminals Extension Cable Wire Color Remote Enclosure Terminal Numbers Sensor Wire Color Red Red 1 Red Red Brown 2 Red White White 3 White White Black 4 Whi...

Page 42: ...interface and allows data monitoring configuration setting data logging to Excel and an option to save and recall FT4X configuration data FT4X Display and Configuration Panel The FT4X has a 2 line x 16 character display with 4 mechanical buttons The meter can be programmed by using the display and configuration panel The configuration panel can be accessed by removing the FT4X cap Be sure to repla...

Page 43: ...ing Menu screens refer to p 13 Pressing the F3 and F4 keys at the same time brings up the Reset Total screen prompt Fig 4 2 FT4X Measurement Mode Display Screen Navigation Operation 43 Model FT4X OPERATION F1 key Moves up one screen F2 key Moves down one screen User programable screen User programable screen Enter totalizer reset screen when F3 F4 are pressed at the same time Fixed screen Enter pr...

Page 44: ... select the next digit and OK F4 to accept the entry To Select from a List F1 F2 F3 F4 Press NXT F1 key repeatedly until the correct selection is made and OK F4 key to accept the entry Entering the Programming Mode To enter the programming mode and access the Main Menu press the F1 or F2 key in the normal running mode until the following screen is shown F1 F2 F3 F4 Press YES F4 and the following s...

Page 45: ...20mA Outputs The following menu allows the scaling of the analog 4 to 20mA output From the Main Menu press I O F1 to move to the 4 to 20mA output selection In this screen press 420 F3 screen appearance may vary according to options F1 F2 F3 F4 The 4 to 20mA output is programmable for flow or temperature F1 F2 F3 F4 Selections for the 4 to 20mA output are Flow Temp Select NXT F1 to select Flow or T...

Page 46: ...3 alarm feature The options are mA Fault 3 6 mA Force the 4 20mA signal to 3 6mA on alarm mA Fault 21 mA Force the 4 20mA signal to 21mA on alarm mA Fault Not use 4 20mA signal alarm fault not used The following events will set the output to 3 6mA or 21mA if the alarm level is selected Sensor resistance above high limit Bridge Shutdown Fig 4 3 Range of 4 20mA Output and NAMUR Alarm 4 mA 0 SCFM CHG...

Page 47: ...value of flow rate All of these approaches are equivalent F1 F2 F3 F4 Use P U F1 to enter pulse per unit U P F2 for unit per pulse or FEQ F3 to enter the flow and maximum frequency to scale the pulse alarm output NOTE When data is entered with any of the three described methods the other values will be re calculated according to the settings Entering data in Pulse per Unit From the Pulse alarm Out...

Page 48: ... show F1 F2 F3 F4 Enter the maximum pulse rate frequency and press OK F4 CAUTION Maximum pulse rate frequency cannot exceed 100 Hz The next screen will show F1 F2 F3 F4 NOTE If the flow rate exceeds the maximum pulse rate frequency the output will stay at 100 Hz and the FT4X will issue an alarm code Alarm Output To access the Pulse alarm feature press I O F1 key from the Main Menu screen The scree...

Page 49: ...pressing CHG F1 and then OK F4 A value of 0 disables the alarm NOTE There is only one output to operate as a pulse output or an alarm output Both cannot operate at the same time For Switch Input Settings From the Main Menu press I O F1 and then I O F1 and then INP F2 key to select input The following menu will display F1 F2 F3 F4 Press NXT F1 until the correct selection is shown and then press OK ...

Page 50: ...a communication option see the Communications Protocols section of this manual Display Setup There are four display screens that you can cycle through in normal operating mode see Figure 4 2 on p 43 Two of the four display screens are fixed and cannot be changed displays 3 4 The other two screens are programmable to show the information that you prefer and is discussed in this section Display 1 Di...

Page 51: ...cept The display will then go through the same process for all 4 lines of the 2 programmable displays DSP1L1 DSP1L2 DSP2L1 and DSP2L2 After the last line of display 2 is accepted the display will show the following menu F1 F2 F3 F4 This menu allows you to alternate between menu display 1 and 2 every few seconds Selections are On or Off Press OK F4 to accept selection Press EXIT F4 repeatedly until...

Page 52: ...be displayed as a 24 hour clock military time format HH MM SS F1 F2 F3 F4 If the date and time are correct the 24 Hour Log will be turned on or off by pressing NXT F1 If the date and time are incorrect the values can be changed and set by choosing CHG F1 and following instructions in the next section Programming the Date Time for 24 Hour Logs and Contract Time The following screens will cycle thro...

Page 53: ...hour value Next press CHG F1 to set the minute value 00 59 F1 F2 F3 F4 Press OK F4 to set the minute value Next press CHG F1 to set the second value 00 59 F1 F2 F3 F4 Press OK F4 to set the second value Next press CHG F1 to set the minute value 00 59 To set all final values choose YES F1 or start over by choosing NO F4 F1 F2 F3 F4 Month Set MM CHG OK Day Set DD CHG OK Hour Set HH CHG OK Min Set MM...

Page 54: ...F4 To accept the listed Contract Time choose OK F4 To change and set the value of the Contract Time press CHG F1 First set the hour value 00 23 F1 F2 F3 F4 Press OK F4 to set the hour value Next press CHG F1 to set the minute value 00 59 F1 F2 F3 F4 Press OK F4 to set the minute value To set the final value choose YES F1 or NO F4 F1 F2 F3 F4 The Contract Time will be displayed MM DD YY HH MM SS CH...

Page 55: ...ng it to 0 From the Main Menu press DSP F3 to select the display menu To Program the Password F1 F2 F3 F4 Press PSW F3 key to select password F1 F2 F3 F4 This screen displays the current Level 1 password Press CHG F1 key to change the password and enter new value Press OK F4 to accept new data and exit programming by pressing EXIT F4 key repeatedly until out of the programming mode NOTE Password c...

Page 56: ...2 F3 F4 Press NXT F1 to change selection and OK F4 to accept NOTE The totalizer total flow measured will roll over when reaching a certain value The maximum value is dependent on the flow units selected see Totalizer Rollover p 64 Flow Units Selections for flow units are SCFM KG M LBS D SM3 H MSCFD MCFD SCFH KG S NLPH SM3 D MMSCFD MMCFD NM3 H LBS H NLPM NM3 D MCFD MSCFD NM3 M LBS M NLPS SLPM MMSCF...

Page 57: ...will prompt for temperature reference in selected unit F1 F2 F3 F4 Press CHG F1 to change the reference and OK F4 to accept Pressure Units After pressing OK F4 to accept the reference temperature the display will prompt for the reference pressure unit selection F1 F2 F3 F4 Press NXT F1 to select next entry and OK F4 to accept Selections are mmHG Millimeters of mercury absolute Psia Pounds per squa...

Page 58: ...ications at the factory They should only be changed when changing the application of the flow meter F1 F2 F3 F4 The menu is accessed from the Main Menu by pressing FLO F2 F1 F2 F3 F4 Then press FM2 F3 F1 F2 F3 F4 NOTE The SPC function key will only appear and be accessible from a Level 2 password Then press PRM F3 This will move into settings for flow cutoff pipe diameter and filter value These se...

Page 59: ... for the pipe ID Filter Value The filter value is entered in seconds The allowable time constant range is 0 8 to 10 seconds The filter time interval is proportional to the dampening Enter the filter value and then press OK F4 F1 F2 F3 F4 Programming High and Low Alarm Settings Settings for the alarms directly follow the flow parameters for flow cutoff pipe diameter and filter value These alarms ca...

Page 60: ...generated when the flow value is below this limit If no alarm is needed set this value to zero To set the parameters for a low flow rate alarm press CHG F1 F1 F2 F3 F4 Press OK F4 to accept the value High Temperature Alarm This is the upper temperature limit alarm value that can be associated with the alarm output An alarm code is generated when the temperature value exceeds this limit If no alarm...

Page 61: ...d only be used for testing and demonstration purposes Make sure to return all of these simulation values to zero before returning to the normal mode of operation CAUTION If the 4 20mA and or the pulse alarm outputs are connected to controllers set the controllers to manual to ensure that the simulated signals do not cause false controller action The menu is accessible from the Main Menu by pressin...

Page 62: ...e press NO F4 Upon pressing either key the program will return to the FLOW MENU 1 screen NOTE Simulation Mode will be cleared if the power is cycled K Factor The K Factor allows the user to adjust the meter s calibration The Fox Thermal flow meter increases the calculated flow rate by the K Factor This results in a direct scaling of the meter s output across the entire full range FloSim 0 SCFM CHG...

Page 63: ...o restore the database will follow Restore Database In case of user error the ability to restore the meter to the original factory settings can be achieved in this menu The display will show F1 F2 F3 F4 Press YES F1 ONLY if you want to restore your database to the initial factory setting that the meter was shipped with All current user entered settings will be overwritten The green LP3 LED will fl...

Page 64: ... and elapsed time screen by pressing the F3 and F4 keys at the same time in the normal running mode F1 F2 F3 F4 Press YES F4 and enter password to reset total and elapsed time Press NO F1 to cancel NOTE This feature is not available on non resettable units Totalizer Rollover The FT4X has an automatic roll over function The total flow count of the FT4X will roll over after the following values Most...

Page 65: ... Thermal has developed the CAL V Calibration Validation test to help our customers avoid sending the meter back for annual or biennial recalibration CAL V ensures the repeatability functionality of the sensor and its associated signal processing circuitry and cleanliness of the sensor During the CAL V calibration validation test the microprocessor adjusts current to the sensor elements and determi...

Page 66: ... Main Menu The display will show F1 F2 F3 F4 Press DGN F1 The display will show F1 F2 F3 F4 Press CAL V F2 The display will show F1 F2 F3 F4 Press VER F1 to perform the CAL V verification test F1 F2 F3 F4 FLOW MENU 1 DGN UNT FM2 EXIT DIAGNOSTIC MENU SIM CAL V EXIT CAL V MENU VER EXIT VERIFY CAL V YES NO 66 Model FT4X OPERATION Operation ...

Page 67: ... V value will be displayed along with a Pass Fail or Warning message Pass less than 0 80 Warning between 0 80 to 1 0 Fail greater than 1 0 Recommended next steps if a Warning or Fail result is displayed Run the test again under a higher flow rate if possible Remove the probe from the pipe clean the sensor and perform the test again under a normal or high flow rate If a Warning or Fail result is di...

Page 68: ...ioxide i Butane C4 Methane Ethane n Butane C4 Natural Gas Methane Pentanes C5 Nitrogen Nitrogen Hexanes C6 Oxygen Oxygen Carbon Dioxide CO2 Helium Helium Nitrogen Hydrogen Hydrogen Heptanes C7 Propane Propane Octanes C8 Nonanes C9 Natural gas is defined as the NAESB Natural Gas mix 94 9 Methane 0 7 CO2 1 6 N2 0 3 Propane and 2 5 Ethane The molar percentages of the gases are programmable in 0 1 inc...

Page 69: ...hese instructions to access the Gas SelectX feature F1 F2 F3 F4 Press FLO F2 from the Main Menu to enter Flow Menu 1 F1 F2 F3 F4 Press FM2 F3 to get to Flow Menu 2 F1 F2 F3 F4 Press GAS F1 to access the Gas SelectX feature The display will show the gas setting Pure Gas Mix or O G Mix F1 F2 F3 F4 Press NXT 1 repeatedly until the correct selection is shown and then press OK F4 to accept the setting ...

Page 70: ...then press OK F4 to accept the setting F1 F2 F3 F4 To choose any pure gas press NXT F1 to cycle through until the correct gas is displayed and press OK F4 to select the gas Gas SelectX Available Gases and Gas Mix Menus on page 68 Choosing a Gas Gas Mix Menu and Oil Gas Menu To create a gas mix choose either Mix or O G Mix from the GAS menu F1 F2 F3 F4 The screen will show the first gas available i...

Page 71: ...r F1 F2 F3 F4 or F1 F2 F3 F4 If the gas mix does not equal 100 press CHG F1 to return to the gas entry menu Once the Gas Mix 100 message appears you have successfully programmed the gas mix in Gas SelectX and can exit Press OK F4 to set the mixture After the gases are programmed the FT4X will begin to monitor flow based on the pre calibrated algorithm for the gas gas mix selected in the Gas Select...

Page 72: ...urrent gas composition programmed into the meter Current flow meter configuration and meter settings Engineering data including non resettable power off totalizer The following is only available by download via the FT4X View Software Date time stamped power off and power on events Event alarm logs with date time stamps including all changes in flow meter settings i e 4 20mA pipe size changes to ga...

Page 73: ...gs can be viewed here The most recent CAL V Calibration Validation record can be viewed here F2 TOT will enter the 40 24 Hour Daily Totals log Each of the 40 24 Hour Daily Totals can be reviewed F3 ENG will enter the Engineering Screens The Engineering screens show information about alarm settings serial numbers firmware versions CSV and output information LOGS MENU1 LOG TOT ENG EXIT Logs 73 Model...

Page 74: ...ossible gas menu component with their percentage value even if the gas is set to 0 F1 F2 F3 F4 F1 F2 F3 F4 Press F1 NXT to view the next gas in the menu Press F2 PRV to move back to the previous gas to view Press F4 EXIT to go back to Logs Menu 2 Once the composition of the gas has been viewed the gross heating value will be displayed F1 F2 F3 F4 Press F1 NXT to view the gas density F1 F2 F3 F4 Pr...

Page 75: ...mming mode with a password See the Operation section of this Manual for further details on programming the meter s settings From the Logs Menu 1 choose F1 LOG to enter Logs Menu 2 F1 F2 F3 F4 From the Logs Menu 2 choose F2 CFG to view the meter s validation screens F1 F2 F3 F4 The first screen will display the flow meter s flow unit setting In this case SCFM F1 F2 F3 F4 Press F1 NXT to view the ne...

Page 76: ...t F1 F2 F3 F4 Press F1 NXT to view the most recent CAL V test result F1 F2 F3 F4 A Pass Warning or Fail message will be displayed Press F1 NXT to view the previous test s data The previous test value data will be displayed next F1 F2 F3 F4 Press F1 NXT to view the previous CAL V test result F1 F2 F3 F4 A Pass Warning or Fail result will be displayed Press F4 EXIT to return to Logs Menu 2 LOGS MENU...

Page 77: ...w total records Day 1 being the latest recorded value and Day 40 being the oldest Resetting Total To reset the total you must exit the Logs and start from the normal operating mode Refer to Reset Total and Elapsed Time on page 64 for instructions on how to reset the total i NOTE Resetting the total will not affect the data logger s 40 24 hour totals LOGS MENU1 LOG TOT ENG EXIT Press F1 to navigate...

Page 78: ... of meter operation and the status of meter operation Display 13 active alarms and lists the firmware version of the meter Display 14 serial numbers for the main and bridge boards Display 15 serial numbers for the meter and the sensor Display 16 high and low flow alarm settings Display 17 high and low temperature alarm settings Display 18 total number of power cycles number of errors in total flow...

Page 79: ...ommunication 256 Server address 1 byte CRC 2 bytes 253 bytes RS485 ADU 253 Server address 1 byte CRC 2 bytes 256 bytes For more information on Modbus go to the web site http www modbus org Command Request Meter Address Function code Register start address high Register start address low Register count high Register count low CRC high CRC low Command Response Meter Address Function code Data byte c...

Page 80: ...T4X and has the following format Request Meter Address Command code 03 Register start address high Register start address low Register count high Register count low CRC high CRC low Response Meter Address Command code 03 Byte count Data high Data low Data high Data low CRC high CRC low Example Request data register at starting address 0x0000 and specifying 2 registers 0x01 0x03 0x00 0x00 0x00 0x02...

Page 81: ...00 flow total scaled for 16 bits Hundredths of user selected 40014 Reserved 40015 Reserved 40016 16 bit int Status 40017 16 bit int Status 2 40018 16 bit int Control Register 40019 Reserved 40020 32 bit float LSW Flow User selected 40021 32 bit float MSW 40022 32 bit float LSW Total User selected 40023 32 bit float MSW 40024 Reserved 40025 Reserved 40026 32 bit float LSW Temperature User selected ...

Page 82: ...nt time second portion Seconds 40055 32 bit int MSW NOTES In the table LSW means Least Significant Word and MSW means Most Significant Word In this case a word is one 16 bit Modbus register A 32 bit float or 32 bit integer is stored in a pair of Modbus registers When a register is designated as 32 bit int LSW it means that bits 0 15 of the variable are in that register A register designated as MSW...

Page 83: ... Flow rate reached low limit threshold Set limit to zero to disable 3 Temperature reached high limit threshold Set limit to zero to disable 4 Temperature reached low limit threshold Set limit to zero to disable 5 Sensor reading is out of range Check sensor wiring 6 Gas mix error Gas mix must total 100 7 Incorrect Settings Check settings 8 In simulation mode Set simulation value to 0 to disable 9 P...

Page 84: ...dress Command code 16 0x10 Starting register address MSB Starting register address LSB Number of registers MSB Number of registers LSB Byte count Register data MSB Register data LSB Register data MSB Register data LSB CRC LSB CRC MSB Response message Meter Address Command code 16 0x10 Starting register address MSB Starting register address LSB Number of registers high Number of registers low CRC L...

Page 85: ...ating point value will look like this in the data stream First byte MSB of lower register Data bit 7 6 5 4 3 2 1 0 Value bit S15 S14 S13 S12 S11 S10 S9 S8 Second byte LSB of lower register Data bit 7 6 5 4 3 2 1 0 Value bit S7 S6 S5 S4 S3 S2 S1 S0 Third byte MSB of higher register Data bit 7 6 5 4 3 2 1 0 Value bit Sign E7 E6 E5 E4 E3 E2 E1 Fourth byte LSB of higher register Data bit 7 6 5 4 3 2 1...

Page 86: ...00 0x00 0x00 value 0 0 0x00 0x00 0x00 0x00 value 0 0 0x00 0x00 0x00 0x00 value 0 0 0x00 0x00 0x00 0x00 value 0 0 0x00 0x00 0x00 0x00 value 0 0 0x00 0x00 0x00 0x00 value 0 0 0x00 0x00 0x00 0x00 value 0 0 0x00 0x00 0x00 0x00 value 0 0 0x00 0x00 0x00 0x00 value 0 0 0x00 0x00 0x00 0x00 value 0 0 0x00 0x00 0x00 0x00 value 0 0 0x00 0x00 0x00 0x00 value 0 0 0x00 0x00 0x42 0x20 value 40 0 0xCA 0x24 CRC Re...

Page 87: ...00 Register address 0x1F Register data 0x00 Register data 0xx CRC high CRC low Read 24 Hour Record command 03 Read Holding register Modbus Address 40034 This register is used to get the data for a single 24 hour record in the floating point format Before issuing that command a preset command has to be sent to select the record to be read Request Meter Address Function code 03 Register address high...

Page 88: ...a 0x00 Register data 0x57 CRC high CRC low Communication Protocol and Parameters To program the communication parameters start at the Main Menu F1 F2 F3 F4 Then press I O F1 to set Inputs Outputs F1 F2 F3 F4 Then press COM F1 to select communication parameters Set Bus protocol for Modbus F1 F2 F3 F4 Press NXT F1 repeatedly until Modbus is selected as shown and then press OK F4 to accept the settin...

Page 89: ...elections are NONE ODD EVEN F1 F2 F3 F4 Press CHG F1 to change the address and then press OK F4 to accept the setting Selections are between 01 and 247 NOTE Power cycle is required for the new settings to take effect Using Modbus to Program Gas SelectX Modbus can be used to access and program gases gas mixes in the Gas SelectX feature available on the Model FT4X Baud 9600 NXT OK Parity EVEN NXT OK...

Page 90: ... Octane 17 Nonanes 250 Mixed gas must set percentages 251 Oil Gas mix Setting Mix Percentages When a custom mix type is selected the percentages of each gas in the mix must be set These percentages are 32 bit floating point numbers Each constituent gas has a pair of registers to hold its percentage Table 5 5 FT4X Modbus Holding Registers for Gas SelectX 40056 16 bit int Gas type selection See tabl...

Page 91: ... percentage Percent 31 4 31 4 40087 32 bit float MSW 40088 32 bit float LSW Octane percentage Percent 31 4 31 4 40089 32 bit float MSW 40090 32 bit float LSW Nonane percentage Percent 31 4 31 4 40091 32 bit float MSW NOTES In the table LSW means Least Significant Word and MSW means Most Significant Word In this case a word is one 16 bit Modbus register A 32 bit float or 32 bit integer is stored in...

Page 92: ...ntegrators and knowledgeable End Users It also provides functional specifications e g commands and performance requirements used during development maintenance and testing This document assumes the reader is familiar with HART Protocol requirements and terminology References HART Smart Communications Protocol Specification HCF_SPEC 12 Available from the HCF Device Identification Product Overview T...

Page 93: ...re transmitted The LEDs are located behind the display panel The orange LED indicator LP2 will be on continuously when HART communication is enabled and the 4 20mA wiring is not connected FT4X HART Communication Setup HART communication must be selected in the FT4X Serial Communication menu for HART communication to operate When this communication parameter is changed power to the FT4X must be cyc...

Page 94: ...NXT OK Status Information Device Status Bit 4 More Status Available is set when any failure is detected Command 48 provides additional detail Extended Device Status This bit is set if a sensor error is detected Device Variable Alert is set if the Primary Variable PV is out of limit 94 Model FT4X COMMUNICATIONS Communications HART Meaning Units PV Flow Rate In Selected Units SV Total In Selected Un...

Page 95: ... Exit Fixed Current Mode 44 Write PV Units 45 Trim Loop Minimum 46 Trim Loop Maximum 48 Read Additional Device Status Command 48 returns 2 bytes of data 59 Write Number of Response Preambles 95 Model FT4X COMMUNICATIONS Communications HART Byte Bit Meaning Class 0 0 Power Up Indication Status 1 High Flow Limit Alarm Alarm 2 Low Flow Limit Alarm Alarm 3 High Temperature Limit Alarm Alarm 4 Low Temp...

Page 96: ... the loop current signal Capability Checklist 96 Model FT4X COMMUNICATIONS Communications HART Manufacturer model Fox Thermal Instruments FT4X Device Type Transmitter HART revision 7 1 Device Description available No Number and type of sensors 1 Number and type of actuators 0 Number and type of host side signals 1 4 20mA analog Number of Device Variables 0 Number of Dynamic Variables 4 Mappable Dy...

Page 97: ...BEFORE ATTEMPTING TO ACCESS ELECTRONICS If there is a problem and a loose connection is not found please contact Fox Thermal Customer Service for technical assistance at 831 384 4300 Specific Conditions of Use 1 The flameproof joints of the equipment are not intended to be repaired Consult the manufacturer if dimensional information on the flameproof joints is necessary 2 Refer to the manufacturer...

Page 98: ... replacements Verify the fuse is defective by measuring it with an Ohm Meter Two replacement fuses are provided with each unit Replacement fuse is Littelfuse part number 0454 750MR To replace the fuse The fuse F1 is located near the power terminal block and can be removed by using tweezers or needle nose pliers Sensor Cleaning The sensor is insensitive to small amounts of residue but continued use...

Page 99: ...y system pressure How to Remove the Meter from the Retractor System Pressurized Step 1 Remove the Probe from the Flow Stream 1 Disconnect power from the meter i NOTE At 150psig of max system pressure the probe will have approximately 66 lbs of force pushing it out 2 System pressure may force the probe out of the retractor when the compression nut is loosened Hold the flow meter to counteract the f...

Page 100: ...removing the probe from the flow stream 1 4 on previous page slowly loosen the compression fitting see figure 6 2 until the pressure in the retractor is relieved 6 Retighten the compression fitting 7 Remove the Collar Clamp by using a 3 16 Hex Key 8 Carefully slide the probe out of the retractor while supporting the meter 100 Model FT4X COMMUNICATIONS MAINTENANCE Model FT4X ...

Page 101: ... the Probe into the Flow Stream Valve closed System Pressurized 1 Carefully slide the probe into the retractor 2 Install the collar clamp just below the collar spacer and tighten it in place on the probe Slide the probe back out of the retractor until the cable is straight and taut 101 Model FT4X COMMUNICATIONS Model FT4X MAINTENANCE ...

Page 102: ...n place to tighten the compression Nut will be approximately 66 lbs 3 Slowly open the ball valve to the full open position Push the meter and probe into the pipe then hand tighten the compression nut onto the compression fitting 4 Verify that the probe is aligned with the center line of the pipe and pointed in the direction of flow 102 Model FT4X MAINTENANCE Maintenance Retractors ...

Page 103: ...he probe in place by tightening the compression nut with a 1 wrench and a 1 wrench on the compression fitting See p 25 of the manual for detailed instructions to tighten the compression nut 6 Power may now be applied to the meter 103 Model FT4X MAINTENANCE Maintenance Retractors ...

Page 104: ...alfunction in flow meter 6 Meter installed incorrectly 1 Increase dampening see filter settings in Flow Parameters on p 59 2 Clean sensor Refer to Maintenance section p 98 3 Return flow meter to Fox Thermal for repair Refer to p 124 for shipping instructions 4 Remount probe see Installation section p 19 must be mounted securely without vibration If vibration persists choose a new mounting location...

Page 105: ...n main board If fuse is OK and unit still won t power up call Fox Thermal for additional assistance 105 Model FT4X MAINTENANCE Maintenance Troubleshooting Troubleshooting CAL V If the FT4X Meter fails a CAL V Calibration Validation test there are a few reasons that could be the cause 1 Flow rate in the pipe Run the test again under a higher flow rate if possible 2 The sensor may be dirty or damage...

Page 106: ...re that pipe inside diameter in the meter matches data on the Fox Thermal Calibration Certificate The pipe inside diameter is programmed into the flow meter through the front panel see Flow Parameters p 58 4 Erratic flow reading especially a flow reading spiking high This may be a symptom of moisture in the flow stream Fox Thermal flow meters are designed to work in relatively dry gas applications...

Page 107: ...heck settings One or more internal settings are corrupted or out of spec Contact Fox Thermal Service for instructions to verify settings 25 Simulation mode Meter is in Simulation Mode Refer to the FLOW MENU 1 section on p 61 of this Manual Use the SIM Section under Diagnostics to return to normal operation 26 Pulse alarm output over range Refer to the DIGITAL OUTPUT MENU on p 7 of this Manual Veri...

Page 108: ...ee the Fox Thermal website for more information on availability of current gases Units of Measurement field selectable SCFM SCFH NM3 M NM3 H NM3 D NLPS NLPM NLPH MCFD MSCFD SCFD MMSCFD MMSCFM SM3 D SM3 H SM3 M LB S LB M LB H LB D KG S KG M KG H SLPM MT H SFPM NMPS SFPS Gas Pressure maximum at 100º F Insertion meter 740 psig 51 02 barg 316 SS inline meter with NPT ends 500 psig 34 47 barg 316 SS in...

Page 109: ...0 12 300mm 0 46 600 0 67 180 0 73 500 NOTE To determine if the FT4X will operate accurately in other pipe sizes divide the maximum flow rate by the pipe area The application is acceptable if the resulting velocity is within the velocity range above Check Fox Thermal website for velocity calculator Maximum Flow Ranges for Inline Flow Meters Size SCFM MSCFD NM3 hr 0 75 0 220 0 320 0 350 1 0 360 0 52...

Page 110: ... to either transmit a 0 to 100Hz signal proportional to flow rate or an on off alarm Remote Switch Input Can be configured to reset the flow totalizer and elapsed time Serial Communication Isolated Modbus RTU RS485 option Isolated HART communication option USB Communication Isolated USB 2 0 for interfacing with a laptop or computer is standard FT4X View A free PC based software tool that provides ...

Page 111: ...IIIC T85 C or T135 C Db Ta 20 C to 70 C IP67 ATEX and IECEx Standards EN 60079 0 2012 A11 2013 IEC 60079 0 2011 EN 60079 1 2014 IEC 60079 1 2014 EN 60079 31 2014 IEC 60079 31 2013 EN 60529 1991 A1 2000 IEC 60529 2001 Model Code Temperature Code Marking Divisions All Temperature Code Marking Zones Gas Temperature Code Marking Zones Dust Enclosure variable b Main Enclosure Remote Enclosure Main Encl...

Page 112: ...ements shown in inches millimeters 112 Model FT4X APPENDICES Appendices Table 7 1 Insertion Meter with 316 stainless steel probe Probe Size Probe Size Dimension LL 01 Dimension HH 01 model code inches inches millimeters inches millimeters 15R 15 15 0 381mm 22 9 582mm 18R 18 18 0 457mm 25 9 658mm 24R 24 24 0 609mm 31 9 810mm 30R 30 30 0 762mm 37 9 963mm 36R 36 36 0 914mm 43 9 1115mm ...

Page 113: ...ELECTRONICS ENCLOSURE HH Fig 7 2 Remote Insertion Meter with Retractor Dimensions 113 Model FT4X APPENDICES Appendices Table 7 2 Remote Insertion Meter with Retractor Probe Size Probe Size Dimension LL 01 Dimension HH 01 model code inches inches millimeters inches millimeters 15R 15 15 0 381mm 22 2 564mm 18R 18 18 0 457mm 25 2 640mm 24R 24 24 0 609mm 31 2 792mm 30R 30 30 0 762mm 37 2 945mm 36R 36 ...

Page 114: ...NCLOSURE JAM NUT SEE ADAPTER DETAIL ADAPTER BRACKET 2x U BOLT W NUT 4x WASHER THREADS PROJECTIONS ADAPTER DETAIL MOUNTING HOLE DETAIL SIDE VIEW FRONT VIEW F1 F2 F3 F4 Fig 7 3 Remote Mounting Kit Dimensions 114 Model FT4X APPENDICES Appendices ...

Page 115: ...ion Meter with 316 stainless steel probe Probe Size Probe Size Dimension LL 01 Dimension HH 01 model code inches inches millimeters inches millimeters 06I 6 6 0 152mm 13 9 353mm 09I 9 9 0 229mm 16 9 429mm 12I 12 12 0 305mm 19 9 505mm 15I 15 15 0 381mm 22 9 582mm 18I 18 18 0 457mm 25 9 658mm 24I 24 24 0 610mm 31 9 810mm 30I 30 30 0 762mm 37 9 963mm 36I 36 36 0 914mm 43 9 1115mm ...

Page 116: ...ensions 116 Model FT4X APPENDICES Appendices Table 7 5 Insertion Remote Meter with 316 stainless steel probe Probe Size Probe Size Dimension LL 01 Dimension HH 01 model code inches inches millimeters inches millimeters 06I 6 6 0 152mm 13 2 335mm 09I 9 9 0 229mm 16 2 411mm 12I 12 12 0 305mm 19 2 488mm 15I 15 15 0 381mm 22 2 564mm 18I 18 18 0 457mm 25 2 640mm 24I 24 24 0 610mm 31 2 792mm 30I 30 30 0...

Page 117: ...nnections Dimensions Table 7 6 Inline Meter with 316 Stainless Steel Flow Body and NPT End Connections also available in A106 Grade B Carbon steel pipe Body Size Body Size Dimension L Dimension H model code inches inches inches millimeters 075P 0 75 12 11 9 302mm 10P 1 00 12 11 9 302mm 125P 1 25 12 11 9 302mm 15P 1 50 12 13 9 353mm 20P 2 00 12 13 9 353mm 25P 2 25 18 13 9 353mm 30P 3 00 18 13 9 353...

Page 118: ... End Connections Dimensions Appendices Table 7 7 Inline Remote Meter with 316 Stainless Steel Flow Body and NPT End Connections also available in A106 Grade B Carbon steel pipe Body Size Body Size Dimension L Dimension HH model code inches inches inches millimeters 075P 0 75 12 11 2 284mm 10P 1 00 12 11 2 284mm 125P 1 25 12 11 2 284mm 15P 1 50 12 13 2 355mm 20P 2 00 12 13 2 355mm 25P 2 50 18 13 2 ...

Page 119: ...le 7 8 Inline Meter with 316 Stainless Steel Flow Body and 150lb RF Flange End Connections Dimensions also available in A106 Grade B Carbon steel pipe A105 Flanges Body Size Body Size Dimension L Dimension H model code inches inches inches millimeters 075F 0 75 12 11 9 302mm 10F 1 00 12 11 9 302mm 125F 1 25 12 11 9 302mm 15F 1 50 12 13 9 353mm 20F 2 00 12 13 9 353mm 25F 2 50 18 13 9 353mm 30F 3 00...

Page 120: ...es Table 7 9 Inline Remote Meter with 316 Stainless Steel Flow Body and 150lb RF Flange End Connections Dimensions also available in A106 Grade B Carbon steel pipe A105 Flanges Body Size Body Size Dimension L Dimension HH model code inches inches inches millimeters 075F 0 75 12 11 2 284mm 10F 1 00 12 11 2 284mm 125F 1 25 12 11 2 284mm 15F 1 50 12 13 2 335mm 20F 2 00 12 13 2 335mm 25F 2 50 18 13 2 ...

Page 121: ...lange End Connections Dimensions Table 7 10 Inline Meter with 316 Stainless Steel Flow Body and 300lb RF Flange End Connections Dimensions also available in A106 Grade B Carbon steel pipe A105 Flanges Body Size Body Size Dimension L Dimension H model code inches inches inches millimeters 15G 1 50 12 13 9 353mm 20G 2 00 12 13 9 353mm 25G 2 50 18 13 9 353mm 30G 3 00 18 13 9 353mm 40G 4 00 18 13 9 35...

Page 122: ... End Connections Dimensions Appendices Table 7 11 Inline Remote Meter with 316 Stainless Steel Flow Body and 300lb RF Flange End Connections Dimensions also available in A106 Grade B Carbon steel pipe A105 Flanges Body Size Body Size Dimension L Dimension HH model code inches inches inches millimeters 15G 1 50 12 13 2 335mm 20G 2 00 12 13 2 335mm 25G 2 50 18 13 2 335mm 30G 3 00 18 13 2 335mm 40G 4...

Page 123: ...ndling and shipping the returned unit d The liability of FOX shall be limited to replacing or repairing at its option any defective parts which are returned Labor and related expenses incurred to install replacement parts are not covered by this warranty e As to replacement parts supplied or repairs made during the original warranty period the warranty period for the replacement or repaired part s...

Page 124: ...e complete return shipping instructions we cannot deliver to post office boxes 4 The entire flow meter must be returned including all electronics unless specifically instructed to do otherwise ALL serial numbers must match their corresponding meters This is especially necessary when returning flow body models 5 Clean and decontaminate all wetted parts before returning to Fox Thermal 6 Ship the met...

Page 125: ...ot including shipping or peak production times If you have already shipped your meter to Fox Thermal for servicing and would like to check the status of your meter please fill out our online Service Order Status form located at www foxthermal com and you will hear from a Customer Service Rep within 1 business day of your requested update Rush recalibration service is available for a fee Restrictio...

Page 126: ...O Maximum Flow NEMA National Electrical Manufactures Association NIST National Institute of Standards and Technology NL Normal Liter NLPH Normal Liter per Hour NLPM Normal Liter per Minute NM3 Normal cubic Meter NM3 H Normal cubic Meter per Hour NM3 M Normal cubic Meter per Minute NPT National Pipe Thread PDA Personal hand held computer PC Personal Computer P U Pulse per Unit PIP A 2 Pipe Area PLC...

Page 127: ...unting meter p 19 Orientation of meter Insertion type p 23 Password Level 1 p 52 Level 2 p 52 Programming p 55 Power Input Wiring p 32 Preventative Maintenance p 98 Product Description p 15 Programming Analog 4 20mA Output p 45 Alarm Output p 48 Changing values or strings p 44 Display Setup p 50 Flow Parameters p 58 Flow and maximum pulse alarm p 48 Pulse alarm Output p 47 Password p 55 Programmin...

Page 128: ...ctive Please dispose of the product in accordance with local regulations and conventions Indicates compliance with the applicable European Union Directives for Safety and EMC Electromagnetic Compatibility Directive 2014 30 EU CAUTION is used to indicate a hazardous situation which if not avoided could result in minor or moderate injury Enclosure Protection Classification per IEC 60529 Protected ag...

Reviews: