background image

Basic Manual

Hookup

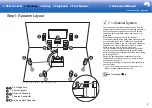
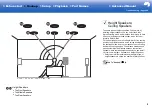
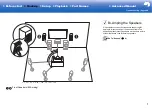
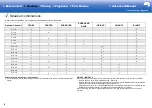
Step1: Speaker Layout  ............................................................3
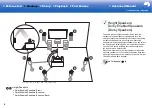
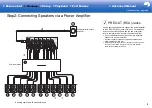
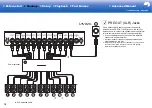
Step2: Connecting Speakers via a Power Amplifier  ................9
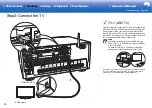
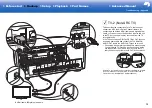
Step3: Connect the TV  ..........................................................12
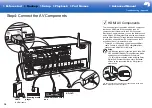
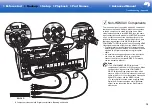
Step4: Connect the AV Components .....................................14
Step5: Multi-zone Connection  ...............................................18
Step6: Connect Other Cables ................................................21

Setup

Step7: Power On & Initial Setup  ............................................22
HDMI Setup ...........................................................................23

Playback

Basic Playback  ......................................................................24
Network Functions .................................................................25
Others ....................................................................................27

Part Names

Front Panel ............................................................................30
Display ...................................................................................31
Rear Panel  ............................................................................32
Remote Controller  .................................................................33

The Basic Manual

 includes information needed when starting up and 

also instructions for frequently used operations. 

The Advanced Manual


has more detailed information and advanced settings.

AV CONTROLLER

PR-RZ5100

Before start Hookup Setup Playback Part Names

Advanced Manual

Troubleshooting | Appendix

Summary of Contents for PR-RZ5100

Page 1: ...p 22 HDMI Setup 23 Playback Basic Playback 24 Network Functions 25 Others 27 Part Names Front Panel 30 Display 31 Rear Panel 32 Remote Controller 33 The Basic Manual includes information needed when s...

Page 2: ...udio Return Channel feature transfers TV audio signals via HDMI cable so that you can play the audio from the TV through this unit Connection to an ARC compatible TV is complete with one HDMI cable Re...

Page 3: ...reated by the back sound field and provide a more realistic sound field Furthermore by installing surround back speakers you can select the Dolby Atmos listening mode which realizes the most up to dat...

Page 4: ...tmos listening mode which realizes the most up to date 3D sound including overhead sounds when the input format is Dolby Atmos Front high speakers or rear high speakers should be situated at least 0 9...

Page 5: ...te 3D sound including overhead sounds when the input format is Dolby Atmos Fit top front speakers on the ceiling forward of the seating position top middle speakers on the ceiling directly above the s...

Page 6: ...special speakers designed to face the ceiling so that sound is heard after bouncing off the ceiling so that sound appears to be coming from overhead Furthermore by installing height speakers you can s...

Page 7: ...0e 2 90e 120e 3 135e 150e 12 Front Speakers Bi Amping Bi Amping the Speakers It is possible to connect front speakers supporting Bi Amping to improve quality of the bass and treble The effects and pla...

Page 8: ...op Middle Height 2 Speaker Rear High Height 1 Speaker Front High Height 2 Speaker One of Rear High Top Middle Top Rear Dolby Enabled Speaker Surround Dolby Enabled Speaker Surround Back Height 1 Speak...

Page 9: ...the power amplifier to the PRE OUT RCA jacks on this unit For details on how to connect the speakers and the power amplifier refer to the instruction manual of the power amplifier 0 If your subwoofer...

Page 10: ...E OUT XLR jacks on this unit For details on how to connect the speakers and the amplifier refer to the instruction manual of the power amplifier 0 If your subwoofer does not have a built in amplifier...

Page 11: ...PRE OUT RCA jacks Refer to the illustration at left also when connecting using the PRE OUT XLR jacks Both connections use the FRONT jacks and HEIGHT 1 jacks Make sure you remove the jumper bar fitted...

Page 12: ...this unit to the TV but you can also play the sound from the TV through this unit Choose an HDMI IN jack on the TV that supports ARC when connecting Another TV or projector can be connected to the HDM...

Page 13: ...so play the sound from the TV through this unit If the TV doesn t have a DIGITAL OPTICAL OUT jack use an analog audio cable and connect the TV s ANALOG AUDIO OUT jack to the AUDIO IN TV jack on this u...

Page 14: ...ctor and the HDMI Standby Through feature which allows you to play video and audio from AV components on the TV even when this unit is in standby mode 0 To play 4K or 1080p video use a high speed HDMI...

Page 15: ...ignals and then output from the HDMI OUT jack 0 To enjoy digital surround playback in formats such as Dolby Digital you need to make a connection for audio signals with a digital coaxial cable or digi...

Page 16: ...cable You can also connect a turntable that has an MM type cartridge to the PHONO jack 0 If the turntable has a built in audio equalizer connect it to an AUDIO IN jack other than the PHONO jack Furth...

Page 17: ...tor etc 1 Component video cable Component Video Monitor Use a component video cable to connect a TV or projector that has component video input jacks rather than an HDMI input jack To output video fro...

Page 18: ...ayer in the main room where this unit is located or play the content from another AV component Only the video from devices connected to the HDMI IN1 to IN5 jacks can be played on the TV in the separat...

Page 19: ...optical cable digital coaxial cable or analog audio cable ZONE 2 PRE LINE OUT It is possible to play 2 ch sources in a separate room while sources with a maximum of 11 1 ch are being played in the mai...

Page 20: ...o ZONE 3 connect using an analog audio cable Output to ZONE 3 is not possible when you connect with an HDMI cable or digital optical coaxial cable ZONE 3 PRE LINE OUT It is possible to play 2 ch sourc...

Page 21: ...by wired LAN connect with an Ethernet cable to the ETHERNET port as shown in the illustration To connect by Wi Fi then after selecting Wireless in 3 Network Connection P23 in Initial Setup select the...

Page 22: ...position measure the test tones emitted by the speakers then the unit automatically sets the optimum volume level for each speaker the crossover frequencies and the distance from the listening positio...

Page 23: ...en connecting a power amplifier If you are going to be connecting a TV in the separate room ZONE 2 then when Would you be using TV in 2nd room is displayed select Yes 5 Audio Return Channel If you hav...

Page 24: ...processing that affects sound quality to deliver a playback sound quality closer to sources Speakers play the sound field according to the number of channels in the input signal so there would be outp...

Page 25: ...ble with Windows Media Player 11 or 12 network servers or NAS that are compatible with home network functionality You may need to make some settings in advance to use Windows Media Player 11 or 12 Ena...

Page 26: ...efore operation make sure this unit and the PC are connected to the same network then press NET on this unit Next click the AirPlay icon in iTunes select this unit from the list of devices displayed a...

Page 27: ...ellaneous Tuner AM FM Frequency Step or AM Frequency Step and select the frequency step for your area Note that when this setting is changed all radio presets are deleted c d e a b Multi zone Play 1 S...

Page 28: ...check in the Setup menu that is displayed When you have connected a TV in the separate room with an HDMI cable have you selected Use in 1 Input Output Assign TV Out OSD Zone2 HDMI When you are playin...

Page 29: ...e display and the unit returns to standby Do not unplug the power cord until Clear disappears from the display To reset the remote controller while holding down CLR press MODE until MAIN flash twice a...

Page 30: ...O TUN AM FM Radio NET Playing the Internet Radio USB etc BLUETOOTH function 7 ZONE 2 ZONE 3 buttons Controls the multi zone function P27 OFF button Switches the multi zone function off 8 MASTER VOLUME...

Page 31: ...hen headphones are connected Z2 Z3 When ZONE 2 ZONE 3 is on When connected by BLUETOOTH When connected by Wi Fi NET When NET is selected with the input selector and the unit is connected to the networ...

Page 32: ...played You can also supply power maximum 5V 1A to USB devices with a USB cable 10 DIGITAL IN OPTICAL COAXIAL jacks Input the digital audio signals from TV or AV components with a digital optical cable...

Page 33: ...e P24 12 Numbered buttons 13 D TUN button Use to directly input the frequency of AM FM stations when tuning 14 DIMMER button You can adjust the brightness of the display in three steps It cannot be tu...

Page 34: ...ertains pays il peut exister des restrictions sur l utilisation d appareils BLUETOOTH V rifiez aupr s des autorit s locales Onkyo Corporation no garantiza la compatibilidad BLUETOOTH entre el receptor...

Page 35: ...EVICE ARE PROVIDED AS IS COMPANY DOES NOT WARRANT INFORMATION CONTENT OR SERVICES SO PROVIDED EITHER EXPRESSLY OR IMPLIEDLY FOR ANY PURPOSE COMPANY EXPRESSLY DISCLAIMS ANY WARRANTIES EXPRESS OR IMPLIE...

Page 36: ...0 208 836 3510 http www uk onkyo com en France 6 Avenue de Marais F 95816 Argenteuil Cedex FRANCE For Product Support only 33 969 368 138 http www fr onkyo com fr For Product Support Team Only 1 800 2...

Page 37: ...stening Modes 41 Playback Function AM FM Radio 55 USB Storage Device 57 Internet Radio 59 Spotify 61 Music Server 62 Other Functions 65 Supplementary information for player functions 66 Troubleshootin...

Page 38: ...tching with the input selector and players conforming to the CEC standard switching audio output and volume using the remote controller of a CEC compliant TV and automatically switching this unit to s...

Page 39: ...iR standard 5 GHz 2 4 GHz band BLUETOOTH Section Communication system BLUETOOTH Specification version 4 1 LE Frequency band 2 4 GHz band Modulation method FHSS Freq Hopping Spread Spectrum Compatible...

Page 40: ...l OPTICAL 1 GAME 2 CD 3 TV COAXIAL 1 BD DVD 2 CBL SAT Analog CBL SAT STRM BOX BD DVD GAME CD TV PHONO Audio Outputs Analog ZONE2 PRE LINE OUT ZONE3 PRE LINE OUT PRE OUT FRONT L R CENTER SURROUND L R S...

Page 41: ...ting devices supporting Deep Color video signals input from the devices can be reproduced on the TV with even more colors x v Color This technology realizes even more realistic colors by broadening th...

Page 42: ...laying operations on the TV OSD etc 1 TV Out OSD Setting Item Default Value Setting Details HDMI Out MAIN Select the HDMI jack to be connected with the TV MAIN When connecting the TV to the HDMI OUT M...

Page 43: ...change its setting to first GAME HDMI 4 HDCP 2 2 HDMI 1 HDCP 2 2 to HDMI 7 Assign a desired HDMI IN jack to the GAME button If you do not assign a jack select To select an HDMI IN jack already assigne...

Page 44: ...IDEO IN jacks to the GAME button VIDEO 1 VIDEO 2 Assign a desired VIDEO IN jack to the GAME button STRM BOX VIDEO 2 COMPONENT 1 COMPONENT 2 Assign the COMPONENT VIDEO IN jacks to the STRM BOX button V...

Page 45: ...ck to the CD button TV OPTICAL 3 COAXIAL 1 COAXIAL 2 OPTICAL 1 OPTICAL 2 OPTICAL 3 Assign a desired DIGITAL IN jack to the TV button PHONO COAXIAL 1 COAXIAL 2 OPTICAL 1 OPTICAL 2 OPTICAL 3 Assign a de...

Page 46: ...jacks output audio signals No Neither the PRE OUT SUBWOOFER 1 jacks nor the PRE OUT SUBWOOFER 2 jacks output audio signals Setting Item Default Value Setting Details Height 1 Speaker Top Front Set the...

Page 47: ...onnected Yes When front speakers are bi amp connected This item will be set to No when two sets of height speakers are being used 2 Crossover If you are using THX certified speakers we recommend the f...

Page 48: ...signals than the set value and thus cancel unwanted noises The low pass filter will be effective only on sources with LFE channel The value from 80Hz to 120Hz can be set Off Do not use this function S...

Page 49: ...st tone will be output each time you change the value Select the desired level Height 1 Right 0 0 dB Select a value between 12 0 dB and 12 0 dB in 0 5 dB increments A test tone will be output each tim...

Page 50: ...th the cursors adjust the volume of that frequency between 6 0 dB and 6 0 dB with Center 0 0 dB After selecting the speaker frequency from between 25 Hz and 16 kHz with the cursors adjust the volume o...

Page 51: ...e bass balance On Use this function Off Do not use this function In the following cases the setting cannot be changed Configulation Subwoofer is set to No THX Ultra2 Select2 Subwoofer is set to No Set...

Page 52: ...lt Value Setting Details Multiplex Input Channel Main Set the audio channel or language to be output when playing multiplex audio or multilingual TV broadcasts etc Main Main channel only Sub Sub chann...

Page 53: ...ude extended channel information the optimum listening mode is automatically selected according to the extended information contained in the input signal and the speaker configuration of this unit whe...

Page 54: ...nd 12 0 dB 4 Source Make settings for input sources such as volume difference adjustments for each input selector for the connected equipment 1 IntelliVolume Adjust the volume level difference between...

Page 55: ...k in the 1 Input Output Assign Digital Audio Input setting OPTICAL When giving priority to input signal from DIGITIAL IN OPTICAL jacks The setting can be selected only when the input is assigned to th...

Page 56: ...f When connecting a non CEC compatible component or when you are not sure whether it is compatible set the setting to Off Setting Item Default Value Setting Details HDMI Standby Through Off When this...

Page 57: ...cally corrects any desynchronization between the video and audio signals based on data from the HDMI LipSync compatible TV On Automatic correction will be enabled Off Automatic correction will be disa...

Page 58: ...he cursor Enters a space To select whether to mask the password with or display it in plain text press MEMORY on the remote controller Pressing CLR on the remote controller will remove all the input c...

Page 59: ...BLUETOOTH enabled devices Pairing Information You can initialize the pairing information saved on this unit Pressing ENTER when Clear is displayed initializes the pairing information stored in this un...

Page 60: ...to Standby and HDMI Standby Through are set to Off Setting Item Default Value Setting Details Network Standby On Off When this feature is turned On you can turn on the power of the unit via the networ...

Page 61: ...ff Set the maximum value for Zone 2 to avoid too high volume Select a value from Off 50 to 99 When 3 Audio Adjust Volume Volume Display is set to Absolute Power On Volume Last Set the Zone 2 volume le...

Page 62: ...alue than that of Maximum Volume 7 Miscellaneous Change the frequency step for the tuner update the firmware and perform Initial Setup etc 1 Tuner Setting Item Default Value Setting Details AM FM Freq...

Page 63: ...ity of a firmware update will be notified via network Enable Notify updates Disable Do not notify updates Version The current firmware version will be displayed Update via NET Press ENTER to select wh...

Page 64: ...the settings for each speaker to suit the specific characteristics of each room 1 Place the supplied speaker setup microphone in the listening position and connect to the SETUP MIC jack on the main u...

Page 65: ...not displayed then in the screen listing the SSIDs select Other with the cursor on the remote controller and press ENTER then follow the onscreen instructions Keyboard input Wi Fi Setup Password When...

Page 66: ...n order to make it suitable for home theater In Re EQ the following listening modes can be used Dolby Digital Dolby Digital Plus Dolby Surround Dolby TrueHD Multichannel DTS DTS ES DTS 96 24 DTS HD Hi...

Page 67: ...V screen Acoustic images of the center speakers move up as the set value is increased Depending on the speaker settings this becomes Off This item may not be available depending on the source being pl...

Page 68: ...rol kit with this jack you can operate the unit with the remote controller even when you are in a separate room or operate the unit with the remote controller even if its remote control sensor is diff...

Page 69: ...or use at your own risk Our company will not be liable and you will have no remedy for damages for any claim of any kind whatsoever concerning your use of the program or the accompanying online docume...

Page 70: ...lem If you are still unable to connect to the Internet the DNS server or proxy server may be temporarily down Check the service status with your ISP provider Others Disconnect then reconnect the AC po...

Page 71: ...will not be able to select Update via USB if there is nothing to update 7 Press ENTER with Update selected to start update During the update the TV screen may go black depending on the updated progra...

Page 72: ...of the listening modes see Listening Mode Effects For listening modes selectable for each of the audio formats in the input signals refer to Selectable Listening Modes When you press PURE AUDIO on th...

Page 73: ...sed on 5 1ch but with additional channels such as the surround back channel added for a maximum of 7 1ch To enable transfer of this audio format connect via HDMI cable and set audio output on the play...

Page 74: ...h as mono stereo 5 1 or 7 1ch to many higher speaker count including the layout using elevated channels set for DTS X playback DTS X This mode faithfully reproduces the sound design recorded in the DT...

Page 75: ...e EQ The speakers for the front channel are installed behind the screen in a movie theater For this reason the high range is enhanced in the front channel of the sound track to take account of acousti...

Page 76: ...THX U2 Music THX Ultra2 Music Select THX Ultra2 Music to play music sources recorded in a multichannel format In this mode the THX ASA processing technology creates a broad and stable back sound fiel...

Page 77: ...led 3 A center speaker surround speakers or height speakers need to be installed Input Format Listening Mode PCM Music files except DSD Dolby TrueHD Direct Mono Dolby Surround DTS Neural X THX Cinema...

Page 78: ...urround 3 THX Cinema 4 THX U2 Cinema 5 TV Logic 6 AllCh Stereo 7 Full Mono 7 T D 1 Cannot be selected when the input format is 2 ch 2 A center speaker or surround speakers need to be installed 3 Canno...

Page 79: ...inema 3 THX U2 Cinema 4 TV Logic 5 AllCh Stereo 6 Full Mono 6 T D 1 Cannot be selected when the input format is 2 ch 2 A center speaker or surround speakers need to be installed 3 Surround speakers ne...

Page 80: ...center speaker or surround speakers need to be installed 3 Cannot be selected when the sampling rate of the input format is 88 2 kHz or more 4 Surround speakers need to be installed 5 Surround back sp...

Page 81: ...kers need to be installed 2 A center speaker surround speakers or height speakers need to be installed MUSIC button This is a list of listening modes you can select according to the audio format of th...

Page 82: ...speakers need to be installed Input Format Listening Mode DSD Pure Audio Direct Stereo DSD 1 2 Dolby Surround DTS Neural X THX Music 3 THX U2 Music 4 Orchestra 5 Unplugged 5 Studio Mix 5 AllCh Stereo...

Page 83: ...Full Mono 7 1 Cannot be selected when the input format is 2 ch 2 A center speaker or surround speakers need to be installed 3 Cannot be selected when the input format is 1 1 ch or 2 1 ch 4 Surround sp...

Page 84: ...Mix 5 AllCh Stereo 6 Full Mono 6 1 Cannot be selected when the input format is 2 ch 2 A center speaker or surround speakers need to be installed 3 Surround speakers need to be installed 4 Surround ba...

Page 85: ...estra 6 Unplugged 6 Studio Mix 6 AllCh Stereo 7 Full Mono 7 1 Cannot be selected when the input format is 2 ch 2 A center speaker or surround speakers need to be installed 3 Cannot be selected when th...

Page 86: ...ng Mode Analog Direct Dolby Surround DTS Neural X THX Games 1 Game RPG 2 Game Action 2 Game Rock 2 Game Sports 2 AllCh Stereo 3 Full Mono 3 T D 1 Surround speakers need to be installed 2 Surround spea...

Page 87: ...be installed 3 Surround speakers need to be installed 4 Surround back speakers need to be installed Can be selected when the input format is 5 1 ch 5 Surround speakers or height speakers need to be in...

Page 88: ...6 Game Rock 6 Game Sports 6 AllCh Stereo 7 Full Mono 7 T D 1 Cannot be selected when the input format is 2 ch 2 A center speaker or surround speakers need to be installed 3 Cannot be selected when the...

Page 89: ...1 Cannot be selected when the input format is 2 ch 2 A center speaker or surround speakers need to be installed 3 Surround speakers need to be installed 4 Surround back speakers need to be installed...

Page 90: ...Rock 4 Game Sports 4 AllCh Stereo 5 Full Mono 5 T D 1 This cannot be selected when surround back speakers are connected When DTS Auto Surround in the Setup menu is set to Off this can be selected 2 Su...

Page 91: ...ectly It allows you to directly enter the frequency of the radio station you want to listen to 1 Press TUNER on the remote controller several times to select either AM or FM 2 Press D TUN on the remot...

Page 92: ...te controller twice 2 Press the cursors on the remote controller to select the Program Type you want to find then press ENTER to start the search The Program Types displayed are as follows None News N...

Page 93: ...repeat playback Pressing this button repeatedly cycles through the repeat modes 4 This button plays the previous track 5 This button lets you start random playback 6 This button plays the next track...

Page 94: ...on bit 8 bit 16 bit 24 bit AAC aac m4a mp4 3gp 3g2 AAC M4A MP4 3GP 3G2 Supported formats MPEG 2 MPEG 4 Audio Supported sampling rates 44 1 kHz 48 kHz 88 2 kHz 96 kHz Supported bitrates Between 8 kbps...

Page 95: ...play the TuneIn Radio menu during play press ENTER on the remote controller Selecting the corresponding menu item with the cursors and pressing ENTER allows you to perform the following operations Add...

Page 96: ...r by selecting I have a Pandora Account and logging in with your email and password 5 To play a station use the cursors on the remote controller to select the station from your station list and then p...

Page 97: ...andby mode the power will come on automatically and streaming starts Operations with the remote controller 1 6 5 3 2 4 1 Pressed during play this button changes the displayed track information 2 This...

Page 98: ...is already turned on select More streaming options in the Stream menu to list players in the network and then go to step 4 3 Click Turn on media streaming to list players in the network 4 Select this...

Page 99: ...d on your PC by operating the PC inside your home network The unit supports remote playback with Windows MediaR Player 12 To use the remote playback function with Windows MediaR Player 12 it must be c...

Page 100: ...pported sampling rates 44 1 kHz 48 kHz Supported bitrates Between 5 kbps and 320 kbps Incompatible files cannot be played WMA Pro Voice WMA Lossless formats are not supported WAV wav WAV WAV files inc...

Page 101: ...DVD player The procedure in this case is as follows 1 Press BD DVD 2 Press CD 3 Start playback on the BD DVD player and CD player Perform the following steps to play the video from a different source...

Page 102: ...re for the system updates after you make your purchase or firmware changes during production of the product there may be additions or changes to the features available compared to what is in the instr...

Page 103: ...h volumes or allow input of excessive bass the protection circuits in the amplifier can be tripped which may suddenly turn the unit off Try the following if this occurs Reduce the volume Select under...

Page 104: ...ections have been made correctly Settings for the speaker connection environment need to be made in AccuEQ Room Calibration in Initial Setup Check in Initial Setup in the Basic Manual Depending on the...

Page 105: ...digital input on the unit This is usually because the DTS bitstream has been processed e g output level sampling rate or frequency response changed and the unit does not recognize it as a genuine DTS...

Page 106: ...the Setup menu if you are finding AM broadcasts difficult to hear FM reception may become clearer if you use the antenna jack on the wall used for the TV BLUETOOTH function Try plugging unplugging th...

Page 107: ...her than the server software Windows MediaR Player 12 etc If the PC is downloading or copying large files the playback may be interrupted USB storage device USB storage device is not displayed Check w...

Page 108: ...by TrueHD audio signals Remote Controller Make sure that the batteries are installed with the correct polarity Install new batteries Do not mix different types of batteries or old and new batteries Ma...

Page 109: ...o the magnetic field static electricity or radio wave interference from radio communication equipment using the same frequency band 2 4 GHz as the AV receiver such as a 2 4 GHz wireless LAN device IEE...

Page 110: ...yo com en France 6 Avenue de Marais F 95816 Argenteuil Cedex FRANCE For Product Support only 33 969 368 138 http www fr onkyo com fr For Product Support Team Only 1 800 229 1687 http www us onkyo com...

Reviews: