Installation
14
4.2.2
Tools
Gecko .............................................. 14
Quick Changer - Tool side ................. 15
RG2 ................................................. 15
RG2-FT ............................................. 16
RG6 ................................................. 16
VG10 ............................................... 17
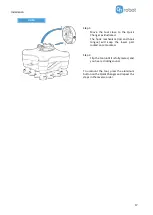
Gecko
Step 1:
Move the tool close to the Quick
Changer as illustrated.
The hook mechanism (rod and hook
tongue) will keep the lower part locked
once mounted.
Step 2:
Flip the tool until it is fully mated, and
you hear a clicking sound.
To unmount the tool, press the aluminum
button on the Quick Changer and repeat the
steps in the reverse order.
CAUTION:
With a Dual Quick Changer the Gecko Gripper can only be mounted on
the Secondary (2) side. Mounting on the Primary (1) side will prevent the
devices to function correctly.
Summary of Contents for DOOSAN Gecko Gripper
Page 1: ...USER MANUAL FOR DOOSAN ROBOTS ORIGINAL INSTRUCTION EN v1 02...
Page 79: ...Hardware Specification 79 RG2 Gripping Speed Graph RG2 Work Range...
Page 82: ...Hardware Specification 82 RG6 Gripping Speed Graph RG6 Work Range...
Page 93: ...Hardware Specification 93 RG2 FT All dimensions are in mm and inches...
Page 94: ...Hardware Specification 94 RG2 All dimensions are in mm and inches...
Page 95: ...Hardware Specification 95 RG6 All dimensions are in mm and inches...
Page 96: ...Hardware Specification 96 VG10 All dimensions are in mm and inches...
Page 97: ...Hardware Specification 97 All dimensions are in mm and inches...
Page 98: ...Hardware Specification 98 Quick Changer Tool side All dimensions are in mm and inches...
Page 104: ...Certifications 104 10 Certifications...
Page 105: ...Certifications 105...


