Installation
15
Quick Changer -
Tool side
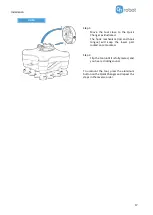
Step 1:
Move the tool close to the Quick Changer
as illustrated.
The hook mechanism (rod and hook
tongue) will keep the lower part locked
once mounted.
Step 2:
Flip the tool until it is fully mated, and you
hear a clicking sound.
To unmount the tool, press the aluminum button
on the Quick Changer and repeat the steps in the
reverse order.
RG2
Step 1:
Move the tool close to the Quick Changer
as illustrated.
The hook mechanism (rod and hook
tongue) will keep the lower part locked
once mounted.
Step 2:
Flip the tool until it is fully mated, and you
hear a clicking sound.
To unmount the tool, press the aluminum button
on the Quick Changer and repeat the steps in the
reverse order.
Summary of Contents for DOOSAN Gecko Gripper
Page 1: ...USER MANUAL FOR DOOSAN ROBOTS ORIGINAL INSTRUCTION EN v1 02...
Page 79: ...Hardware Specification 79 RG2 Gripping Speed Graph RG2 Work Range...
Page 82: ...Hardware Specification 82 RG6 Gripping Speed Graph RG6 Work Range...
Page 93: ...Hardware Specification 93 RG2 FT All dimensions are in mm and inches...
Page 94: ...Hardware Specification 94 RG2 All dimensions are in mm and inches...
Page 95: ...Hardware Specification 95 RG6 All dimensions are in mm and inches...
Page 96: ...Hardware Specification 96 VG10 All dimensions are in mm and inches...
Page 97: ...Hardware Specification 97 All dimensions are in mm and inches...
Page 98: ...Hardware Specification 98 Quick Changer Tool side All dimensions are in mm and inches...
Page 104: ...Certifications 104 10 Certifications...
Page 105: ...Certifications 105...


