HOBO External Temp/RH Data Logger (UX100-023A) Manual
1-800-LOGGERS
4
www.onsetcomp.com
•
Push Button.
Logging will end once you press the
Start/Stop logging button for 3 seconds. Note that if you
also choose Push Button to start logging, then you will
not be able to stop logging until 30 seconds after logging
begins.
If you select the Push Button setting, then you also have
the option to select “Allow button restart.” This allows
you to stop and then restart logging during the
deployment by pushing the Start/Stop button on the
logger for 3 seconds.
Important:
When “Allow button restart” is selected and you
use the Start/Stop button to stop and restart logging,
logging will restart on the next even logging interval, not at
the time the button was pushed. For example, a logger
started logging at 7:00 AM with a logging interval set to 1
hour. If you press the Start/Stop button to stop the logger
at 8:45 AM and then press the button again at 10:15 AM,
logging will not begin immediately at 10:15. Instead, logging
will begin again at 11:00 AM, which is the next even interval
time based on your 1-hour logging interval. Therefore,
depending on the logging interval, the gap between the
time you press the button to resume logging and the time
actual logging begins could be significant. The faster the
logging interval, the less time will elapse before logging
resumes.
•
Specific Stop Date.
Logging will end at a date and time
you specify. Note that if you also configure the logger for
a Push Button stop and to “Allow button restart,” then
the logger will stop logging at the date you select
regardless of how many times you stop and restart the
logger with the Start/Stop button.
9.
Choose whether to keep the LCD on or off.
By default, the
LCD will always remain on while logging. If you select the
“Turn LCD off” checkbox, the LCD will not show the current
readings, status, or other information while the logger is
logging. You will, however, be able to temporarily turn the
LCD screen on by pressing the Start/Stop button for 1
second if you select this option.
10.
Click the Start button to launch the logger.
Disconnect the
logger from the computer and deploy it using the mounting
materials (see
Mounting the Logger
). After logging begins,
you can read out the logger at any time (see
Reading Out
the Logger
for details).
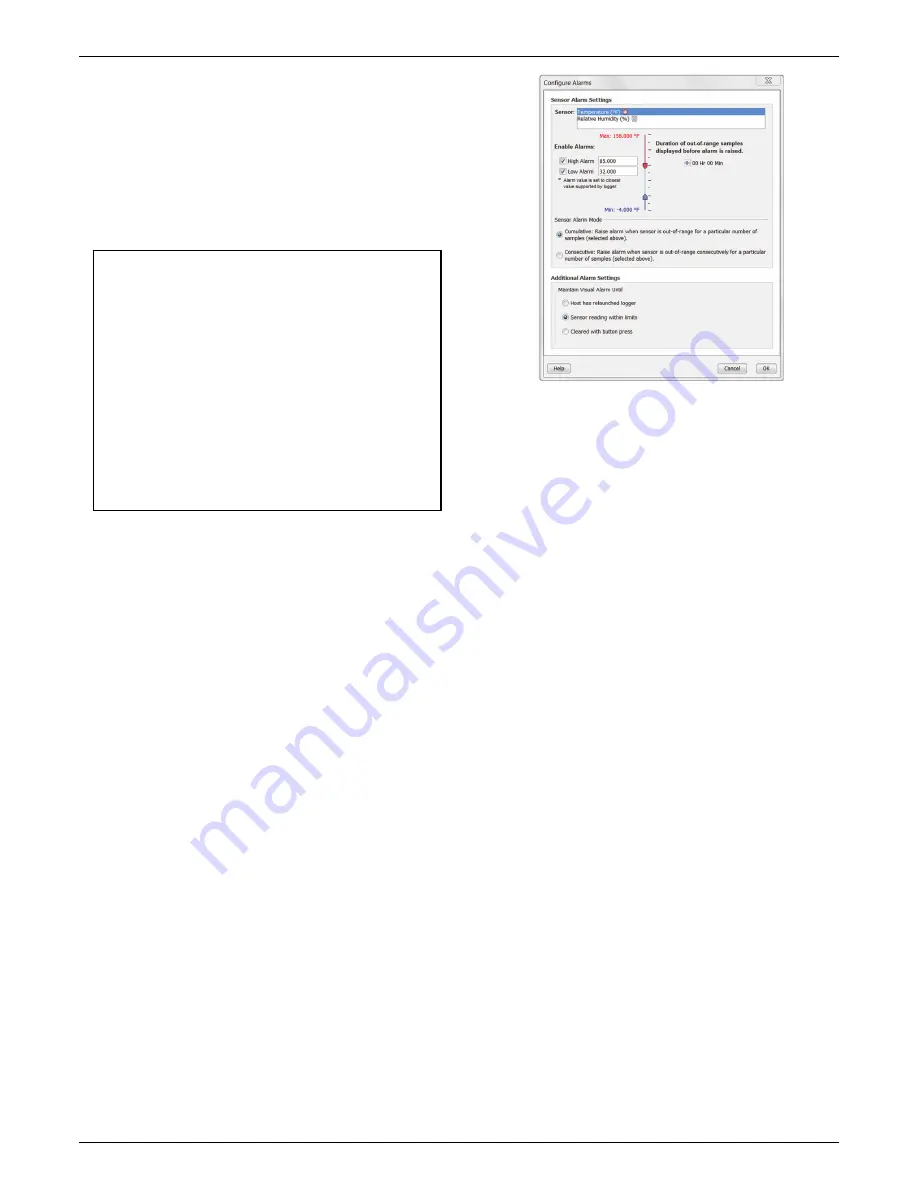
Setting up Alarms
You can set an alarm to trip on the logger when a sensor
reading rises above or falls below a specified value. To set an
alarm:
1.
Click the Alarms button from the Launch Logger window.
If the Alarms button is disabled, make sure the Logging
Mode is not set to Burst. (Alarms can only be configured
if the logger is in Normal or Statistics mode.)
2.
Select a sensor. In this example, the temperature sensor
was selected.
3.
Select the High Alarm checkbox if you want an alarm to
trip when the sensor reading rises above the high alarm
value. Type the reading next to the High Alarm checkbox
or drag the red upper slider in the Configure Alarms
window.
4.
Select the Low Alarm checkbox if you want an alarm to
trip when the sensor reading falls below the low alarm
value. Type the reading next to the Low Alarm checkbox
or drag the blue lower slider.
5.
Set the duration before an alarm is tripped.
6.
Select either Cumulative or Consecutive. If you select
Cumulative, then the alarm will trip when the time the
sensor is out of range over the course of the deployment
is equal to the selected duration. If you select
Consecutive, then the alarm will trip when the time the
sensor is continuously out of range is equal to the
selected duration. For example, the high alarm for
temperature is set to 85°F and the duration is set to 30
minutes. If Cumulative is selected, then an alarm will trip
once a sensor reading has been at or above 85°F for a
total of 30 minutes since the logger was configured;
specifically, this could be 15 minutes above 85°F in the
morning and then 15 minutes above 85°F again in the
afternoon. If Consecutive is selected, then an alarm will
trip only if all sensor readings are 85°F or above for a
continuous 30-minute period.
7.
Repeat steps 2 through 6 for the other sensor if desired.
8.
Choose how long the logger should maintain a sensor
alarm once it has tripped. Select “Host has relaunched
logger” if you want the alarm to remain visible on the
LCD until the next time you relaunch the logger. Select
“Sensor reading within limits” if you want the alarm to
clear once the sensor reading returns to the normal
range between the high and low alarm limits. Select
“Cleared with button press” if you want the alarm to
remain on until you press the Alarm/Stats button on the
logger.
9.
Click OK to save alarm settings.
Notes:
•
Once the logger is launched, alarms will trip as
determined by these settings. Logger alarms will display


