HOBO Light On/Off Data Logger (UX90-002x) Manual
1-800-LOGGERS 2
www.onsetcomp.com
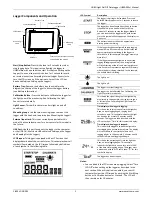
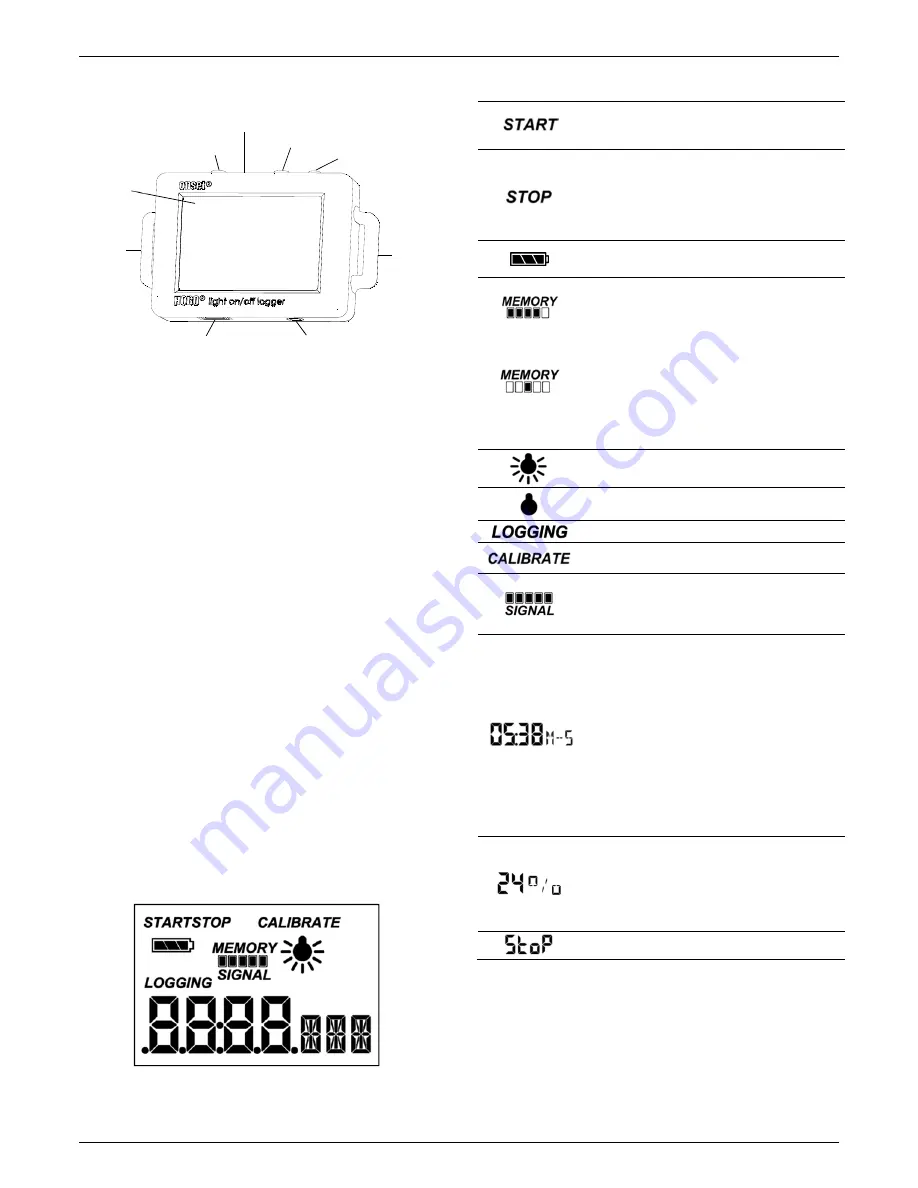
Logger Components and Operation
Start/Stop Button:
Press this button for 3 seconds to start or
stop logging data. This requires configuring the logger in
HOBOware with a push button start or stop (see
Setting up the
Logger
). You can also press this button for 1 second to record
an internal event (see
Recording Internal Logger Events
) or to
turn the LCD screen on if the option to turn off the LCD has
been enabled (see
Setting up the Logger
).
Battery Tray:
Remove the battery tray (not visible in the
diagram) on the top of the logger to access the logger battery
(see
Battery Information
).
Calibration Button:
Press this button to calibrate the logger for
the light you will be monitoring. See
Calibrating the Light
Sensor
for more details.
Light Sensor:
This built-in sensor monitors light on and off
conditions.
Mounting Loops:
Use the two mounting loops to mount the
logger with the hook-and-loop strap (see
Mounting the Logger
).
External Input Jack:
This is not currently supported for this
model. Check onsetcomp.com for new sensors for this model in
the future.
USB Port:
Use this port to connect the logger to the computer
or the HOBO U-Shuttle via USB cable (see
Setting up the Logger
and
Reading Out the Logger
).
LCD Screen:
This logger is equipped with an LCD screen that
displays details about the current status. This example shows all
symbols illuminated on the LCD screen followed by definitions
of each symbol in the following table.
LCD Symbol
Description
The logger is waiting to be launched. Press and
hold the Start/Stop button for 3 seconds to launch
the logger.
The logger has been launched with a push button
stop enabled; press and hold the Start/Stop
button for 3 seconds to stop the logger.
Note
: If
you also launched the logger with a push button
start, this symbol will not appear on the display for
5 minutes.
The battery indicator shows the approximate
battery power remaining.
If the logger has been configured to stop logging
when memory fills, the memory bar indicates the
approximate space remaining in the logger to
record data. In this example, the logger memory is
almost full.
If the logger has been configured to never stop
logging (wrapping enabled), then a single block
will blink starting at the left and moving right over
time. Each block represents a segment of memory
where the data is being recorded. In this example,
the middle block is blinking.
The light is on.
The light is off.
The logger is currently logging.
The logger can be calibrated. See
Calibrating the
Light Sensor
for more details.
This shows the signal strength of the light being
monitored. In this example, the signal strength is
at full scale. See
Calibrating the Light Sensor
for
more details.
Time display when logger is logging:
This shows the total amount of time the light has
been on since logging began, ranging from
seconds to days. This example indicates the light
has been on for a total of 5 minutes and 38
seconds. The logger must be launched with the
LCD set to show “Time” for this symbol to display.
Time display when logger is stopped:
This indicates the logger has been configured to
start logging on a particular date/time. The display
will count down to the start date/time until
logging begins. In this example, 5 minutes and 38
seconds remain until logging will begin.
This shows the percentage of time the light has
been on since logging began. This example
indicates the light has been on for a total of 24%
of the time since logging began. The logger must
be launched with the LCD set to show “%” for this
symbol to display.
The logger has been stopped.
Notes:
•
You can disable the LCD screen when logging. Select “Turn
LCD Off” when setting up the logger as described in the
next section. When this option is enabled, you can still
temporarily view the LCD screen by pushing the Start/Stop
button or Calibration button for 1 second. The LCD will
then remain on for 10 minutes.
Calibration Button
Start/Stop Button
USB Port
Mounting
Loop
External Input Jack (not currently
supported in this model)
Light Sensor
Battery Tray
Mounting
Loop
LCD Screen
Distributed by MicroDAQ.com, Ltd. www.MicroDAQ.com (603) 746-5524


