background image

10 

MAINTENANCE 

PERIODIC MAINTENANCE 

After you have finished, prepare for the next cookout by 
burning off any residue of food from the Flav-R-Cast™ in 
the following manner: 

Cooking Grids 
Remove all food from the grids, turn the control knobs to 
“HIGH”, and operate the barbecue with the lid closed for 5 
to 10 minutes or until smoking stops.  Turn the gas cylinder 
valve to OFF, then the control knobs to OFF. 
Use a long-handled brass wire brush to clean the grids.  
Remember that the barbecue is hot, so wear kitchen mitts 
or use a pot-holder to handle the brush. 
You do not have to wash the grids and upper cooking rack 
after each cookout, but if you wish to do so, use a mild soap 
and water solution, then rinse them thoroughly.  Never use a 
commercial oven cleaner. 

Porcelain Coating - Most OMC cooking grids are coated 
with a durable porcelain enamel to assist in cleaning and 
reduce the tendency of food sticking to the grid. Some 
chipping may occur if mishandled.  This will not affect the 
use or performance of the grids.  If some rust appears, 
remove the rust with a scrub pad and coat the grid with 
cooking oil.  


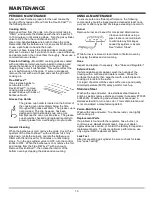
Flav-R-Wave™ 
If any residue begins to 
accumulate on the 
Flav-R-Wave™, remove 
cooking grids and scrape 
excess residue with back of 
barbecue brush. 

Grease Cup Holder 

The grease cup holder is located on the bottom of 
the cooking oven immediately below the hole 
through which grease will drain.  The grease cup is 
not provided.  The clip, however, has been 
designed to hold a standard soup can or jar.  
Simply snap the can or jar into place.  The grease 
cup should be checked and replaced regularly to 
prevent grease from overflowing onto your patio. 

 
General Cleaning 

When the barbecue is cold, remove the grids.  Cover three 
quarters of the Flav-R-Wave™ with aluminum foil, shiny 
side down.  Ignite the burners; operate the barbecue on 
HIGH with the lid closed for 10 minutes or until smoking 
stops.  Turn the gas cylinder valve to OFF, turn the control 
knobs to OFF.  When the barbecue is cool, remove the foil, 
and residue from the Flav-R-Wave™ with a vacuum. 
Remove Flav-R-Wave™, then clean the interior of the 
bottom oven by scrapping the sides and vacuuming. 


ANNUAL MAINTENANCE 

To ensure safe and efficient performance, the following 
components should be inspected and cleaned at least once 
per year or after any period of storage exceeding one month. 

Burner 
Remove burner and inspect for cracks and deterioration.   

Clean venturi tubes using a 
pipe cleaner or venturi brush 
to eliminate any blockages 
caused by spiders or insects.  
See "Venturi Tubes". 


While burner is removed, clean interior of bottom oven by 
scrapping the sides and vacuuming. 

Hose 
Inspect and replace if necessary.  See "Hose and Regulator". 

Exterior Finish 
If white oxidation spots appear, wash the outside of the 
housing with a mild soap and water solution.  Rinse the 
surfaces thoroughly, then wipe them with a cloth dipped in 
cooking oil to restore the luster. 
For repair of paint scratches and scuffs, use a good quality 
HIGH temperature (600°F) spray paint for touch-up. 

Stainless Steel 

Wash with soap and water. Use stainless steel cleaner to 
polish as well as remove stains and marks (Accessory #70395 
or #44395).  Weathering and extreme heat can cause a 
stainless steel lid to turn a tan color. This is discoloration and 
is not considered a manufacturing defect. 

Perma-Mold Shelves 
Wash with soap and water. To enhance luster, coat lightly 
with cooking oil. 

Replacement Parts 
If a problem is found with the regulator, hose, burner, or 
control valves, do not attempt repair.  See your dealer, 
approved service centre, or contact the factory for repairs or 
replacement parts.  To ensure optimum performance, use 
only original OMC replacement parts. 

Leak Test 
After reconnecting gas cylinder, be sure to check for leaks. 
See "Leak Testing" 

Summary of Contents for ANSI CSA 1.6a-2008

Page 1: ...pliance 2 An LP cylinder not connected for use shall not be stored in the vicinity of this or any other appliance ANSI Z21 58a 2008 CSA 1 6a 2008 CONTENTS SAFETY 2 INSTALLATION 2 L P GAS CYLINDER 3 OP...

Page 2: ...alifornia to cause cancer birth defects or other reproductive harm WASH YOUR HANDS AFTER HANDLING THIS PRODUCT WARNING Fuels used in gas or oil fired appliances and the products of combustion of such...

Page 3: ...et and Inlet Connection USA ANSI CGA V 1 1977 Canada CSA B96 The cylinder supply system must be arranged for vapor withdrawal The cylinder must include a collar to protect the cylinder valve The cylin...

Page 4: ...ator assembly and replace with a new one 3 The pressure regulator is set at 11 inches WC water column and is for use with LP gas only The hose and hose couplings comply with CGA Standard CAN 1 83 No m...

Page 5: ...from the area of the leak 8 If a leak is detected close the gas cylinder shut off valve tighten the connection and retest Step 5 9 If the leak persists contact your barbecue dealer for assistance Do...

Page 6: ...sh or rotate the ignitor knob 3 or 4 times Burner should ignite within 5 seconds Note To light burner with a match follow steps 1 thru 8 above Apply lighted match to burner ports Push in the side burn...

Page 7: ...and chops Medium Setting will produce temperatures inside the barbecue of approximately 450 F 230 C with the l id down Use this setting for most grilling of chicken burgers vegetables and for roasting...

Page 8: ...LB MED LOW 3 5 HRS TURKEY OR CHICKEN 2 5 LB MED LOW 2 4 HRS TURKEY OR CHICKEN 5 10 LB MED LOW 3 5 HRS When using rotisserie burner set heat at Med High ROTISSERIE COOKING Follow the steps for Indirec...

Page 9: ...to turn freely Set the rotisserie rod in the slots of the barbecue casting Let the heaviest side of the meat rotate to the bottom 2 Adjust the balance to the top of the rod opposite the heaviest side...

Page 10: ...nite the burners operate the barbecue on HIGH with the lid closed for 10 minutes or until smoking stops Turn the gas cylinder valve to OFF turn the control knobs to OFF When the barbecue is cool remov...

Page 11: ...itting Leak test system 8 Venturi blocked 8 Remove burner clean venturi See Venturi Tubes 9 Venturi not aligned with valve orifice 9 Realign venturi to orifice See Venturi Tubes 10 Orifice blocked 10...

Page 12: ...ng a new burner at the following discounts from current price During 3rd year 50 4th year 40 5th year 25 Shipping and handling charges are the responsibility of the owner PORCELAIN COOKING GRIDS Most...

Page 13: ...ans ce cas cette garantie accorde un rabais au propri taire pour l achat d un nouveau br leur 50 la 1 re la 3 i me ann e 40 la 4 i me ann e et 25 la 5 i me ann e selon le prix courant de remplacement...

Page 14: ...r s il y a des fuites 8 Venturi bloqu 8 Enlever le br leur nettoyer le tube venturi Voir nettoyage et entretien 9 Venturi non align avec l orifice de la soupape 9 Aligner de nouveau le venturi l orifi...

Page 15: ...haute temp rature pour 10 minutes ou jusqu ce qu il arr te de faire de la fum e Fermez le robinet de la bonbonne et ensuite les boutons de contr le Lorque le barbecue est refroidi enlevez le papier d...

Page 16: ...r la broche Enrouler une ficelle autour des queues et des pattes et attacher la broche Mettre la deuxi me fourchette sur la broche et ins rer les dents dans le poulet Serrer les vis CONTREPOIDS DE TOU...

Page 17: ...MOYEN BAS 2 4 HEURES DINDE OU POULET 5 10 LB MOYEN BAS 3 5 HEURES Avec un tournebroche r gler la temp rature moyen lev CUISSON AU TOURNEBROCHE Suivre les tapes d crites la section de cuisson convecti...

Page 18: ...ure est utilis e pour le r chauffement du gril et pour la cuisson de steaks et de c telettes R glage moyen La temp rature la surface des grilles est d environ 450 F 230 C avec le couvercle ferm Ce r g...

Page 19: ...d allumage Le br leur devrait s allumer dans les 5 prochaines secondes Remarque Allumage l allumette Suivre les tapes 1 8 ci dessus Placer une allumette allum e pr s des orifices du br leur lat ral P...

Page 20: ...Tourner le bouton de commande SIDE REAR la position d arr t OFF 7 Si la solution fait des bulles il y a une fuite 8 Si une fuite est d tect e fermer le robinet d arr t de la bonbonne reserrer la conne...

Page 21: ...e pression est r gl l usine une pression de 11 po CE colonne d eau Les accouplements du tuyau et le tuyau sont conformes la Norme CGA CAN 1 83 Ne tentez pas de les modifier ou de les substituer 4 Prot...

Page 22: ...tation du r servoir doit permettre la vapeur de s chapper Le r servoir doit inclure un rebord pour prot ger le robinet d arr t La bonbonne doit tre install e conform ment aux instructions d assemblage...

Page 23: ...que connu de l tat de Californie qui peut causer le cancer des malformations cong nitales ou d autres dommage reproductifs SE LAVER LES MAINS APR S AVOIR MANIPUL CE PRODUIT AVERTISSEMENT Les combustib...

Page 24: ...teille de propane qui n est pas raccord e en vue de son utilisation ne doit pas tre entrepos e dans le voisinage de cet appareil ou de tout autre appareil ANSI Z21 58a 2008 CSA 1 6a 2008 TABLE DES MAT...

Reviews: