background image

DX26/DX32 OPERATOR MANUAL 


18 

www.onyxsolutions.com


Rev 4 –11/4/2021 

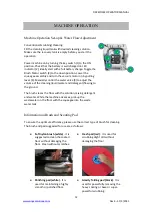
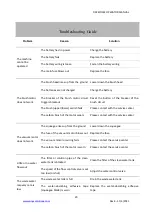
Monthly Maintenance (every 80 hours) 
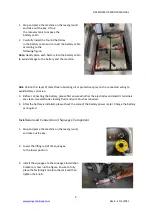
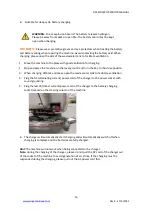
1.


Dismantle the filter of the clean water tank from the bottom of the machine and 
clean the filter screen. Ensure the clean water tank is emptied before dismantling 
the filter. 

2.


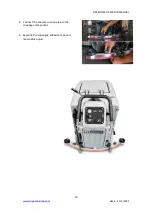
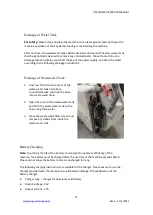
Clean the top of the battery to prevent electrode corrosion (refer to [Battery 
Maintenance]). 

3.


Check whether the battery wiring is loose. 
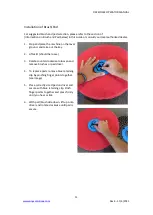
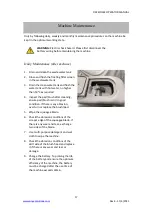
4.


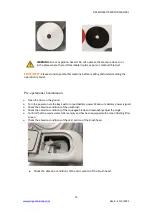
Check and clean the cover seal of the wastewater tank and replace it if there is any 
damage. 

5.


Spray the silica gel dry lubricant on all pivots and wheels and cover a layer of water-
proof lubricating oil to ensure smooth operation of wheels and pivots. 

6.


Check whether the nuts and bolts on the machine are loose. 

7.


Check whether the machine leaks. 
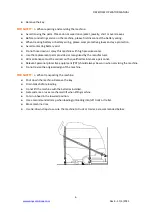
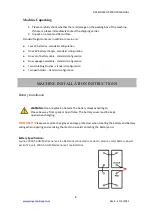
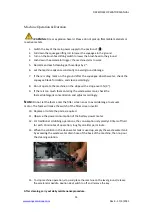
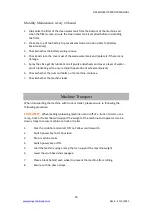


Machine Transport 

When transporting the machine with truck or trailer, please ensure to following the 
following procedure: 

 
FOR SAFETY:


When loading/unloading machine onto or off of a  truck or trailer, use a 

ramp, truck or trailer that will support the weight of the machine and operator. Use tie- 
down straps to secure machine to truck or trailer. 
 
1.


Park the scrubber and select OFF on Yellow control switch. 

2.


Switch power key to OFF position. 

3.


Drain machine tanks. 

4.


Switch power key or ON. 

5.


Load the machine using a ramp that can support the machine weight. 

6.


Lower the scrub head and squeegee. 


7.


Place a block behind each wheel to prevent the machine from rolling. 

8.


Secure with tie-down straps. 


Summary of Contents for DX26

Page 1: ...ine please carefully read and understand this Guide ONYX Systems LLC 12703 Commerce Station Dr Ste 200 Huntersville NC 28078 United States Tel 704 827 9368 Website https www onyxsolutions store No further notice will be given for possible change of specification and parts Machine Information Please fill in when installing for future reference Model number Machine serial number Sales representative...

Page 2: ...n of Brush Pad 11 MACHINE OPERATION 12 Machine Operation Set up Water Flow Adjustment 12 Information on Brush and Scouring Pad 12 Pre operational Examination 13 Machine Operation Duration 14 Drainage of Water Tank 15 Drainage of Wastewater Tank 15 Battery Charging 15 Machine Maintenance 17 Daily Maintenance after each use 17 Monthly Maintenance every 80 hours 18 Machine Transport 18 Machine Storag...

Page 3: ...d service center or dealer by telephone at 704 827 9368 or email us at sales onyxsolutions com Warranty Claims ONYX Warranty Statement policy and Warranty Claim form can be found on the SUPPORT page of the ONYX website https www onyxsolutions store support Technical Support Technical support is available by submitting a HELP TICKET on the CONTACT US page of the ONYX website https onyxsolutions odo...

Page 4: ...actices which could result in severe personal injury or death FOR SAFETY To identify actions which must be followed for safe operation of equipment All operators must read understand and observe the following safety precautions The following safety precautions signal potentially dangerous conditions to the operator or equipment If the following warnings are not observed it may cause personal injur...

Page 5: ...al odor Move the machine to a ventilated area and contact Customer Service immediately If the battery is leaking any substance Avoid contact with battery substance and contact Customer Service immediately If the battery becomes excessively hot Disconnect battery charger Move the machine to a ventilated area and contact Customer Service immediately FOR SAFETY 2 Before starting the machine Please en...

Page 6: ...cement parts provided or recognized by the manufacturer All maintenance must be carried out by qualified maintenance personnel Relevant personal protective equipment PPE should always be worn when servicing the machine Do not revise the original design of the machine FOR SAFETY 6 When transporting the machine Shut down the machine Remove the key Drain tanks before loading Do not lift the machine w...

Page 7: ...Handle B Accelerator Trigger C Fresh Solution Tank Fill Port D Solution Flow Valve E Stabilizer wheel F Recovery Tank G Fresh Solution Tank H Bumper Wheel I Skirt Brushes pads underneath J Main Drive Wheel K Vacuum Hose to Recovery Tank L Recovery Tank Drainage Hose M Squeegee Assembly H J A B D L K F C M E G I ...

Page 8: ...bly standard configuration Two scrubbing brushes standard configuration Two pad holders standard configuration MACHINE INSTALLATION INSTRUCTIONS Battery Installation WARNING Fire or explosion hazard The battery releases hydrogen Please be away from spark or open flame The battery cover must be kept open when charging FOR SAFETY Please wear protective gloves and eye protectors when treating the bat...

Page 9: ...ive spray on the connected wiring to avoid battery corrosion 3 Before connecting the battery please first ensure whether the electrodes and electric terminals are clean Use electrode cleaning fluid and wire brush as required 4 After the battery is installed please check the scale of the battery power meter Charge the battery as required Installation and Connection of Squeegee Component 1 Stop and ...

Page 10: ...DX26 DX32 OPERATOR MANUAL 10 www onyxsolutions com Rev 4 11 4 2021 4 Connect the vacuum suction pipe to the squeegee component 5 Examine the squeegee adhesive tape and reasonably adjust ...

Page 11: ...he machine on the level ground and take out the key 2 Lift skirt should be loose 3 Rotate counterclockwise to loosen and remove brushes or pad driver 4 To replace pads remove blue retaining clip by pinching finger points together see image 5 Place correctly sized pad on driver and secure with blue retaining clip Pinch finger points together and press firmly until you hear a click 6 With pad brush ...

Page 12: ...st the volume of the cleaning liquid water and detergent flowing to the ground The brush cleans the floor with the solution mixing detergent and water While the machine advances pick up the wastewater on the floor with the squeegee into the waste water tank Information on Brush and Scouring Pad To ensure the optimum efficiency please use the correct type of brush for cleaning The brush and pad sug...

Page 13: ...e operational Examination Clean the dust on the ground Turn the power on via the Key Switch to read battery power Make sure battery power is good Check the abrasion conditions of the pad brush Check the abrasion conditions of the squeegee blade and reasonably adjust the angle Confirm that the waste water tank is empty and has been equipped with a clean floating filter screen Check the abrasion con...

Page 14: ...slope with a slope over 5 3 9 If there is too much foam entering the wastewater tank check the foamer detergent concentration and adjust accordingly Note Do not let the foam enter the filter screen so as to avoid damage to vacuum motor The foam will make the switch of the filter screen invalid 10 Replace or rotate the pad as required 11 Observe the power consumption of the battery power meter 12 F...

Page 15: ...f the waste water tank drain hose counterclockwise and drop the hose into waste water drain 2 Open the cover of the waste water tank and flush the waste water tank with a hose using fresh water 3 Rinse the waste water filter screen and remove any debris from inside the waste water tank Battery Charging Note To prolong the life of the battery and ensure the optimum efficiency of the machine the bat...

Page 16: ...nd and turn the key to the close position 3 When charging tilt back and leave open the waste water tank to facilitate ventilation 4 Plug the AC alternating current power cord of the charger to the power socket with sound grounding 5 Plug the red DC direct current power cord of the charger to the battery charging socket located on the steering column of the machine 6 The charger will automatically ...

Page 17: ...ot water no higher than 50 as required 4 Inspect the pad brush after cleaning ensure pad brush is still in good condition If there is any abrasion overturn or replace the brush pad 5 Wipe the squeegee blade 6 Check the abrasion conditions of the scraper edge of the squeegee blade If there is any wear and tear exchange two sides of the blade 7 Use multi purpose detergent and wet cloth to wipe the m...

Page 18: ...nsure smooth operation of wheels and pivots 6 Check whether the nuts and bolts on the machine are loose 7 Check whether the machine leaks Machine Transport When transporting the machine with truck or trailer please ensure to following the following procedure FOR SAFETY When loading unloading machine onto or off of a truck or trailer use a ramp truck or trailer that will support the weight of the m...

Page 19: ...his will place pad brush head and squeegee in up position 3 Switch power key to OFF position 4 Disconnect the batteries before any long term storage 5 Drain and flush thoroughly the bottom of the water tank 6 Store the machine in a dry place 7 Open the cover of the waste water tank 8 Note Do not let the machine be subject to rain excessive amounts of humidity and moisture and store indoor 9 If the...

Page 20: ...ease contact with the service center The carbon brush of the motor wears Please contact with the service center The vacuum motor does not work The squeegee rises up from the ground Lower down the squeegee The fuse of the vacuum motor blows out Replace the fuse The vacuum motor or wiring fails Please contact the service center The carbon brush of the motor is worn Please contact the service center ...

Page 21: ... shortens The battery has flaws Replace the battery The battery charging fails Repair or replace the charger Technical Parameters Technical parameter Unit DX26 DX32 Operating voltage V AH 24 200 Scrubbing motor W 550 Suction motor W 550 Brush lifting motor W 100 Cleaning width mm DX32 800 30 w 34 skirt width DX26 660 26 w 34 skirt width Squeegee width mm 1080 43 Cleaning efficiency m2 h RX32 4 200...

Page 22: ... MANUAL 22 www onyxsolutions com Rev 4 11 4 2021 Waste water tank capacity Gallons 28 Gallons Machine weight lbs DX32 570 Shipping weight 590lbs DX26 550 Shipping weight 570lbs Machine dimension cm 1650 900 1300 66 36 52 ...

Page 23: ...DX26 DX32 OPERATOR MANUAL 23 www onyxsolutions com Rev 4 11 4 2021 Wiring Diagram Schematic Link to Wiring Schematic PDF file on ONYX Website Support Page https www onyxsolutions store support ...

Page 24: ... voltage or the controller battery voltage level setting is wrong 18 Power board is severely overheated The controller is protected and temporarily suspended 19 The motor is severely overheated The controller is protected and temporarily suspended 20 R20 Accelerator problem Check whether the accelerator cable is loose and whetehr the accelerator is burned out 21 Main contactor contact welding Chec...

Reviews: