background image

28

After Sales Support

Telephone: 


1300 886 649

Email: 


                    info@tempo.org

Operating Instructions (Cont.)

Summary of Contents for ADVC-014

Page 1: ...Instruction Manual 1300 886 649 Model ADVC 014 Customer Helpline HD Digital Camcorder...

Page 2: ...MMC card 10 Powering ON and OFF 11 Basic operations 12 Operating Instructions Video mode 14 Camera mode 17 Driver mode 20 Voice recording mode 21 Playback mode 22 Setup Internal settings mode 26 Conn...

Page 3: ...ts conferred by this warranty are in addition to all rights and remedies in respect of the product that the consumer has under the Competition and Consumer Act 2010 and similar state and territory law...

Page 4: ...NIX product All products brought to you by ONIX are manufactured to the highest standards of performance and safety and as part of our philosophy of customer service and satisfaction are backed by our...

Page 5: ...not shake strike or drop the HD Digital Camcorder This may cause it to malfunction render it incapable of recording moving images and render the SD card unusable for image data breakdown Taking care o...

Page 6: ...or mental capabilities or lack of experience and knowledge unless they have been given supervision or instruction concerning use of the device by a person responsible for their safety Children Young...

Page 7: ...terfere with the HD Digital Camcorder s power supply when the HD Digital Camcorder or computer is accessing the memory card i e reading writing formatting etc Do not touch the card s metal contact sur...

Page 8: ...er Indicator 3 LED Support Light 4 Zoom In Button 5 Zoom Out Button 6 Navigation Button Up Down Right Left 7 Select Button 8 Display Button 9 Menu Button 10 LCD Screen 11 Mode Indicator 12 Mode Switch...

Page 9: ...cro Normal Lens Switch 16 Zoom Lever 17 Shutter Button 18 Tripod Socket 19 SD Memory Card Slot 20 Built In Speaker 21 Battery Cover 22 Battery Cover Lock Button 23 TV USB Port 24 Voice Recording Butto...

Page 10: ...r until you hear the lock securing the cover Using an SD Memory Card inserting removing a card Insert an SD memory card into the card slot located on the bottom of the recorder and press it down until...

Page 11: ...reen Press and hold the Power button for two to three seconds to turn the power ON The power indicator will light the camcorder and the LCD will display Press and hold the Power button again for two t...

Page 12: ...the Shutter button once to take a still picture Voice Recording Press the Voice audio recording button to activate voice recording mode Press the Shutter button to start voice recording Press again t...

Page 13: ...ces to brighten the scene if required Press the LED Support light button to activate this lamp Press again to turn the light OFF Self Timer LED Indicator This lamp indicates that the camcorder is acti...

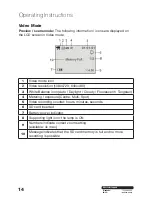
Page 14: ...80x720 640x480 3 White Balance icon Auto Daylight Cloudy Fluorescent Tungsten 4 Metering exposure Centre Multi Spot 5 Video recording counter hours minutes seconds 6 SD card inserted 7 Battery power i...

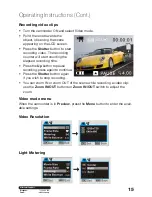
Page 15: ...ounter will start counting the elapsed recording time Press the Up button to pause recording press again to continue Press the Shutter button again if you wish to stop recording You can zoom IN or zoo...

Page 16: ...lect available menu options then press the Right button to review available settings Press Up Down to select the desired setting then press OK to confirm Press the Menu button to exit the video menu m...

Page 17: ...e icon 2 Self timer mode symbol 3 White balance Auto 4 Metering exposure mode 5 Exposure value 6 Image quality icon 7 Image counter shows number of available pictures remaining 8 Picture resolution va...

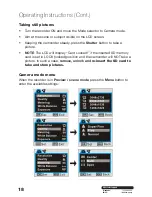
Page 18: ...LCD screen Keeping the camcorder steady press the Shutter button to take a picture NOTE The LCD will display Card Locked if the inserted SD memory card is set in LOCK locked position and the camcorde...

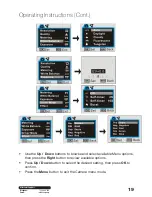
Page 19: ...ing Instructions Cont Use the Up Down buttons to browse and select available Menu options then press the Right button to review available options Press Up Down button to select the desired setting the...

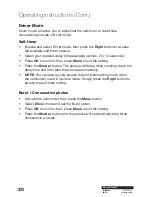
Page 20: ...to confirm then press Menu to exit the setting Press the Shutter button The camera will beep while counting down the delay time and then take the picture automatically NOTE You can also quickly access...

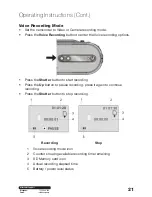
Page 21: ...ing button to enter the Voice recording options Press the Shutter button to start recording Press the Up button to pause recording press it again to continue recording Press the Shutter button to stop...

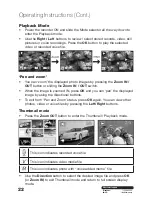
Page 22: ...e OK button to play the selected video or recorded voice file Pan and zoom You can zoom the displayed photo images by pressing the Zoom IN OUT button or sliding the Zoom IN OUT switch When the image i...

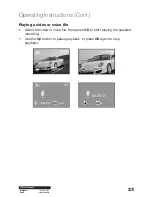
Page 23: ...empo org Operating Instructions Cont Playing a video or voice file Select the video or voice file then press OK to start playing the selected recording Use the Up button to pause playback or press OK...

Page 24: ...use the Right button to obtain access to the available settings Use the Up Down buttons to select an option then press OK to confirm Resize function You can resize the image only to a size smaller tha...

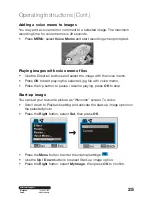
Page 25: ...s and select the image with the voice memo Press OK to start playing the selected jpg file with voice memo Press the Up button to pause resume playing press OK to stop Start up image You can set your...

Page 26: ...mode Power ON press Menu then press the Right button to enter internal settings mode Use the Up Down buttons to select the desired setting and press the Right button to access available options avail...

Page 27: ...27 After Sales Support Telephone 1300 886 649 Email info tempo org Operating Instructions Cont Operating Instructions Cont...

Page 28: ...28 After Sales Support Telephone 1300 886 649 Email info tempo org Operating Instructions Cont...

Page 29: ...u wish to use the camcorder as a PC cam to see or transfer live images scenes via the Internet Driver installation Insert the supplied CD into the computer s CD ROM drive When the system starts the CD...

Page 30: ...ecordings on your computer using a typical pre installed software program or you may install Magix software Power ON the camcorder and connect it to the computer via USB cable Select and open My Compu...

Page 31: ...se the supplied AV cable and connect the TV output port on your recorder to the Video input yellow connector and Audio input red white connector on your TV Set your TV to Video External mode Slide the...

Page 32: ...48 5MP 2592 x 1944 3MP 2048 x 1536 1 3MP 1280 x 1024 Focus distance Normal 140cm 5ft Infinity Macro 15 25cm 6 10inches Digital zoom 4 LCD screen 2 inch TFT LCD Function modes Video recording Photo tak...

Page 33: ...ed data may be lost We recommend you save this data elsewhere prior to sending the product for repair You should also be aware that rather than repairing goods we may replace them with refurbished goo...

Page 34: ...34 After Sales Support Telephone 1300 886 649 Email info tempo org...

Page 35: ...35 After Sales Support Telephone 1300 886 649 Email info tempo org...

Page 36: ...36 After Sales Support Telephone 1300 886 649 Email info tempo org...

Reviews: