ACM5504-‐5-‐GS-‐I Quick Start (520071-‐Rev 1.0)
Page
2
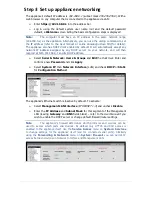
Step 3 Set up appliance networking
The appliance’s default IP address is
192.168.0.1
(subnet mask
255.255.255.0
). With a
web browser on any computer that is connected to the appliance via LAN:
Ø
Enter
https://192.168.0.1
into the address bar
Ø
Log in using the default system user name
root
and the default password
default,
a
Welcome
screen listing the basic configuration steps is displayed
Note:
The computer must have an IP address in the same network range
(192.168.0.x) as the appliance. Alternatively, you can use the
arping
command to set
the IP address (refer to the
User Manual
or online
Knowledge Base FAQ
for details).
The appliance also has DHCP client enabled by default. It will automatically accept any
network IP address assigned by any DHCP server on your network, and will then
respond at both 192.168.0.1 and its DHCP address.
Ø
Select
Serial & Network: Users & Groups
and
Edit
the
Root User
. Enter and
confirm a new
Password
and click
Apply
Ø
Select
System: IP
then
Network Interface
(
LAN)
and check
DHCP
or
Static
for
Configuration Method
The appliance’s Ethernet switch is inactive by default. To activate:
Ø
Select
Management LAN Interface
(ETHERNET 1-4)
and uncheck
Disable
Ø
Enter the
IP Address
and
Subnet Mask
for this segment of the Management
LAN (leaving
Gateway
and
DNS
fields blank) – refer to the
User Manual
if you
wish to enable the DHCP server or change default firewall/router settings
Note
:
The appliance’s firewall determines which protocols and services can be
used to access which ports and devices. By default only HTTPS and SSH access is
enabled to the appliance itself. Use the
Service Access
menu on
System: Services
to change settings for the appliance itself (and for connected serial ports). Similarly
using the
Forwarding & Network
menu on
System: Firewall
you can permit IP
access between devices on Network Interface and Management LAN.


