background image

19

  |  

Opera Care


Solo Bed Installation Guide and Technical Specification  | Version 1

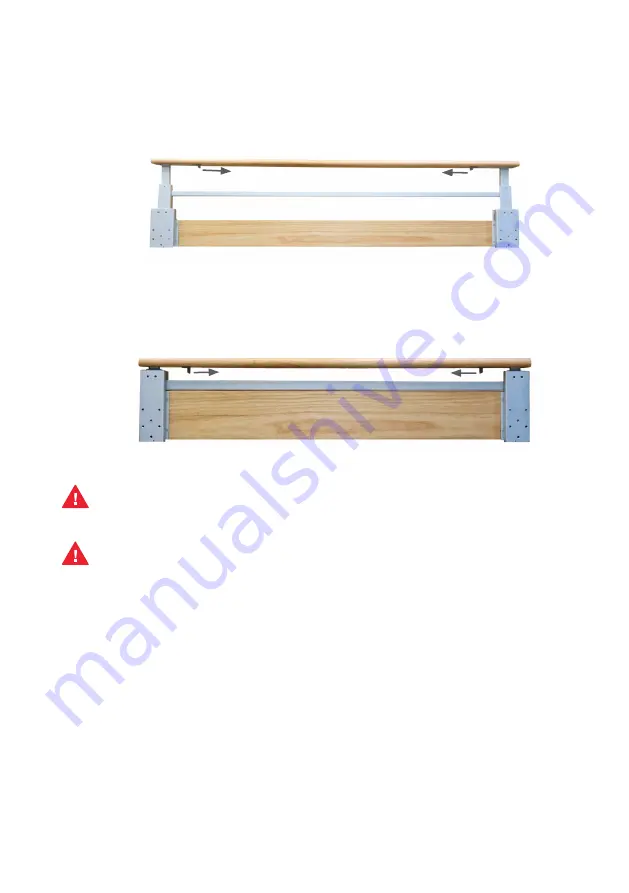
To lift up the split side rails, pull in both of the grey sliders (circled) that are 
under the side rail at the same time. Slowly lift until an audible click is heard. 

To lower down the split side rails, pull in both of the sliders at the same time 
and carefully lower by pushing down gently.

The split side rails are designed to only prevent the occupant from falling out 
of the bed. Leaning or climbing on the split side rail may result in injury.

3.2 

Side Rail Operation

When the split side rails are in the highest position, ensure that they are 
securely locked in to place. Failing to do this may result in injury.

3. 

Bed Operation and Maintenance

Summary of Contents for Solo Bed 105

Page 1: ...opera care co uk 0333 222 8584 Solo Bed Installation Guide and Technical Specifications ...

Page 2: ...of Symbols 2 2 Installation and Commissioning 3 3 Bed Operation and Maintenance 18 4 Troubleshooting 21 5 Safety Instructions 22 6 General Information 27 7 Servicing 29 8 Technical Specification 32 9 Service Life and Disposal 38 10 Guarantee 38 11 Opera Warranty Terms and Conditions 38 Contents ...

Page 3: ...rmity mark in accordance with the Medical Device Rgulation 2017 745 The electrical equipment is splash proof Symbol for Protection Class II device double shock proof Symbol for type B device according to DIN EN 60601 1 This care bed may only be used indoors This product must be disposed of in a separate refuse collection in the European Union Do not dispose of as normal domestic waste Maximum perm...

Page 4: ...and headboards styles may vary 2 Installation and Commissioning A Solo Bed x 1 G Head Footboard Insert Nut X 8 F Head Footboard Bolt x 8 C Footboard x 1 B Headboard x 1 D Footboard Bracket x 2 E Headboard Bracket x 2 H Mattress Retainer x 8 2 Installation and Commissioning 2 1 Contents ...

Page 5: ...ptional purchase Before you begin you will also need Wall space with a plug socket nearby Tools Size 5 and 4 allen key and two adjustable spanners N Bracket Fixing Bolt x 8 I Telescopic Split Side Raill x 4 J Bracket x 8 M Bracket Fixing Screw x 24 L Fixing Bar Bolt Nut x 8 O Security Pin x 8 2 Installation and Commissioning ...

Page 6: ...all and unpack this bed to avoid injury Observe the general manual handling guidelines 1 2 Castor unlocked unbraked Castor locked braked Position the bed Move the bed into the centre of the room Lock all four castors by pressing down on the castor brakes Plug in the bed and raise the bed to a safe working height by using the bed platform height adjustment function see page 20 on how to adjust the ...

Page 7: ...e headboard in place with the head footboard bolts F On the other side the front of the headboard push the insert nuts G into the mounting holes Repeat these steps for the footboard making sure that the correct brackets are used D 3 Headboard with brackets attached Headboard with bracket lined up Footboard with brackets attached Front of headboard with insert nuts B E C D F G 2 Installation and Co...

Page 8: ...kets either side of the head footboard are in line with the two mounting slots of the mattress platform Slide the brackets into the channels so that the head footboard is aligned with the mattress platform Tighten the head footboard turning knobs to secure the brackets and head footboards 4 Do not overtighten the mounting hardware this will damage the mounting brackets Headboard brackets lined up ...

Page 9: ...ion 1 see photos below To move the retainer to position 2 lift the end of the retainer using the finger hole and slide towards you until position 2 is located please note that it is recomended that position 2 is used for 90cm mattresses Repeat this for all mattress retainers 2 mounting holes on the sides of the mattress platform and 2 at each end of the bed towards the Head board footboards 5 Pre ...

Page 10: ...atform extension knobs 2 taking hold of both sides of the mattress platform pull the platform to extend it to either the 10cm or 20cm increments marked on the platform Tighten both platform extension knobs 2 Push the footboard into the new extended position and tighten both footboard retaining knobs 1 Photo of the small black turning knobs 6 Turnings knob locations for releasing the platform exten...

Page 11: ...nically See diagram 2 To further alter the knee break angle manually lift the foot rest section up slowly Audible clicks confirm when the platform is locked into a new position See diagram 3 To lower lift the foot rest to its highest position and slowly lower it back down 7 1 Bed in flat position 3 Knee break angle manually adjusted 2 Knee break angle electronically adjusted 2 Installation and Com...

Page 12: ...sition and re apply the brakes Place the mattress onto the bed and make sure that it is securely held in place by the mattress retainers 8 9 Before lowering the bed check that the area underneath is clear any obtructions could damage the bed Take extra care when lowering the bed fully make sure that there are no limbs persons pets or objects under the bed that could become trapped and crushed The ...

Page 13: ...8 N Bracket Fixing Bolts x 8 O Security Pin x 8 Assembly Instructions for the Telescopic Side Rails Position the bed Remove any accessories mattress grab rail objects from the bed and brake the castors Plug in and raise the bed to a safe working height by using the bed platform height adjustment function on the handset See page 20 on how to adjust the bed platform 2 1 I K J L M N O x 4 x 8 x 2 x 8...

Page 14: ...hassis fixing bar holes circled blue at the head and foot ends of the chassis Insert a fixing bar bolt L through the fixing bar hole and chassis fixing bar hole Using a spanner hold the head of the bolt firmly in place and use a second spanner to secure the end of the bolt in place with a nut Fully tighten the nut to the chassis Repeat this for all four bolts 3 K L L K Lined up fixing holes Fixing...

Page 15: ...s caution the inserts have been greased Insert the security pins O through the small holes in the front and the back of the sheath at both ends Pull the sheaths back over the grey plastic inserts and repeat these steps for each of the split side rails 4 Split side rail facing up Aluminium sheath pulled down Security pin inserted I I I O O Aluminium sheath pulled up with pin in place 2 Installation...

Page 16: ...p the three holes of the bracket J to the three holes on the aluminium sheath I With an allen key take three bracket fixing screws M and screw the brackets into the split side rail Repeat this for each of the split side rails 5 Split side rail facing up Split side rail with bracket screwed in J M I 2 Installation and Commissioning ...

Page 17: ... Take a second split side rail and slide up to holes 3 and 4 To secure the side rail brackets to the fixing bar take a bracket fixing bolt N and insert the bolt through the bracket and fixing bar use an allen key to tighten Repeat the steps for the split side rails on the other side of the bed to complete installation 6 Fixing bar with bracket fixing holes numbered 1 2 3 4 Split side rail brackets...

Page 18: ...h the Opera Solo Telescopic side rails must meet the following requirements The split side rail height from the top of the mattress in an uncompressed condition must be a minimum of 220mm Only mattresses that match the specification requirements are compatible with the Opera Solo Bed 7 2 Installation and Commissioning ...

Page 19: ...chanically extendable platform 6 Chassis 7 Handset 8 Foot board 9 Headboard 10 Split side rail 11 Castors with mechanical brake 12 Fixing bar 13 Bracket fixing holes for telescopic side rail 14 Fixing bar holes 15 Chassis fixing bar holes 3 Bed Operation and Maintenance 1 9 8 11 10 14 4 1 2 3 5 6 7 12 13 13 14 15 15 13 3 Bed Operation and Maintenance 3 1 Overview ...

Page 20: ...e split side rails pull in both of the sliders at the same time and carefully lower by pushing down gently The split side rails are designed to only prevent the occupant from falling out of the bed Leaning or climbing on the split side rail may result in injury 3 2 Side Rail Operation When the split side rails are in the highest position ensure that they are securely locked in to place Failing to ...

Page 21: ... of thebed The bed is equipped with anti entrapment features If the bed platform is higher than 320mm from the floor long press the bed platform down button to lower it to below 320mm To continue lowering the bed release and long press the button again Ensure that there are no limbs objects or obstacles within the beds moving range Where a connection fault is identified and rectified the control s...

Page 22: ... backup battery to the control box Actuator in need of service or load is too high Contact Opera for more information Handset system has not been reset after faults were fixed Refer to page 20 on how to reset the handset Castors brakes noisy or stiff Debris in the bearings Hair dust lint Clean or replace the castors see page 25 Noisy or dry sound from the pivots Requires lubrication Lubricate pivo...

Page 23: ...ate the control system and check if pets are under the bed before operating any of the functions Never store anything under the bed Adjustments to the bed must only be carried out by suitably instructed persons or in the presence of an instructed person Disconnect the mains plug from the socket before moving the bed and take care to avoid dragging the mains plug across the floor when moving the be...

Page 24: ...he care bed the brake on all four castors must be released and the mattress base be adjusted to the lowest horizontal position The maximum duty cycle and the safe working load must not be exceeded otherwise safe operation cannot be guaranteed please refer to Technical Data The care bed must not be used in rooms where there is a risk of explosion The care bed must only be taken apart if there is no...

Page 25: ...otection against rolling out of the care bed if the backrest and lower leg adjustments are in the horizontal position Excercise caution when using the side rails with a disabled occupant always conduct a risk assessment to ensure that the side rails are suitable for use 5 2 Safety Information for the Operator With the help of this Instruction Manual instruct each user in the safe operation of this...

Page 26: ...nform the person responsible for the bed immediately 5 Electrical and Earthing Do not under any circumstances cut or remove the earthing prong from any plugs If you must use an extension cable use only a three wired extension cable with the same or a higher elecrtrical rating as the connected device Do not use if the power cable is cut frayed or loosely connected to the device 5 4 Cleaning and Dis...

Page 27: ...esses compatible with the supplied side rails and bed The dimension between the mattress upper surface in an uncompressed condition and the top edge of the upper side rail must be 220mm minimum If this dimension is less than 220mm an extension side rail kit should be fitted 5 7 Electromagnetic Compatibility Regarding the emitted interference and interference resistance the electric motor units com...

Page 28: ...infirm and occupying a care bed Qualified Personnel Qualified personnel are employees of the operator who as a result of their vocational training or briefing are entitled to deliver assemble disassemble and transport the care bed In addition these persons are instructed in cleaning and disinfection regulations for the bed 6 2 General Notice Clean and disinfect the care bed before using it for the...

Page 29: ... from falling rolling out of bed they are not designed to be climbed leaned on or used for children They may only be used under the conditions for use described in this Instruction Manual 6 4 Non intended Use A non intended use is a use that deviates from the intended purpose and is not outlined in the Instruction Manual Non intended uses include but are not limited to the following Loading the be...

Page 30: ... the bed is faulty operation must not be started Any issues or incidents must be reported to Opera Care Please refer to the back cover for contact details 6 7 Qualification of Users The bed must only be operated by persons who have the corresponding training or experience to enable them to handle the care bed correctly 7 Servicing Operators of care beds are obliged according to the regulations in ...

Page 31: ...l adjustment options for the bed be operated without hindrance on site 10 Is the mechanism for locking the thigh rest in place in working order 11 Are the side guard beams free of any fractures cracks or other damage 12 Do the side guard beams sit securely in their anchorage 13 Has the load test been carried out successfully according to the regulations 14 Are the patient s lifting pole and pole s...

Page 32: ...andset securely attached 23 Are all plug in connections securely attached Washers without damage 24 Are cables laid correctly and safely No damage 25 Motor housing and SMPS housing mains plug housing without damage 26 Are the thrust pipes of the height adjustment motors undamaged 27 Functional test of the handset can the buttons be operated properly 28 Functional test of handset locking device On ...

Page 33: ...0 49 6 Internal Length 2000mm 78 7 External Height In lowest position 230m 9 05 Internal Width 900mm 35 4 1050mm 41 3 1200mm 47 2 Backrest angle adjustment electronically 0 70 Thighrest angle adjustment electronically 0 39 Footrest Angle Adjustments Mechanically raised 128 148 Reverse Trendelenburg 12 2 Mattress Base Surface Material Steel Castors 4 with brakes 4 without Max Castor Loading Capacit...

Page 34: ...t 110mm 4 3 to 425mm 16 7 Safe working load SWL 75Kg 11st 8lb 8 2 Technical Data Electrical Power supply unit Mains Voltage rating 110V 240V Frequency rating 50Hz 60Hz Type of current AC Nominal consumption during operation 363W Nominal consumption in idle state 0 5W Nominal operating time idle time 2 Minutes 18 Minutes Primary safety fuse Yes Motor unit protection class IPX6 8 3 Classification Me...

Page 35: ... used in such an environment Emitted interference Compliance Electromagentic Environment Guidelines RF emissions according to CISPR11 Group 1 The care bed uses RF energy only for its internal functioning Therefore the RF emissions are very low and it is unlikely that nearby electronic devices will be disturbed RF emissions according to CISPR11 Class B The care bed is designed for use in all establ...

Page 36: ... the relative humidity should be at least 30 Electrical Fast Transients Bursts according to IEC 61000 4 4 2 kV For power lines 1 kV for input and output lines 2 kV For power lines 1 kV For input and output lines The quality of the supply voltage should be equivalent to that of a typical business or hospital environment Surges according to IEC 61000 4 5 1 Kv Voltage phase phase conductor 1 Kv Volta...

Page 37: ...he transmitter manufacturer and D is the recommended working clearance in meters Field strengths from fixed RF transmitters should at all frequencies accordng to a site survey a Note p 5 be lower than the level of agreement be b Note p 5 In the vincinity of equipment bearing the following symbol interference Note 1 At 80 and 800 MHz the higher frequency range must be taken Note 2 These guidelines ...

Page 38: ... 100 12 12 23 For transmitters not rated in the list above the working clearance can be determined using the equation which belongs to the transmitter where P is the nominal output of the transmitter in Watts W according to specifications of the transmitter manufacturer Note 1 An additional factor of 10 3 is applied when calculating the recommended working clearance between transmitters in the 80 ...

Page 39: ...ons below Opera provides a manufacturers warranty of 3 years from the date of purchase for the Opera Solo Bed and 1 year for the Telescopic Side Rails 11 Opera Warranty Terms and Conditions 11 1 Warranty Terms 11 1 1 Subject to the terms and conditions set out below Opera agrees to repair or replace the product within the United Kingdom at its own cost and any Opera accessory supplied with it purc...

Page 40: ... provided Opera will determine in its discretion the closest product within the current range of products offered by Opera with which to replace the faulty or damaged product The replacement product may differ with the replaced product in size and specifications at the reasonable election of Opera Opera may replace parts with refurbished parts Replacement of the product or a part under the warrant...

Page 41: ... serial number has been altered or removed from the product c To damage malfunction or failure resulting from alteration accident misuse abuse fire liquid spillage mis adjustment of customer controls use on an incorrect voltage power surges and dips thunderstorm activity force majeure voltage supply problems tampering or unauthorised repairs by an persons use of defective or incompatible accessori...

Page 42: ...for any loss damage or alterations to third party products no matter how occuring or for any loss or damage arising from loss of use loss of profits or revenue or for any resulting indirect or consequential loss of damage b Opera s aggregate liablity in respect of all claims under the warranty shall not exceed the original purchase price of the product or at Opera s option the replacement of the p...

Page 43: ...42 opera care co uk 0333 222 8584 Notes ...

Page 44: ... Solo Bed Installation Guide and Technical Specification Version 1 Opera Care Azure House Connaught Road Kingswood Hull HU7 3AP 0333 222 8584 support opera care co uk opera care co uk Version 1 Published August 2020 ...

Reviews: