background image

    1. Product information


Article:

  Flying model in construction kit form


Conditions: 

For flying in still or very light winds


Use:

  With pupils aged 10 plus


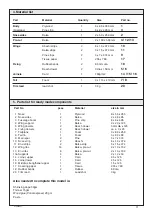
  2. Material information


2.1. Material:

  Balsa wood (Technically a tropical hardwood, soft and light)


  Beech wood (Hardwood)


  Pine wood (Soft wood)


  Plywood (Multi layered, glued crosswise)


Working:

  Wood can planed, sawn or sanded


Joining:

  Glueing


Finish:

  Wood varnish (Base coat plus finish- also in spray form)


  Staining (Water based - finish with clear varnish)


2.2. Material:

  Depron, thermoplastic


  Polystyrol hard foam (PS) white


Working: 

  Cutting with a modelling knife


Joining:

  DO NOT use any any glue containing solvent


Finish:

  No special finish is necessary


3. Tools:


Saws: 

Use a PuK saw from our catalogue for sawing small strips of wood and dowel


Note!    

Hold the work in a clamp


Cutting::

  Use a modelling knife


Note!   

Be careful with your fingers the blade will be sharp!


Sanding: 

  Use a block and glasspaper for all flat areas and edges

2

E102056#1

Summary of Contents for 102.056

Page 1: ...ded for pupils 10 years old plus by B Elsner Please Note The OPITEC range of projects is not intended as play toys for young children They are teaching aids for young people learning the skills of Cra...

Page 2: ...ish Wood varnish Base coat plus finish also in spray form Staining Water based finish with clear varnish 2 2 Material Depron thermoplastic Polystyrol hard foam PS white Working Cutting with a modellin...

Page 3: ...55 x 255 2 Nose sides 2 Balsa 2 x 48 x 95 3 Fuselage boom 1 Pine strip 6 x 8 x 495 4 Wing support 1 Balsa 2 x 20 x 125 5 Wing dowels 2 Beech dowel 3mm dia x 125 6 Fixing dowels 2 Beech dowel ca 3 x 2...

Page 4: ...056 1 6 The layout of the balsa pre cut ribs sheet and Depron 62 5 4 13a 12 2 2 7 8 12 13 Pre cut balsa ribs etc Balsa sheet tailplane Depron sheet Note Do not alter the layout due to the cutting dire...

Page 5: ...selage 7 1 1 Assemble the building plan Pages 15 17 19 3 pages by cutting the plans along the broken lines and sello tape them together Note Note the markings 7 1 2 Cut out the pattern for the nose se...

Page 6: ...plan as reference glue one dowel at the front end of the nose and the other at the end see plan Note Do not cut both of these pieces from the same length of dowel 7 1 9 Sand the nose and then chamfer...

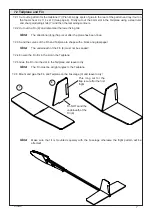
Page 7: ...he plane has been flown 7 2 3 Sand the curves of the Fin and Tailplane to shape with a block and glasspaper Note The underneath of the Fin 8 must not be sanded 7 2 4 Ensure the Fin fits in the slot in...

Page 8: ...egularities can be removed on the top or bottom of the ribs can be smoothed in this way 7 3 5 Cut out the patterns for the angled wing supports 13a from the plan Use the patterns on the balsa sheet an...

Page 9: ...middle ribs A must not be glued 7 3 11 Glue the angle supports 13a against the second rib and leave to dry thoroughly 7 3 12 Place the middle rib A on the end of the main wing spar and lean it against...

Page 10: ...only apply glue to the ribs and spar The middle line on the joiner must be just visible Rub the joiner on the glued area and leave to dry for approximately 1 2 hour 7 3 20 Weight one half of the wings...

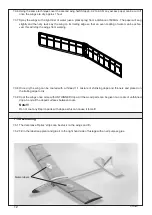
Page 11: ...and gently stretch it over the wing smoothing out any wrinkles as you go 7 4 4 Coat the top of the wing leading edge etc with paste 7 4 5 Hold the wing in the air turn it slowly so that the covering...

Page 12: ...l stop the wings from warping 7 3 8 Once dry the wing can be coated with a thinned 1 1 mixture of shrinking dope and thinners and placed on the trailing edge to dry 7 3 9 Coat the wings once more with...

Page 13: ...k is mad e smaller Keep repeating this stage until a smooth flight path is achieved 7 7 4 If the model dives add card strips under the leading edge of the wing the angle of attack is made larger Repea...

Page 14: ...14 E102056 1...

Page 15: ...15 E102056 1 Plan patterns Scale 1 1 1 2 3 11 9 12 5 4 10 6 6 6...

Page 16: ...16 E102056 1...

Page 17: ...Plan patterns Scale 1 1 17 E102056 1 Pattern for the nose 1 Win d Flyer 2 Win d Flyer 2 Hochstarthaken...

Page 18: ...18 E102056 1...

Page 19: ...Plan pattern Scale 1 1 19 E102056 1 Pattern tailplane Pattern nose side clad ding Pattern tail fin Pattern wing rood angle joiner 8 7...

Page 20: ...20 E102056 1...

Page 21: ...Wing patterns Scale 1 1 4 5 21 E102056 1 Selloptape 9 13 12 12 10 11 Left hand wing half Shape the tips as shown...

Page 22: ...22 E102056 1...

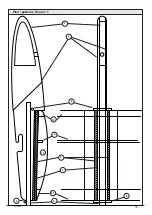
Page 23: ...23 E102056 1 Patterns for parts 15 16 17 and 22 scale 1 1 12 12 13a 13a 16 15 14 10 9 11 13a Middle rib A Flight direction...

Page 24: ...24 E102056 1...

Page 25: ...25 E102056 1 Patterns for parts 15 16 17 and 22 Scale 1 1 70 25 105 If found please notify the owner Name Address Town Tel 13 12 12 Right hand wing half...

Reviews: