5
E102056#1
7. Instructions
General notes:
Keep to the drying time for the glue, otherwise you may have difficulties. Other parts can be made whilst the glue
is drying.
Use white glue, check that any glue you use does not melt the styropor / Depron foam.
Use a block and glasspaper for sanding all flat surfaces (sanding block is not included) Use an all purpose glue
to fix the sandpaper to a block.
Tick off the steps as you go along
The shortened form 'Sk' means sketch. A number in brackets (4) means part eg.4
Use mapping pins, most normal pins will bend or break under pressure!
Planning overview
7.1 Fuselage (body)
7.2 Tail plane and fin
7.3 Wings
7.4 Cover wings, spray with water and then dope
7.5 Colouring
7.6 Balancing
7.7 Flying
7.1 Fuselage
7.1.1 Assemble the building plan (Pages 15/17/19/3 pages) by cutting the plans along the broken lines and sello-
tape them together.
Note:
Note the markings
7.1.2 Cut out the pattern for the nose (see plan) and using dabs of glue fix it to the 8mm plywood. Drill the 3mm
hole for the front dowel (6)
7.1.3 Carefully saw out the shape of the nose. Do not forget the 20mm and 25mm lead chambers (The openings
for the chambers will be drilled later)
7.1.4 Cut out the pattern for the nose cladding (2/plans) and trace it twice on to the balsa wood sheet, cut out the
shapes with a modelling knife.
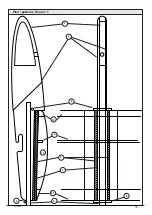
7.1.5 Start by firstly gluing on one side of the cladding (2) and then the other
Apply the white glue in a circular motion to the nose (1). Make sure the edges that the edges are particulary
well covered. Rub the cladding on to the nose until the glue starts to 'pull' then press it into the final position
once more!
Cutting lines
Esq 1
Bead of glue
Summary of Contents for 102.056
Page 14: ...14 E102056 1...
Page 15: ...15 E102056 1 Plan patterns Scale 1 1 1 2 3 11 9 12 5 4 10 6 6 6...
Page 16: ...16 E102056 1...
Page 18: ...18 E102056 1...
Page 20: ...20 E102056 1...
Page 22: ...22 E102056 1...
Page 24: ...24 E102056 1...


