background image

Adjustment

26

During adjustment a progress bar is 
displayed.
When completed, the display returns 
to the measurement value display.

$GMXVW

7XUE76&'

6SDQ$GMXVWPHQW

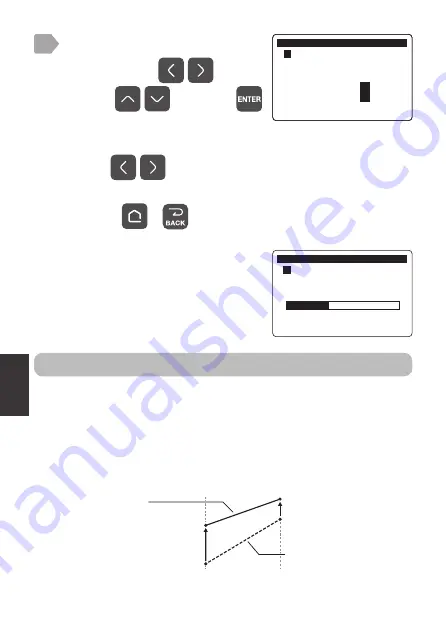
2-point adjustment

Display current values of the 2 points as any adjustment values,  
respectively.
Performing 2-point adjustment changes the offset and span based on the 
adjusted values.
For 4-20 mA output (“7 4-20 mA Setting” P.16) and alarm output (“Alarm 
output setting” P.18), the adjusted values are applied.

[Point 1]

Adjusted value

Measurement 

value

Current display

value

Adjusted

value

Display value

after 2-point

adjustment

Current display

value

[Point 2]

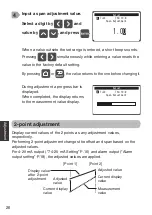
Input a span adjustment value.

Select a digit by 

 and 

value by 

, and press 

.

4

$GMXVW

7XUE76&'

6SDQ$GMXVWPHQW

When a value outside the set range is entered, a short beep sounds.
Pressing 

 simultaneously while entering a value resets the 

value to the factory default setting.

By pressing 

 or 

, the value returns to the one before changing it.

Summary of Contents for TSC-10-D

Page 1: ...re operation of this Turbidity Checker for safe and proper operation This instruction manual should be kept for future reference such as maintenance Turbidity Checker TSC 10 D Instruction Manual WATER it The instruction manual is also available on the following website https navi optex net manual 05337 lang en ...

Page 2: ...le protective cover 1 Cable tying band 5 Cleaning brush 1 Detection window cleaning paper 1 Instruction manual this document If there are any missing or faulty items please contact our sales representative Reference Can be connected to SC U1 ...

Page 3: ...play item unit selection 14 Response time 15 7 4 20 mA Setting 16 Output item selection 16 Upper lower limit of signal output range 17 8 Relay Setting 18 Alarm output setting 18 Maintenance output setting 19 Self Checking output setting 19 9 Calibration 20 Zero calibration 20 10 Adjustment 23 Offset adjustment 23 Span adjustment 25 2 point adjustment 26 Adjustment initialization 29 ...

Page 4: ...leaning 32 Manual cleaning 32 Cleaning interval 33 13 Troubleshooting 34 Error code list 34 14 Maintenance 36 Maintenance monthly 36 Periodic inspection every 3 months 36 Replacement of consumables 36 Calibration 37 Long term storage 37 Overhaul 37 15 Specifications 38 16 External Dimensions 39 ...

Page 5: ...ilure or malfunction observe the precautions for use without fail Do not use TSC 10 D except for measurement of water quality denotes Prohibited action and denotes Required action In the unlikely event of occurrence of abnormalities such as smoke or abnormal noise immediately turn off the power Do not disassemble or modify the sensor Handle with care not to damage Use the sensor with 24 VDC 24 VDC...

Page 6: ...d mild detergent solution and then wipe off moisture with a dry clean soft cloth Do not wipe the sensor with solvent such as Thinner It may cause failure 2UJDQLF 6ROYHQW 7KLQQHU HWF Avoid strong physical shock to the sensor or do not drop it Do not apply oil such as grease to the sensor ...

Page 7: ...7 2 Component Name Sensor cable Detection windows Wiper blade Caution Do not carry the sensor with the sensor cable Do not touch the detection window Clean the detection window if your hand touches it ...

Page 8: ... amount of scattered light Photo element Light source LED Caution Turbidity Checker uses a method of scattered light to measure amount of reflected light Therefore measurement values may be affected by measurement light reflected from equipment surfaces or accumulated materials if the sensor is installed nearby Install the sensor with a clearance of at least 30 cm from the sensor surface to equipm...

Page 9: ... detection surface and affect the measurement value Do not install the sensor with the sensor surface facing down Bubbles may accumulate in the measurement area or the measurement light may be reflected off the bottom of the facility or accumulated objects making it impossible to measure correctly Water flow Do not install the sensor near a wall or other surface Measurement light will strike the s...

Page 10: ...sensor from hitting the side wall or rotating by the water flow a mounting attachment TA 3 for fixing the sensor to the pipe is available as an option For details contact the dealer or visit our website https www optex co jp e products environmental sensor Pipe The 25A stainless steel pipe outer diameter 34 mm for piping to be prepared by the user Read the precautions in the TA 3 instruction manua...

Page 11: ...end of the sensor cable Be sure to install the cable protective cover The cable may be damaged and flooded during maintenance Do not hang the sensor with the sensor cable If there are walls equipment bottom surfaces or accumulations near the facility the measurement light will be reflected by them affecting the measurement value Keep the detection surface at least 30 cm away from the facility wall...

Page 12: ...nd the cable refer to the following To extend the cable connection using pull box is recommended The cable gland fits the cable sheath diameter of 6 to 8 mm Max cable length X Pull box etc Nominal sectional area Max cable length X 0 3 mm2 20 m 0 5 mm2 40 m 0 75 mm2 70 m 1 0 mm2 100 m ...

Page 13: ...ctional area of 0 2 to 1 25 mm2 Refer to Extension of sensor cable P 12 for extension of the sensor cable To extend the sensor cable connection using pull box is recommended Wire the terminal block according to the color of the tip of each wire Use this product by connecting to Universal Transmitter SC U1 For installation and wiring to SC U1 refer to the Universal Transmitter SC U1 Installation Ma...

Page 14: ...em Caution Pressing automatically retains the measurement value Measurement item Display item Factory default setting Item Unit Main display Turbidity Turb NTU Turb NTU Turb FNU Turb mg L Turb 度 Turb No unit Caution When the display item is changed the settings of 7 4 20 mA Setting P 16 and 8 Relay Setting P 18 that have set the display item become OFF In addition the values of 10 Adjustment Offse...

Page 15: ...s shown The measurement accuracy will not change even if the unit is changed Response time Set a signal output response time A measurement value is calculated using moving average of the time period set by the signal output response time For example if the sensor measures values every 5 seconds and the signal output response time is set to 50 seconds which is 5 seconds 10 times the moving average ...

Page 16: ... mA signal Output item selection Output item Display Turbidity Turb For operation refer to the Universal Transmitter SC U1 Operation Manual 5 3 4 20 mA Setting and Output Item Select Caution Pressing automatically retains the measurement value Caution When Display item unit selection P 14 is changed the out put item of the channel of 4 20 mA setting that has set the display item becomes OFF Set ag...

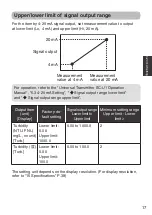
Page 17: ...al output range Lower limit to Upper limit Minimum setting range Upper limit Lower limit Turbidity NTU FNU mg L no unit Turb Lower limit 0 00 Upper limit 1000 0 0 00 to 1000 0 2 Turbidity 度 Turb Lower limit 0 00 Upper limit 100 0 0 00 to 100 0 2 The setting unit depends on the display resolution For display resolution refer to 15 Specifications P 38 For operation refer to the Universal Transmitter...

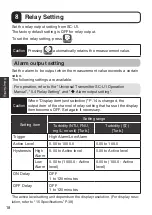
Page 18: ...resis High Alarm 0 00 to Active level 0 00 to Active level Low Alarm 0 00 to 1000 0 Active level 0 00 to 100 0 Active level ON Delay OFF 1 to 120 minutes OFF Delay OFF 1 to 120 minutes The active level setting unit depends on the display resolution For display reso lution refer to 15 Specifications P 38 For operation refer to the Universal Transmitter SC U1 Operation Manual 5 4 Relay Setting and A...

Page 19: ...timer P 31 to notify the user when the set period has elapsed Use this for notification of sensor maintenance replacement of consumables and overhaul timing Check notifications by the relay output and dedicated cloud server SC U1 and GW connected For more information about checking notifications on the cloud server refer to the cloud server s help Self Checking output setting For operation refer t...

Page 20: ...lly retains the measurement value 3 Allow the sensor to acclimate to the water temperature for about 5 minutes and check that there are no bubbles in the detection window Caution When calibrating be sure to clean the sensor body and detection window before immersing the sensor in distilled water When calibrating keep the detection surface at least 30 cm away from the bottom of the container or the...

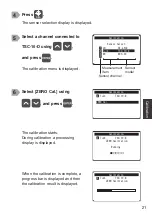
Page 21: ...ayed and then the calibration result is displayed DOLEUDWLRQ 㸰 7XUE 76 ࠉࠉࠉࠉ 52 DOLEUDWLRQ The calibration menu is displayed Select ZERO Cal using and press DOLEUDWLRQ 6HQVRU 6HOHFW 㸯 S 6 S 㸰 7XUE 76 㸱 2 26 㸲 Measurement item Sensor model Sensor channel DOLEUDWLRQ 㸰 7XUE 76 52 DO Select a channel connected to TSC 10 D using and press 5 6 DOLEUDWLRQ 㸰 7XUE 76 ࠉࠉࠉࠉ 52 DOLEUDWLRQ ࠉࠉࠉࠉࠉ 5XQQLQJ ڧڧڧڧڦ ...

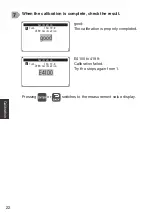
Page 22: ...e result Pressing or switches to the measurement value display good The calibration is properly completed E4100 to 4199 Calibration failed Try the steps again from 1 7 DOLEUDWLRQ 㸰 7XUE 76 ࠉࠉࠉࠉ 52 DOLEUDWLRQ good DOLEUDWLRQ 㸰 7XUE 76 ࠉࠉࠉࠉ 52 DOLEUDWLRQ E4100 ...

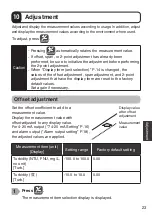
Page 23: ...n adjustment and 2 point adjustment that have the display item are reset to the factory default values Set again if necessary 10 Adjustment Set the offset coefficient to add to a measurement value Display the measurement value with offset adjusted to any display value For 4 20 mA output 7 4 20 mA Setting P 16 and alarm output Alarm output setting P 18 the adjusted values are applied Offset adjustm...

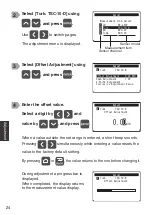
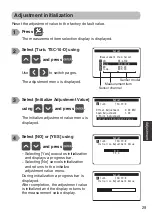
Page 24: ...sly while entering a value resets the value to the factory default setting By pressing or the value returns to the one before changing it 3 4 GMXVW 㸰 7XUE 76 2IIVHW GMXVWPHQW 178 6SDQ GMXVWPHQW 3RLQW GMXVWPHQW QLWLDOL H GMXVWPHQW 9DOXH GMXVW 㸰 7XUE 76 2IIVHW GMXVWPHQW ࠉࠉࠉࠉࠉࠉࠉࠉࠉࠉࠉ 178 GMXVW 㸰 7XUE 76 2IIVHW GMXVWPHQW Use to switch pages The adjustment menu is displayed Select Turb TSC 10 D using an...

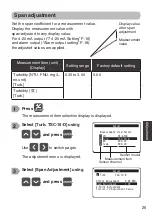
Page 25: ...Span Adjustment using and press 3 GMXVW 㸰 7XUE 76 2IIVHW GMXVWPHQW 178 6SDQ GMXVWPHQW 3RLQW GMXVWPHQW QLWLDOL H GMXVWPHQW 9DOXH 2 GMXVW 0HDVXUHPHQW WHP 6HOHFW 㸯 S ࠉ 6 S 㸰 7XUE 76 㸱 2 26 㸱 7HPS 26 Measurement item Sensor model Sensor channel Select Turb TSC 10 D using and press Press The measurement item selection display is displayed 1 Use to switch pages The adjustment menu is displayed Measureme...

Page 26: ...0 mA Setting P 16 and alarm output Alarm output setting P 18 the adjusted values are applied Point 1 Adjusted value Measurement value Current display value Adjusted value Display value after 2 point adjustment Current display value Point 2 Input a span adjustment value Select a digit by and value by and press 4 GMXVW 㸰 7XUE 76 6SDQ GMXVWPHQW When a value outside the set range is entered a short be...

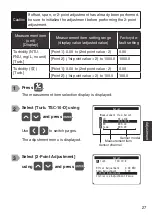
Page 27: ...ution If offset span or 2 point adjustment has already been performed be sure to initialize the adjustment before performing the 2 point adjustment Select 2 Point Adjustment using and press 3 GMXVW 㸰 7XUE 76 2IIVHW GMXVWPHQW 178 6SDQ GMXVWPHQW 3RLQW GMXVWPHQW QLWLDOL H GMXVWPHQW 9DOXH Press The measurement item selection display is displayed 1 2 GMXVW 0HDVXUHPHQW WHP 6HOHFW 㸯 S ࠉ 6 S 㸰 7XUE 76 㸱 2...

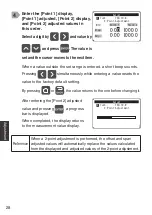
Page 28: ...lue by and press The value is set and the cursor moves to the next item 4 GMXVW 㸰 7XUE 76 3RLQW GMXVWPHQW 178 ࠉ 3RLQW ࠉ 3RLQW LVS GM After entering the Point 2 adjusted value and pressing a progress bar is displayed When completed the display returns to the measurement value display GMXVW 㸰 7XUE 76 3RLQW GMXVWPHQW When a value outside the set range is entered a short beep sounds Pressing simultane...

Page 29: ...UE 76 㸱 2 26 㸱 7HPS 26 Measurement item Sensor model Sensor channel Select Turb TSC 10 D using and press Use to switch pages The adjustment menu is displayed GMXVW 㸰 7XUE 76 QLWLDOL H GMXVWPHQW 9DOXH 4 Selecting Yes executes initialization and displays a progress bar Selecting No cancels initialization and returns to the initialize adjustment value menu Select NO or YES using and press During init...

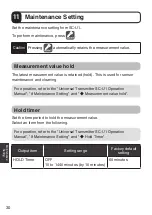
Page 30: ... to hold the measurement value Select an item from the following Output item Setting range Factory default setting HOLD Timer OFF 10 to 1440 minutes by 10 minutes 60 minutes Caution Pressing automatically retains the measurement value For operation refer to the Universal Transmitter SC U1 Operation Manual 8 Maintenance Setting and Measurement value hold For operation refer to the Universal Transmi...

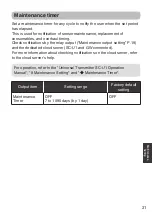
Page 31: ...e relay output Maintenance output setting P 19 and the dedicated cloud server SC U1 and GW connected For more information about checking notifications on the cloud server refer to the cloud server s help Maintenance timer Output item Setting range Factory default setting Maintenance Timer OFF 7 to 1095 days by 1 day OFF For operation refer to the Universal Transmitter SC U1 Operation Manual 8 Main...

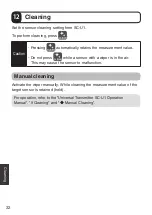
Page 32: ...y While cleaning the measurement value of the target sensor is retained held For operation refer to the Universal Transmitter SC U1 Operation Manual 9 Cleaning and Manual Cleaning Caution Pressing automatically retains the measurement value Do not press while a sensor with a wiper is in the air This may cause the sensor to malfunction ...

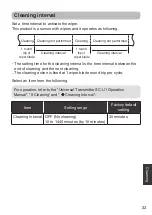
Page 33: ... Cleaning interval Cleaning The setting time for the cleaning interval is the time interval between the end of cleaning and the next cleaning The cleaning action is fixed at 1 wiper blade round trip per cycle Select an item from the following Item Setting range Factory default setting Cleaning Interval OFF No cleaning 10 to 1440 minutes by 10 minutes 30 minutes For operation refer to the Universal...

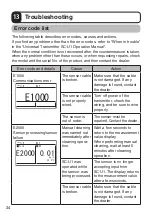
Page 34: ...ue display When performing manual cleaning wait at least 5 minutes after cleaning operation SC U1 was operated while the sensor was being processed The sensor is no longer accepting input from SC U1 The display returns to the measurement value after a few seconds The sensor cable is broken Make sure that the cable is not damaged If any damage is found contact the dealer The following table describ...

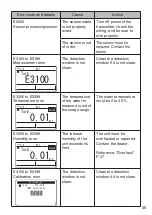
Page 35: ...an Clean the detection window if it is not clean E3200 to E3299 Temperature error 㸯 7XUE 5 178 The temperature of the water to measure is out of the usage range The water temperature must be 0 to 40 C E3300 to E3399 Humidity error 㸯 7XUE 5 178 The internal humidity of the unit exceeds its limit The unit must be overhauled or repaired Contact the dealer Reference Overhaul P 37 E4100 to E4199 Calibr...

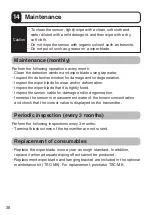
Page 36: ... wiper blade that it is tightly fixed Inspect the sensor cable for damage and or degeneration Immerse the sensor in measurement water of the known concentration and check that the correct value is displayed on the transmitter Perform the following inspections every 3 months Terminal block screws of the transmitter are not rusted 14 Maintenance Maintenance monthly Periodic inspection every 3 months...

Page 37: ...n it 3 Store the unit away from direct sunlight As the packing will deteriorate over time we recommend replacing the maintenance parts every 3 years For details contact the dealer Overhaul Calibration The sensor is designed to be able to measure stably for a prolonged period of time In order to maintain the reliability of measurement however calibration should be carried out at least once a year ...

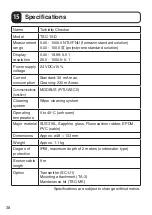
Page 38: ...mA max Communications function MODBUS RTU ASCII Cleaning system Wiper cleaning system Operating temperature 0 to 40 C unfrozen Major material SUS316L Sapphire glass Fluorocarbon rubber EPDM PVC cable Dimensions Approx ø48 133 mm Weight Approx 1 1 kg Degree of protection IP68 maximum depth of 2 meters underwater type Sensor cable length 9 m Option Transmitter SC U1 Mounting attachment TA 3 Maintena...

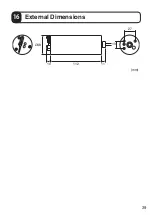
Page 39: ...39 16 External Dimensions mm 11 Ø48 10 112 19 27 ...

Page 40: ...1 Japan T el 81 77 579 8680 Fax 81 77 579 8199 https www optex co jp e products environmental sensor EU contact information UK contact information https navi optex net cert contact Whole document of the DOC can be referenced in the following website www optex net ...

Reviews: