background image

OK

DTV/VCR

EXIT

PAUSE

1

2

3

4

5

6

7

8

9

0

INFO

AUDIO

EPG

VOL
   +

VOL
   -

CH+

CH-

MENU

MUTE

RECALL

TV/RADIO

STANDBY

GAME

SUBTITLE

TEXT

FAVORITE

OPTICUM 7002T

3

3

Remote Key Function:

1. DTV/VCR

Used to switch between the VCR  SCART input 

     and the DTV output mode.

2. INFO

Used to display information about the  channel being 

    viewed or further information about the program when in 
    small EPG screen.

3. PAUSE

Used to pause or playback the program being 

     viewed .

4. EPG

Used to display information about the  program being 

    viewed and what's on next.

5. EXIT

Used to return to the previous screen  or menu.

6. OK

Used to confirm a selection within a menu.

7. VOL+

Used to move around the menu screens  or  changing 

    the volume in non-menu state.

8. FAVORITE

Used to access  your  favourite  channels.

9. GAME:

 Used to select 

4 built-in mini games: Mine, Tetris, 

    Gomoku, Calendar.

10. RECALL

Used to switch between the last  two viewed 

      channels.

11. SUBTITLE:

 Used to switch between different subtitles that 

       are broadcasted

12. TEXT: 

Used to open teletext OSD display if teletext available 

       in the broadcasted stream.

13. STANDBY

Used to switch the  set  top box  to on and off.

14. MUTE

Used to turn  the  sound on or off.

15. MENU

Used to open the main menu  window.

16. CH+

Used to move around  the menu screens   or  selecting 

       the channels in non-menu state.

17. VOL-

Used to move around  the menu screens  or  changing 

      the volume in non-menu state.

18. CH-

Used to move around the menu screens  or  selecting 

      the channels in non-menu state.

19. NUMBER KEYS

Used to select channel numbers or input 

       numbers in menus.

20. AUDIO

Used to set the sound output, the available 

      settings  are STEREO, LEFT, RIGHT, MONO.

21. TV/RADIO

Used to switch between TV channels and 

       Radio stations.

22. COLOR KEYS(RED/GREEN/YELLOW/BLUE): 

Used to 

      operate different functions in TEXT screen or other menus.

Note: SUBTITLE/TEXT/LANGUAGE may  not  be  available 
for all channels

Summary of Contents for 7002T

Page 1: ...User Manual Of Digital Set Top Box Please read this UserManual carefully to ensure proper use of this product and keep thismanual for future reference Size 120X170mm OPTICUM 7002T...

Page 2: ...e set top box are for ventilation Do not cover or block them as it may cause overheating NEVER let children push anything into the holes or slots on the case Servicing There are no user serviceable pa...

Page 3: ...the apparatus 2 The mains plug is used as the disconnect device the disconnect device shall remain readily operable 3 To be completely disconnect the power input the mains plug of apparatus shall be...

Page 4: ...le of Contents Introduction 1 Front and Rear Panel 2 Remote Controller 3 Connections 5 First Time Installation 7 Basic Operations 9 Using the On Screen Setup Menu 13 Troubleshooting 25 Specifications...

Page 5: ...s Full comply with European standard Full MPEG2 ISO IEC 13818 transport stream compliant audio video decoding Bandwidth of 6 7 8MHz supported COFDM demodulator Automatic manual channel search Channel...

Page 6: ...F LOOPTHROUGH This socket willbypass the RF signalto either yourTV or another video system 3 COAXIAL This socket connectsto a coaxial socketon your surround soundsystem 4 VCR SCART This socket connect...

Page 7: ...ndar 10 RECALL Used to switch betweenthe last two viewed channels 11 SUBTITLE Used to switch betweendifferent subtitles that are broadcasted 12 TEXT Used to open teletextOSD display if teletextavailab...

Page 8: ...To use the remote control point it towards the front of the digital set top box The remote control has a range of up to 7 metres from the set top box at an angle of up to 60 degrees The remote control...

Page 9: ...ating with the receiver To prevent the risk of electric shock do not open the cover or the back of the receiver Connections Connecting to a TV Set LOOP LOOP R R F F THROUGH THROUGH Coaxial Coaxial Dig...

Page 10: ...V SERVICE 100 240V 50 60Hz IN IN R R F F VCR TV Connecting to TV and VCR Note When connecting the receiver to other equipment e g TV VCR and amplifier make sure to refer to relevant user manual for in...

Page 11: ...finish the setup 1 At the First time installation menu select YES and press OK on the remote controller to proceed 2 Enter your regional settings include your Region OSD Language Time Zone and Antenna...

Page 12: ...ls and radio broadcasts In case you skip the First Time Installation screen you can still specify your Regional Setting and Program Search via the on screen setup menu The Regional Setting menu can be...

Page 13: ...mode Changing Channels To switch between different channels you can Press OK to display the channel list and UP DOWN to select a desired channel Press the CH CH key or buttons on the receiver to go to...

Page 14: ...detailed information Displaying information To display the detailed information of the current channel press the INFO key Choosing Subtitle You can press the SUBTITLE key to select or close subtitles...

Page 15: ...ed channel to preview the EPG To view today s complete EPG press the Right key 2 When today s complete EPG is displayed use the Up Down key to scroll along the EPG To view the EPG of next previous day...

Page 16: ...to open a teletext page if teletext is transmitted Press TEXT key again to close it Selecting Sound Mode To switch the sound mode between LL left RR right and LR stereo press the Audio key 4 To exit t...

Page 17: ...elete or sort channels Creating Favorite Channel Groups This feature allows you to group your favorite channels To create your favorite groups 1 Select the channel which you would like to add to the g...

Page 18: ...be displayed 3 Use the Up Down key to move the channel to a desired position Deleting a Channel 1 Select the channel which you like to delete and go to the Del column 2 Press OK and an X symbol will...

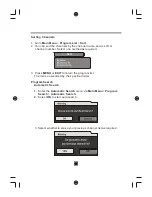
Page 19: ...elect one method as required 3 Press MENU or EXIT to return the program list The list is now sorted by the specified order Program Search Automatic Search 1 Enter the Automatic Search menu via Main Me...

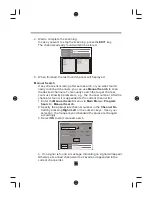
Page 20: ...rget channel you must know its parameters e g the channel number After the channel is found it is appended to the current channel list 1 Enter the Manual Search menu via Main Menu Program Search Manua...

Page 21: ...al control menu The default PIN is 6666 2 After correct PIN input the following options are provided Channel Lock Allows you to activate or de activate the overall parental control When set to YES all...

Page 22: ...age indicating PIN Code Changed will appear Note To activate the parental control feature Channel Lock must be set to YES If you want to lock particular channels while keeping other channels unlocked...

Page 23: ...oadcasted But occasionally broadcasters transmit widescreen content in this situation you can choose how to display it in a conventional TV set 4 3 LB Letterbox For conventional 4 3 TV The full width...

Page 24: ...aution If you are using a normal passive antenna make sure to set this setting to OFF Regional Setting Region Select the region or country you are located Depending on the country you select the on sc...

Page 25: ...ubtitle language If your selected language is not available on the program transmitted the main language of the program will be used You can also select OFF to close the subtitle on the screen Time Se...

Page 26: ...he Up Down key to move between setting items the Right Left key to switch between available selections and numeric keys to enter numeric value Mode You can repeat the task by setting the frequency as...

Page 27: ...the regional settings languages and favorite lists will return to the factory default 3 After restoring defaults a First Time Installation screen appears asking if you would like to conduct an automat...

Page 28: ...Personal Style This option allows you to customize the menu settings You can set the Menu Color Transparency level Border Pattern and Entry Animation as preferred 24 24...

Page 29: ...you experience problems with this receiver or its installation in the first instance please read carefully the relevant sections of this User Manual and this Troubleshooting section 25 25 Troubleshoot...

Page 30: ...Specifications 26 26...

Page 31: ......

Reviews: