background image


5. Working distance and Focus adjustment 

 
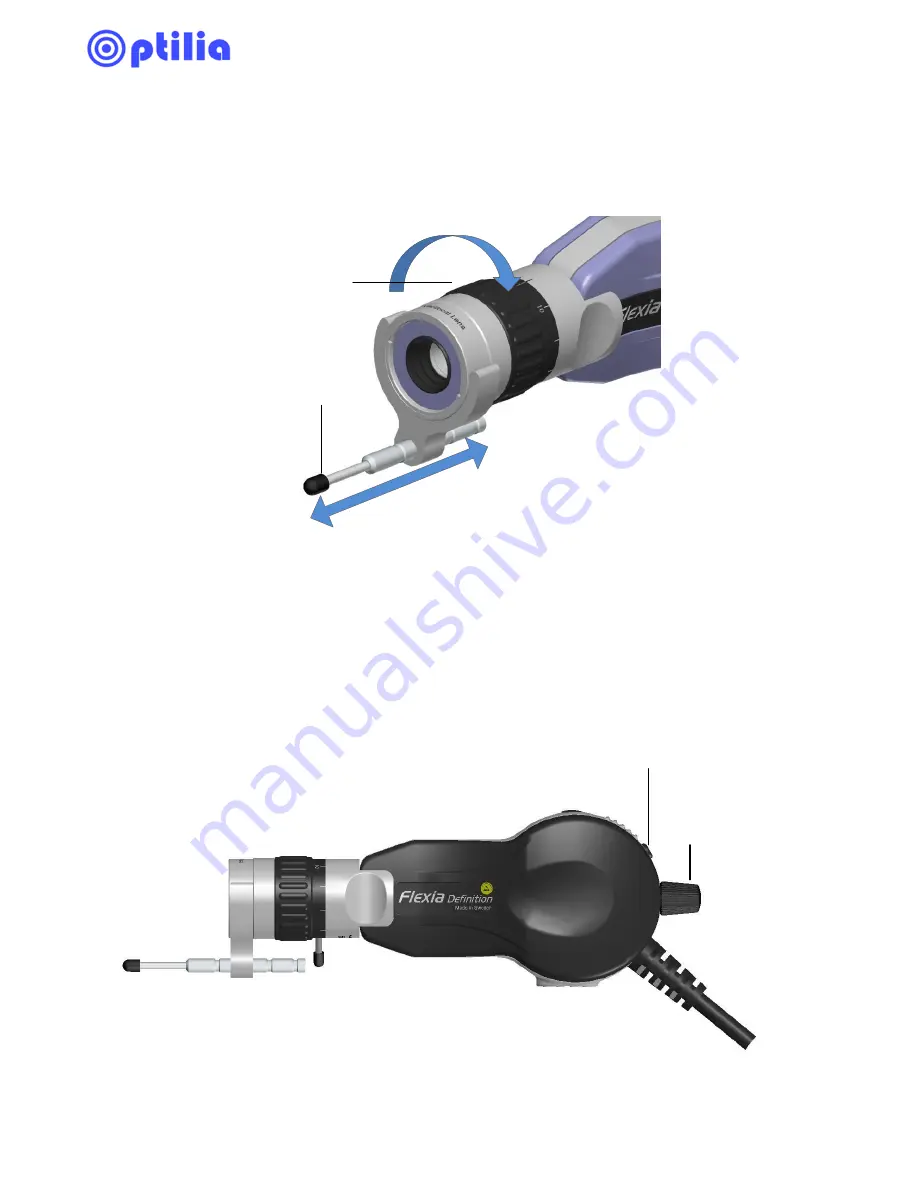
Image magnification (as well as the object distance) is changed by rotating 
the “zoom ring” as illustrated below. Move Flexia slightly forward/backward 
and rotate the Zoom adjuster to get into the best focus.  


6. Illumination 

Flexia  lenses  are  equipped  with  high  intensity  white  light  emitting  diodes.  
Illumination intensity of the device can be adjusted via the control knob at the 
rear  of  Flexia.  The  illumination  may  be  turned  on  or  off  by  using  the  on/off 
switch. 


Telescopic pin 

Zoom ring 

Illumination intensity 
control (Dimmer) 

On/Off switch 
and indication 
LED 


Summary of Contents for Flexia Definition HM ESD

Page 1: ...es how to setup and use Flexia Definition Digital ESD protected and Blue Instructions Manual Flexia Video Inspection Microscope Flexia Definition HM ESD Flexia Definition ESD Flexia Definition HM Blue Flexia Definition Blue ...

Page 2: ...2 Contents 1 Safety and maintenance Instructions 3 2 About Flexia 4 3 Installation 5 4 Image view Capture in OptiPix software 5 5 Working distance and Focus adjustment 6 6 Illumination 7 7 Notes 8 ...

Page 3: ...l or Isopropyl alcohol for cleaning optical surfaces of the device Never use Acetone or other similar strong solvents for cleaning Never knock or drop the video microscope Keep the microscope away from direct sun light heat and extreme humidity Store the equipment inside its transport case when not used Protect the Flexia lens Objective lens and Zoom lens by the supplied protection rubber Caps or ...

Page 4: ...exible inspection quality control measurement and digital recording There are four different versions of Flexia available ESD HM ESD BLUE and HM Blue ESD means that Flexia housing and cables are ESD protected Flexia ESD is fully safe for inspection of sensitive electronic boards and devices HM implies that Flexia provides with even higher magnification capabilities and larger working distance Illu...

Page 5: ...lexia is not plugged to the USB port before installing the drivers 2 Insert the provided installation CD into your PC and follow the on screen instructions 3 When the installation is finished you have to reboot the PC before connecting the device 4 When the PC is rebooted insert Flexia into one of the available USB2 0 port The drivers will now be automatically found ...

Page 6: ...ill be enabled Insert the dongle into a free USB port of your computer Enter your license number b OptiPix Lite if you have ordered a lite license Image view capture annotation and only distance measurement on image will be enabled Enter your license number c 30 days demo for 30 days trial All software functions will be enabled for 30 days 3 Select Optilia 2 0MP Camera in the next dialog which wil...

Page 7: ...ate the Zoom adjuster to get into the best focus 6 Illumination Flexia lenses are equipped with high intensity white light emitting diodes Illumination intensity of the device can be adjusted via the control knob at the rear of Flexia The illumination may be turned on or off by using the on off switch Telescopic pin Zoom ring Illumination intensity control Dimmer On Off switch and indication LED ...

Page 8: ...s or alternations to this product or failure to strictly comply with Optilia Instruments AB s operating and maintenance instructions Optilia Instruments AB shall not be liable for any damages or problems arising from the use of any options or any consumable products other than those designated as original Optilia products or Optilia approved products by Optilia Instruments AB Optilia Instruments A...

Reviews: