background image

Version 1.0.1 - 2020-07-23

37

Translation of original instruction

B20 | B25 | B32

EN

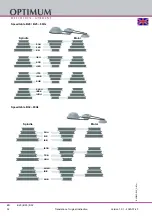
B20-

B25-

B32_

GB.

fm

5.3

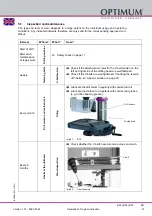
Inspection and maintenance

The type and level of wear depends to a large extent on the individual usage and operating
conditions. Any indicated intervals therefore are only valid for the corresponding approved con-
ditions.

Interval

Where?

What?

How?

Start of shift

After each 
maintenance 
or repair work

Dri

lli

ng

 mach

in

e



 Safety check on page 11

weekly

Cla

m

pi

ng

 bo

lts

V-

belt ten

s

ion

Check if the attachment screws for the V-belt tension on the 
left and right side of the drilling head are well fastened.

Check if the V-belts are well tightened. Checking the tension 
of V-belts, 



 Speed variation on page 30.

Every month

Dri

ll

 co

lu

mn an

d too

the

d rac

k

Oi

li

n

g

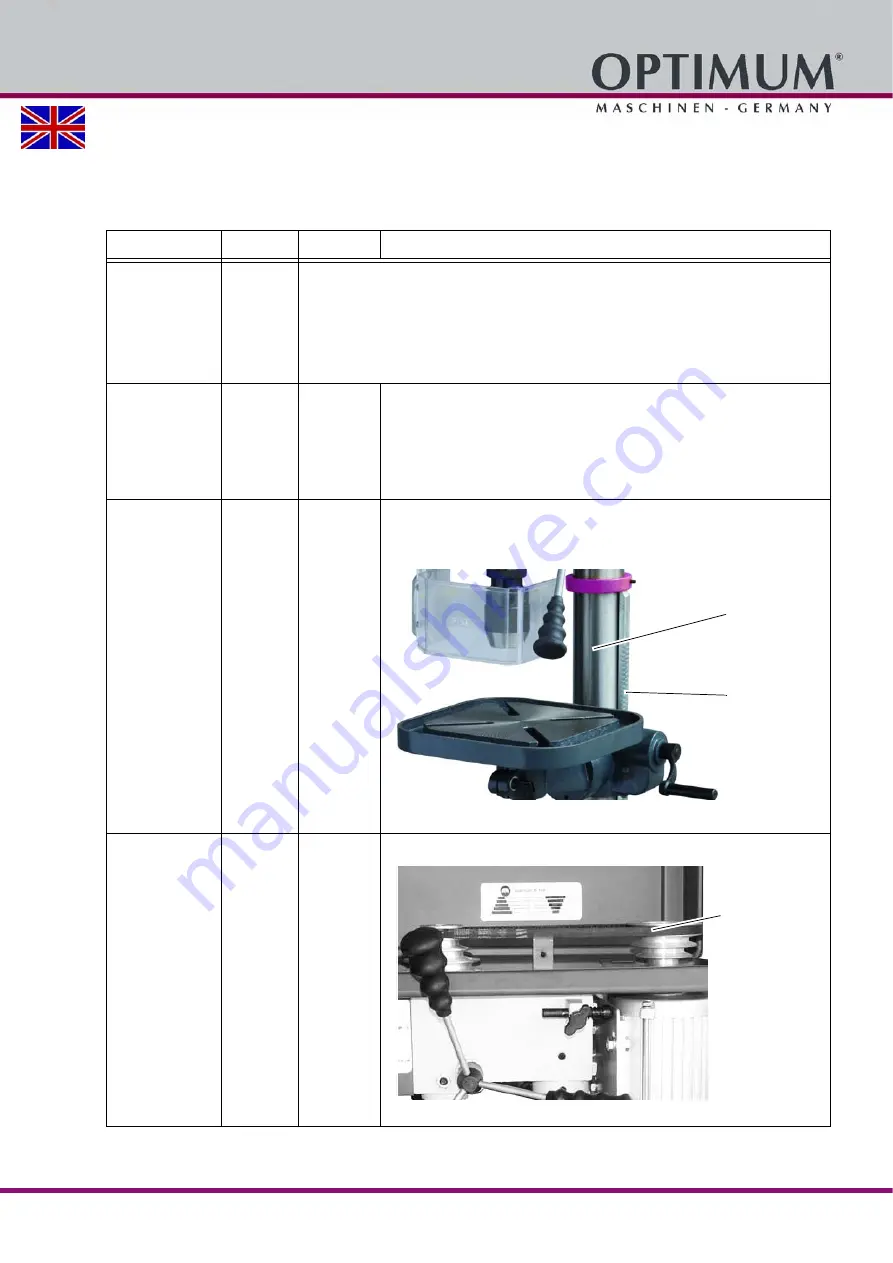
Lubricate the drill column regularly with commercial oil.

Lubricate the toothed rod regularly with commercial grease 
(e.g. friction bearing grease).

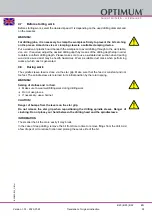
Img.5-1:

B 20

Every 6 
months

V-belt

s at

 the drill

 h

e

ad

Visu

al ins

p

e

c

tio

n

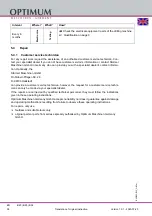
Check whether the V-belts have become porous and worn.

Img.5-2:

V-belt housing

Drill column

Toothed rod

V-belt

Summary of Contents for 3008201

Page 1: ...EN Operating manual Version 1 0 1 Drilling machine B25 B32 B20 3008201 3008203 3008253 3008323 ...

Page 2: ...y during operation 14 1 16 Safety during maintenance 15 1 16 1 Disconnecting and securing the drilling machine 15 1 17 Using lifting equipment 15 1 17 1 Mechanical maintenance 15 1 18 Accident report 15 1 19 Electronics 16 1 20 Inspection deadlines 16 2 Technical specification 2 1 Electrical connection 17 2 2 Drilling capacity 17 2 3 Spindle seat 17 2 4 Drilling table 17 2 5 Dimensions 17 2 6 Work...

Page 3: ... 3 3 Disposal of the old device 41 7 3 4 Disposal of electrical and electronic components 42 7 4 Disposal via municipal collection facilities 42 7 4 1 Change information operating manual 42 7 5 Product follow up 42 8 Determining the cutting speed and the speed 8 1 Table cutting speeds infeed 43 8 2 Speed table 43 8 3 Examples to calculatory determine the required speed for your drilling machine 45...

Page 4: ...ce all maintenance works and functional tests are described which the operator must perform in regular intervals The illustration and information included in the present manual can possibly deviate from the current state of construction of your machine Being the manufacturer we are continuously seeking for improvements and renewal of the products Therefore changes might be performed without prior ...

Page 5: ...Ο ΠΑΓΚΟΥ DE GB ES FR IT CZ DK FI GR HU NL PL PT RO SE SK TR 7 X QU U 5 I KPQVMV MZUI Va UJ0 Z WJMZ 8NTMOMZ Z 0I TT I L LH 8 7 _ 6 N JO 67 6 AMI Z 5 I MZ 4I JMT 3 4 5 4 6 1 15 30 36 4 47 ÊOLCPSSNBTLJO 53 5JTDICPISNBTDIJOF FODI ESJMMJOH NBDIJOF 1FSDFVTF NPEÒMF ÏUBCMJ 5BMBESP EF TPCSFNFTB 5SBQBOJ EB CBODP 4UPMOÓ WSUBǏLB 5BCMF CPSFNBTLJOF ȜȩșȨșȥȧ ȨșțȢȧȬ 1FOLLJQPSBLPOF T UBMJ GÞSØHÏQ PPSNBDIJOF UBGFMNP...

Page 6: ...us injury or death CAUTION A danger or unsafe procedure that can cause personal injury or damage to property ATTENTION Situation that could cause damage to the drilling machine and product as well as other types of damage No risk of injury to persons Information Practical tips and other important or useful information and notes No dangerous or harmful consequences for people or objects In case of ...

Page 7: ...ill is being used improperly We will not be held liable for any damages resulting from any operation which is not in accord ance with the intended use We expressly point out that the guarantee will expire if any constructive technical or proce dural changes are not performed by the company Optimum Maschinen Germany GmbH It is also part of the intended use that you observe the limits of the drillin...

Page 8: ... the machine table Use cooling and lubricating agents to increase the durability of the tool and to improve the surface quality Clamp the cutting tools and workpieces on clean clamping surfaces Sufficiently lubricate the machine Set the bearing clearance and guides correctly Recommendations Insert the drill in a way that it is exactly positioned between the three clamping jaws of the quick action ...

Page 9: ...devices installed by the operator must be equipped with the stipulated safety devices This is your responsibility being the operating company Safety devices on page 11 1 6 Qualification It is indispensable that the operator is suitably qualified for safe use and secure setting and operation of the machine 1 6 1 Private Users The drilling machine is also used in the private domain The acumen of peo...

Page 10: ...to perform work on the electrical sys tem and recognise and avoid any possible dangers Qualified electricians have been specially trained for the working environment in which they are working and know the relevant standards and regulations Qualified personnel Due to their professional training knowledge and experience as well as knowledge of relevant regulations qualified personnel are able to per...

Page 11: ...f the fault has been eliminated you have verified that there is no danger to personnel or objects WARNING If you bypass remove or deactivate a safety device in any other way you are endangering yourself and other personnel working with the drilling machine The possible consequences are injuries due to components or workpieces flying off at high speed contact with rotating parts fatal electrocution...

Page 12: ...ck OK Guards Mounted firmly bolted and not damaged Signs Markers Installed and legible Date Checked by signature Functional check Equipment check OK Emergency stop switch After the emergency stop button is pressed the drilling machine must switch off Drill chuck guard The drilling machine may only switch on if the drill chuck guard is closed The engine must switch off when the drill chuck guard is...

Page 13: ...ton depending on the preset speed 1 12 Drill chuck guard INFORMATION The machine cannot be started if the drill chuck guard is not closed Adjust the guard to the correct height before you start working To do so slacken the clamping screw set the required height and re tighten the clamping screw There is a switch integrated in the spindle protection mounting which monitors the closed posi tion Emer...

Page 14: ...er each use regularly once a week Personal protective equipment for special works Protect your face and your eyes Wear a safety helmet with facial protection when performing work where your face and eyes are exposed to hazards Wear protective gloves when handling pieces with sharp edges Wear safety shoes when you assemble disassemble or transport heavy components 1 15 Safety during operation We pr...

Page 15: ...ain switch with a padlock against unauthorised switching on or switching on by accident All machine parts as well as all dangerous voltages are switched off Excepted are only the positions which are marked with the adjoining pictogram 1 17 Using lifting equipment WARNING The use of unstable lifting and load suspension equipment that might break under load can cause severe injuries or even death Ch...

Page 16: ...ifications or repairs prior to recommissioning and at set intervals The deadlines must be set so that arising foreseeable defects can be detected in a timely man ner The relevant electro technical rules must be followed during the inspection The inspection prior to initial commissioning is not required if the operator receives confirma tion from the manufacturer or installer that the electrical sy...

Page 17: ...indle seat B 20 B 25 B 32 Spindle seat MT2 MT3 MT4 2 4 Drilling table B 20 B 25 B 32 Table size mm Length x Width of the work ing surface 275 x 275 275 x 275 360 x 360 T slot size mm 14 14 14 Maximum distance mm spindle table 465 760 660 Working surface stand mm Length x Width of the work ing surface 205 x 200 235 x 220 260 x 270 2 5 Dimensions B 20 B 25 B 32 Height mm 990 1570 1730 Depth mm 700 6...

Page 18: ...ible to use it reliably to determine if further precau tion measures are required or not The following factors influence the actual degree of the noise exposure of the operator Characteristics of the working area e g size or damping behaviour other noise sources e g the number of machines other processes taking place in proximity and the period of time during which the operator is exposed to the n...

Page 19: ...allation site 3 1 1 General risks during internal transport CAUTION DANGER OF TIPPING The device may be lifted unsecured by a maximum of 2cm Employees must be outside the danger zone the reach of loads Warn employees and if necessary advise employees of the hazard Act responsibly during transport and always consider the consequences Refrain from daring and risky actions Gradients and descents e g ...

Page 20: ...ent environmental conditions than those spec ified here 3 4 Installation and assembly 3 4 1 Installation site requirements Organize the working area around the drilling machine according to the local safety regulations WARNING The drilling machine must be connected to the substructure INFORMATION In order to attain good functionality as well as a long service life of the machine the place of insta...

Page 21: ...the personnel preparing and operating the machine and trans porting the material Also make sure the machine is accessible for setting and maintenance works Provide for sufficient backlight Minimum value 500 Lux measured at the tool tip In the event of a lower level of lighting additional illumination must be provided e g by means of a separate workplace light CAUTION Arrange the machine s connecti...

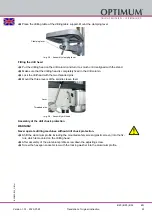
Page 22: ... wheel of the support for the drilling machine table Push the drilling table support with the toothed rack on the drill column Img 3 2 Assembly drilling column Insert the guide ring on to the column and on the toothed rack Fix the guide ring and the threaded pin Make sure that you can still easily turn the drilling table round the drill column Img 3 3 Assembly drilling column Mount the crank handl...

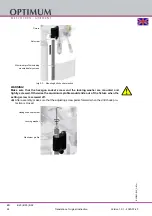
Page 23: ...d in the drill column Lock the drill head with the two threaded pins Mount the three levers of the spindle sleeve feed Img 3 6 Assembly drill head Assembly of the drill chuck protection WARNING Never operate drilling machines without drill chuck protection Shift the aluminium profile including the mounted safety screen plastic screen into the fix ture which is mounted on the drilling head After as...

Page 24: ... and the locking washer are mounted and tightly screwed Otherwise the aluminium profile would slide out of the fixture when the setting screw is screwed off After assembly make sure that the adjusting screw points forward when the drill chuck pro tection is closed Fixture Setscrew Aluminium profile including mounted safety screen Hexagon socket screw Locking washer Aluminium profile ...

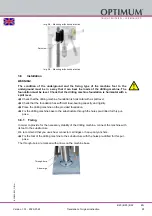
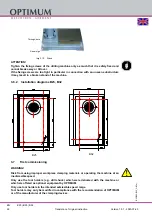
Page 25: ...g machine foundation is horizontal with a spirit level Check that the foundation has sufficient load bearing capacity and rigidity Place the drilling machine on the provided foundation Fix the drilling machine base to the substructure through the holes pre drilled for this pur pose 3 6 1 Fixing In order to provide for the necessary stability of the drilling machine connect the machine with its foo...

Page 26: ...broken stand of the machine 3 6 2 Installation diagrams B25 B32 3 7 First commissioning WARNING Risk from using improper workpiece clamping materials or operating the machine at an inadmissible speed Only use the tool holders e g drill chuck which were delivered with the machine or which are offered as optional equipment by OPTIMUM Only use tool holders in the intended admissible speed range Tool ...

Page 27: ...ly Most motor defects result of wrong connections For instance if a motor phase is not correctly clamped or connected to the neutral conductor N Effects may be as follows The motor is getting hot very rapidly Increased motor noises The motor has no power ATTENTION Make sure that the direction of rotation of the drive motor is correct The switch position of the rotation selector switch for right ha...

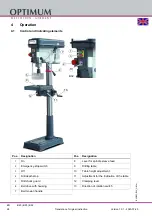
Page 28: ...esignation Pos Designation 1 On 8 Lever for spindle sleeve feed 2 Emergency stop switch 9 Drilling table 3 Off 10 Table height adjustment 4 Drill depth stop 11 Adjustment for the inclination of the table 5 Drill chuck guard 12 Clamping lever 6 Belt drive with housing 13 Direction of rotation switch 7 Belt tension handle 1 3 13 B32 2 5 9 7 8 10 12 11 ...

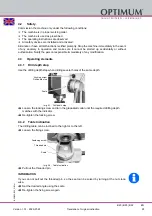
Page 29: ...ponsible immediately of any modification 4 3 Operating elements 4 3 1 Drill depth stop Use the drilling depth stop when drilling several holes of the same depth Img 4 1 Drill depth stop Loosen the locking screw and turn the graduated collar until the required drilling depth matches with the indicator Re tighten the locking screw 4 3 2 Table Inclination The drilling table can be inclined to the rig...

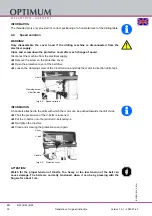
Page 30: ...protective cover of the belt drive Loosen the clamping screw of the V belt tension and slide the motor in direction drill chuck Img 4 3 Speed variation INFORMATION A handle is attached to the drills with which the motor can be pushed towards the drill chuck Thus the pre tension of the V belts is loosened Put the V belt s onto the required V belt pulley s Re tighten the V belt s Close and screwing ...

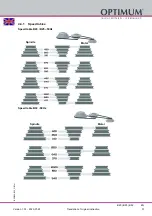
Page 31: ...Version 1 0 1 2020 07 23 31 Translation of original instruction B20 B25 B32 EN B20 B25 B32_GB fm 4 4 1 Speed tables Speed table B20 B25 50Hz Speed table B32 50Hz Spindle Motor Spindle Motor ...

Page 32: ...nslation of original instruction B20 B25 B32 EN B20 B25 B32_GB fm Speed table B20 B25 60Hz Speed table B32 60Hz Spindle Motor 504 360 231 1164 600 420 1776 1248 648 2664 1896 1404 Spindle Motor 504 312 168 1500 768 444 2424 1812 648 ...

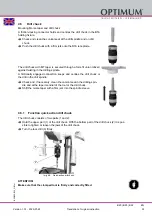
Page 33: ...ing spindle A frictionally engaged connection keeps and centres the drill chuck or the drill in the drill spindle Check and if necessary clean the conical seat in the drilling spin dle and at the taper mandrel of the tool or the drill chuck Shift the morse taper with a firm jerk into the spindle sleeve 4 5 1 Function quick action drill chuck The drill chuck consists of two parts 1 and 2 Hold the u...

Page 34: ...erated during rotation can cause the edge of the tool to become very hot The tool should be cooled during the drilling process Cooling the tool with a suitable cooling lubricant ensures better working results and a longer edge life of the tools This is best realised by a separate cooling equipment If there is no cooling equipment included in the delivery volume you can cool by means of a spray gun...

Page 35: ...since wood dust may be health hazardous Wear a suitable dust mask when performing works at which dust is generated 4 8 During work The spindle sleeve feed is done via the star grip Make sure that the feed is constant and not too fast The spindle sleeve is returned to its initial position by the return spring WARNING Seizing of clothes and or hair Make sure to wear well fitting work during drilling...

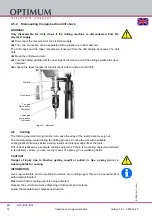
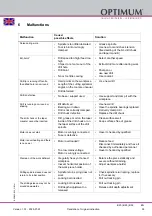
Page 36: ...o a collection centre Please consult your supervisor for further information on your nearest collection point 5 1 Safety WARNING The consequences of incorrect maintenance and repair work may include extremely serious injuries to those working on the drilling machine and damage to the machine Only qualified personnel should carry out maintenance and repair work on the machine 5 1 1 Preparation WARN...

Page 37: ...ge 11 weekly Clamping bolts V belt tension Check if the attachment screws for the V belt tension on the left and right side of the drilling head are well fastened Check if the V belts are well tightened Checking the tension of V belts Speed variation on page 30 Every month Drill column and toothed rack Oiling Lubricate the drill column regularly with commercial oil Lubricate the toothed rod regula...

Page 38: ...omer service technician however the request for a customer service techni cian can only be made via your specialist dealer If the repairs are carried out by qualified technical personnel they must follow the indications given in these operating instructions Optimum Maschinen Germany GmbH accepts no liability nor does it guarantee against damage and operating malfunctions resulting from failure to ...

Page 39: ...ill Have the spindle bearings replaced Correctly clamp drill Replace the drill chuck The drill chuck or the taper mandrel cannot be inserted Dirt grease or oil on the taper inside of the drill chuck or on the taper surface of the drill spindle Clean surfaces well Keep surfaces free of grease Motor does not start Motor is wrongly connected Fuse is defective Have it checked by qualified Motor is ove...

Page 40: ...rder to assert liability or warranty claims If the original proof of purchase is not presented we are not able to perform any services Defects resulting from the following circumstances are excluded from liability and warranty claims Using the product beyond the technical options and proper use in particular due to over straining of the machine Any defects arising by one s own fault due to faulty ...

Page 41: ...d down by your city council local authority or by an authorised disposal company 7 3 1 Decommissioning CAUTION Immediately decommission used machines in order to avoid later misuse and endangering of the environment or of persons Unplug the power cord Cut the connection cable Remove all operating materials from the used device which are harmful to the envi ronment If applicable remove batteries an...

Page 42: ...ionally and according to the legal regulations Please only throw depleted batteries in the collection boxes in shops or at municipal waste management companies 7 4 Disposal via municipal collection facilities Disposal of used electrical and electronic components Applicable in the countries of the European Union and other European countries with a sepa rate collecting system for those devices The s...

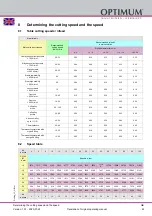
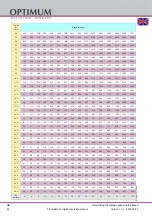
Page 43: ...e 60 100 0 10 0 15 0 30 0 40 0 60 CuZn alloy ductile 35 60 0 05 0 10 0 25 0 35 0 55 Aluminum alloy up to 11 Si 30 50 0 10 0 20 0 30 0 40 0 60 Thermoplastics 20 40 0 05 0 10 0 20 0 30 0 40 Thermosetting materials with organic filling 15 35 0 05 0 10 0 20 0 30 0 40 Thermosetting materials with anorganic filling 15 25 0 05 0 10 0 20 0 30 0 40 Vc in m min 4 6 8 10 12 15 18 20 25 30 35 40 50 60 80 100 ...

Page 44: ...62 1274 1699 2123 16 0 80 119 159 199 239 299 358 398 498 597 697 796 995 1194 1592 1990 17 0 75 112 150 187 225 281 337 375 468 562 656 749 937 1124 1499 1873 18 0 71 106 142 177 212 265 318 354 442 531 619 708 885 1062 1415 1769 19 0 67 101 134 168 201 251 302 335 419 503 587 670 838 1006 1341 1676 20 0 64 96 127 159 191 239 287 318 398 478 557 637 796 955 1274 1592 21 0 61 91 121 152 182 227 27...

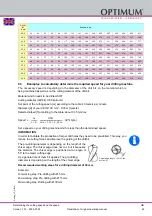
Page 45: ...hisel edge is positioned at an angle of 55 to the major cutting edge As a general rule of thumb it applies The pre drilling diameter is depending on the length of the chisel edge Recommended working steps for a drilling diameter of 30 mm Example 1st working step Pre drilling with Ø 5 mm 2nd working step Pre drilling with Ø 15 mm 3rd working step Drilling with Ø 30 mm Drill bit Ø in mm Speed n in r...

Page 46: ...chnung Machines name Herstellungsdatum Date of manufacture Artikelnummer Article no Die Artikelnummer befindet sich in der Ersatzteilliste The article no is located in the spare parts list Die Seriennummer befindet sich am Typschild The serial no is on the rating plate 9 2 Hotline Ersatzteile Spare parts Hotline 49 0 951 96555 118 ersatzteile stuermer maschinen de 9 3 Service Hotline 49 0 951 9655...

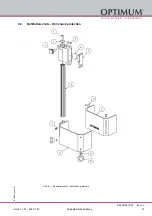
Page 47: ...Version 1 0 1 2020 7 23 47 Originalbetriebsanleitung B20 B25 B32 de en B20 B32_parts fm 9 4 Bohrfutterschutz Drill chuck protection Abb 9 1 Bohrfutterschutz Drill chuck protection ...

Page 48: ...er Qty Size Item no 1 Spezialschraube 2 M5x10 2 Beilagscheibe 5 3 Innensechskantschraube 4 Rändelschraube 030031712014 6 Mikroschalter 030031712018 7 Abdeckung Halter 030031712019 8 Aluprofil 1 B20 B25 B32 03011233209 9 Sichtschutzscheibe 03003171207 11 Nutschraube M5x20 12 Rändelschraube 03003171212 13 Beilagscheibe 5 Komplett Sätze Complete sets Pos Bezeichnung Designation Menge Grösse Artikelnu...

Page 49: ...Version 1 0 1 2020 7 23 49 Originalbetriebsanleitung B20 B25 B32 de en B20 B32_parts fm 9 5 B20 B25 Ersatzteilzeichnung Parts drawing Abb 9 2 B20 B25 ...

Page 50: ...lemmhebel Clamp Handle 1 0300813107 16 Bohrtischträger Drill table holder 1 0300820116 17 Bohrtisch Work Table 1 0300820117 18 Klemmhebel Clamp Handle 1 0300820118 19 Zahnrad Gear 1 0300820119 20 Schneckenrad Worm Gear 1 0300820120 21 Knopf Knob 3 0300813116 22 Hebel Lever 3 0300820122 23 Nabe Collet 1 0300820123 24 Hohlspannstift Spring pin 1 5 x 32 0300832369 25 Skalenring Dial 1 0300820125 26 R...

Page 51: ... 5 x 6 60 Sicherungsring Retaining ring 1 35 042SR35I 61 Kugellager Bearing 2 6201 0406201R 62 Keilriemen V belt 1 10 x 610 0300820162 63 Riemenscheibe Mitte Middle Pulley 1 0300820163 64 Zentrierteil Centering Device 1 0300820164 66 Riemenabdeckung Pulley Cover 1 0300820166 67 Keilriemen V belt 1 10 x 605 0300820167 68 Rundmutter Round Nut 1 0300820168 69 Spindelriemenscheibe Spindle pulley 1 030...

Page 52: ...08131216 216 Ein Aus Taster ab 2012 On off button from 2012 1 B20 B25 400V 03008203216 Teile ohne Abbildung Parts without illustration 0 Kondensator capacitor 1 0300820192 0 Schütz Contactor 1 400V 0460025 0 O Anzeige O Pointer 0322025 0 Lüfterraddeckel fan cover 0300820193 Komplett Sätze Complete sets 0 Pinole Komplett Spindle sleeve complete 1 B20 0300820179CPL 0 Pinole Komplett Spindle sleeve c...

Page 53: ...Version 1 0 1 2020 7 23 53 Originalbetriebsanleitung B20 B25 B32 de en B20 B32_parts fm 9 6 B32 Ersatzteilzeichnung Parts drawing Abb 9 3 B32 ...

Page 54: ...318 19 Kurbel Crank 1 0300832319 20 Schraube bolt 1 M 6 x 12 21 Zahnrad Gear 1 0300832321 22 Madenschraube Grub screw 1 M5x10 23 Säulenring Column Ring 1 0300832323 24 Klemmhebel Clamp Handle 1 0300323188 25 Bohrtischhalter Support 1 0300832325 26 Madenschraube Grub Screw 1 M 5 x 8 27 Abdeckung Cover Board 1 28 Mutter Nut 2 29 Rückholfedergehäuse Cover of Spring 1 0300832329 30 Rückholfeder Turbin...

Page 55: ...rew 1 68 Klemmstück Clamping Piece 1 69 Hohlspannstift Spring Pin 1 6 0300832369 70 Nabe Hub 1 0300832370 71 Hebel Lever 3 0300832371 72 Griff Grip 3 0300813116 73 Riemengehäuse Pulley Cover 1 0300832373 74 Schutz Kabelring Protect Wire Ring 2 75 Mutter Nut 2 76 Druckkabelblock Press Wire Block 2 77 Scheibe Washer 2 78 Bolzen Bolt 2 79 Schraube Screw 1 M5x8 80 Verschlußplatte Locking Plate 1 03008...

Page 56: ... Wire Block 1 111 Scheibe Washer 1 113 2 Reed Kontakt Reed Contact 1 0302024192 205 Gehäuse Trafo Housing trafo 1 0300820194 205 1 Deckel Cover 1 0300820194 1 206 Transformator Transformer 1 03302300TC 214 Not Aus Schalter ab 2012 Emergency Stop switch from 2012 1 LA103 0460058 215 Klemmkasten ab 2012 Terminal box from 2012 1 03003171114 216 Ein Aus Taster ab 2012 On off button from 2012 1 400V 03...

Page 57: ...Version 1 0 1 2020 7 23 57 Originalbetriebsanleitung B20 B25 B32 de en B20 B32_parts fm 9 7 Schaltplan Wiring diagram B20 230V Abb 9 4 Schaltplan Wiring diagram B13 B14 B16 B20 230V ...

Page 58: ...Version 1 0 1 2020 7 23 58 Originalbetriebsanleitung B20 B25 B32 de en B20 B32_parts fm 9 8 Schaltplan Wiring diagram B20 B25 B32 400V Abb 9 5 Schaltplan Wiring diagram B20 B25 B32 400V ...

Page 59: ...rmator Trafo 1 03021303RK 1M1 Motor B13 B14 Motor B13 B14 1 230V 0300813127 1M1 Motor B16 Motor B16 1 230V 0300816140 1M1 Motor B20 Motor B20 1 230V 0300820141 1M1 Motor B20 Motor B20 1 400V 0300825341 B20 B25 B32 400 Pos Bezeichnung Designation Menge Grösse Artikelnummer Qty Size Item no 1S1 EIN AUS Taster ON OFF switch 1 400V 03008203216 1S2 Not Aus Schalter Emergency Stop switch 1 0460058 1B2 1...

Page 60: ...s have been applied EMC Directive 2014 30 EU Restriction of the use of certain hazardous substances in electrical and elec tronic equipment 2015 863 EU The following harmonized standards were applied EN 12717 2001 Machine tools Safety Drilling machines EN 60204 1 Safety of machinery Electrical equipment of machines Part 1 General requirements EN 13849 1 2015 Safety of machinery Safety related part...

Page 61: ... Declaration of Conformity 60 Electronics 16 I Inspection 36 Intended use 7 M Maintenance 36 Misuse 8 O Obligations user 9 P Personal protective equipment 14 Personnel qualification Safety 9 Pictograms 6 S Safety During maintenance 15 During operation 14 Safety devices 11 Safety instructions 6 Service Hotline 46 Specialist dealer 38 Speed tables 31 Speed variation 30 Storage and packaging 20 T Tab...

Page 62: ... B 32 Ersatzteile OPTIdrill B 32 Zubehör OPTIdrill Zubehör Ihr Ersatzteil nicht in den Listen Direkt zum Formular Download Tragen sie Ihr Maschinenmodell samt Bauteil und Artikelnr und wir senden Ihnen ein Angebot zeitnah zu Allgemeine Betriebsmittel Öle und Schmiermittel Minimalmengenschmierung Weitere interessante Verweise Fräsmaschinen CNC Fräsmaschinen CNC Steuerungen Drehmaschinen CNC Drehmas...

Reviews: