12
13
PRODUCT ASSEMBLY
(CONTINUED)
DIRECTIONS FOR USE
C
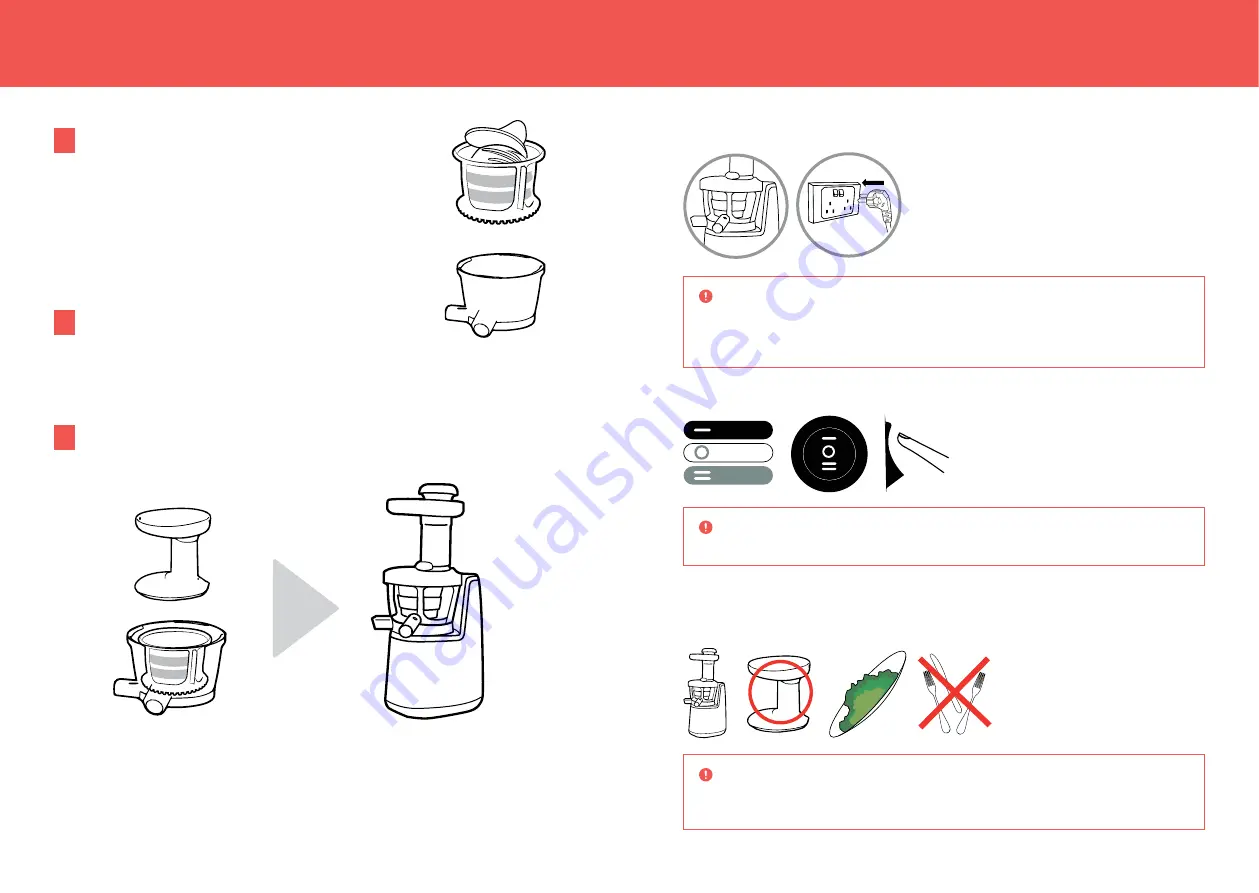
Place the kit after being assembled (juicing strainer, dual
action juicing screw and spinning brush) into juicing bowl,
by lining up the dot on the top of the juicing strainer with
the dot on the side of the juicing bowl.
Ensure that bottom of the dual action juicing screw is
engaged onto the motor shaft.
When positioned properly, the juicing strainer and dual
action juicing screw will sit flat and level and will not rotate.
D
Engage the hopper with the juicing bowl as shown on the
picture, lining up the dot on the side of the hopper with the
dot on the side of the juicing bowl and turning into place.
The device can only work when hopper and juicing bowl is fixed properly. If experiencing
difficulty please ensure strainer and dual action juicing screw are correctly inserted.
E
If desired install the de-foaming tap onto juice outlet, place juice pitcher and pulp pitcher under
juice outlet and pulp outlet accordingly. When using the tap ensure you do not fill the bowl with
liquid more than 1/3rd the way up the bowl to avoid leakage onto base.
STEP 1
Connect power plug with socket outlet and switch on the power.
STEP 2
Switch on the device and slowly feed cut up pieces of food down the feed tube.
STEP 3
Rinse everything thoroughly before putting into the machine.
Do not put excessive volumes of food or press food hard into the device; this may cause
clogging, leaks or damage.
Caution Place pitchers under two outlets (juice & pulp outlets). It is normal that the device
makes squeaking noise when starting. This noise is caused by friction between
spinning brush and parts inside juicing bowl. Sounds will disappear after food
is inserted.
Caution Do not operate with wet hands. Violating the warning may cause serious injury or
electric shock.
Caution Please use only the tamper to assist with guiding food into bowl, do not use any
other implement like spoons in the feed tube.
This will cause damage to the machine.
ON
OFF
REV


