background image

24

Notes:

• If you leave the VCR in the freeze-frame

mode for 3 minutes, the VCR stops playing
the tape.

• To reduce or eliminate jitter in the freeze-

frame picture, press and hold 

CH 

s/t until

the picture is clear.

Frame Advance

During freeze-frame, you can advance the pic-
ture one frame at a time by repeatedly pressing

SLOW

. This feature works best with video cas-

settes recorded at the SP or EP speed. Press

PAUSE

 to return to normal playback.

Slow Motion

To start slow motion playback, while a tape is
playing, press 

SLOW

. Press 

SLOW

 again or

PLAY

 to return to normal playback.

Notes:

• During slow motion, the sound is muted

and the picture quality is lower than during
normal playback. Slow motion picture qual-
ity is best with tapes recorded at the SP or
EP speed.

• If you leave the VCR in the slow-motion

mode for 3 minutes, the VCR stops playing
the tape.

• If the slow-motion picture is poor, press

and hold 

CH 

s/t until the picture improves.

One Minute Skip

You can skip over unwanted material on the re-
corded tape, such as commercials. Press

ZERO/1MIN

 during playback. The VCR fast for-

wards over 1 minute of recording, then re-
sumes normal playback.

REAL-TIME COUNTER

Using the Counter

Your VCR’s counter shows how long a tape
has been running. To display the counter on
the TV screen, press 

DISPLAY

 on the remote

control.

Notes:

• The real-time counter might stop if you

fast-forward or rewind through a blank sec-
tion on the tape. This is normal.

• You can press 

COUNTER RESET

 to reset

the counter to 

0:00:00

.

Using the Zero Search Function

You can reset the counter to 

0:00:00

 at any

position on the tape and then return to that po-
sition.

Follow these steps to use the zero search func-
tion.

1. Press 

COUNTER RESET

 once so the

counter appears on the TV screen.

2. Within 5 seconds, press 

COUNTER RESET

again at the location you want to return to
later. The counter resets to 

0:00:00

.

3. When you want to return to the selected

location, stop the tape, then press 

ZERO/

1MIN

. The tape rewinds or fast-forwards

and automatically stops at the location you
selected in Step 2.

16-547.fm  Page 24  Tuesday, July 20, 1999  4:45 PM

Summary of Contents for 16-547

Page 1: ...Cat No 16 547 630 OWNER S MANUAL Please read before using this equipment MODEL 110 MODEL 60 4 Head VHS HQ VCR 4 Head VHS HQ Hi Fi VCR 16 547 fm Page 1 Tuesday July 20 1999 4 45 PM...

Page 2: ...en adhered to 10 Power Sources This VCR should be operated only from the type of power source indicated on the marking label If you are not sure of the type of power supplied to your home consult your...

Page 3: ...n require extensive work by a qualified technician to restore the VCR to its normal operation If the VCR has been dropped or the cabinet has been damaged When the VCR exhibits a distinct change in per...

Page 4: ...tically ad justs tracking when you start playback Auto Repeat Playback automatically re winds the tape for repeat playback when the tape reaches the end of the tape or the record ing Easy to Use Immed...

Page 5: ...r programming information and timer memory settings in case of a power loss The clock continues to run for 3 minutes and tuner programming information and timer memory settings are kept for 24 hours A...

Page 6: ...9 Operation 21 Watching TV 21 Viewing a Video Tape 22 Special Functions 23 Special Displays 23 Tape Motion Controls 23 Real Time Counter 24 Repeat Play 25 Tracking 25 Recording 26 Recording Speeds 26...

Page 7: ...methods for recording Additional Information includes a trouble shooting section care and maintenance proce dures and the VCR s specifications We recommend that you read through at least Installation...

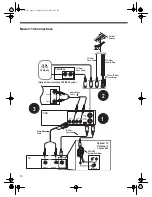
Page 8: ...ct connections to cable wires connections that do not go through a cable box Check the laws in your area before you make connections A cable converter box to the VCR s IN FROM ANT jack Note There are...

Page 9: ...CR DSS System Stereo Audio Video Cable Stereo Audio Video Cable VHF UHF Splitter Combiner OUT I N UHF Antenna In Audio In Video In L R L Audio Video R VHF Antenna In 1 2 3 75 Ohm Coax Cable or or or 3...

Page 10: ...Splitter Combiner OUT I N UHF Antenna In Audio In Video In L R L Audio Video R VHF Antenna In 1 2 3 or or or 300 Ohm Lead In Wire Outside Antenna 300 to 75 Ohm Transformer 75 Ohm Coax Cable 75 Ohm Coa...

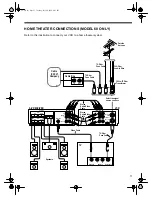
Page 11: ...IN TV Monitor A V RECEIVER TV Stereo Audio Video Cable Stereo Audio Video Cable Speakers OUT I N Antenna In Audio In Video In L R 75 Ohm Coax Cable Video Cable or or or 300 Ohm Lead In Wire Outside An...

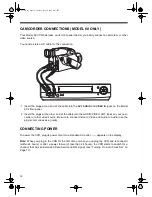
Page 12: ...Be sure to connect Video to Video and Audio to Audio use the plug s color codes as a guide CONNECTING POWER To power the VCR plug its power cord into a standard AC outlet appears on the display Note...

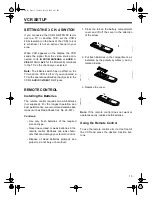
Page 13: ...A batteries not supplied For the longest operation and best performance we recommend alkaline bat teries such as RadioShack Cat No 23 557 Cautions Use only fresh batteries of the required size and typ...

Page 14: ...u to set the clock Notes Your VCR protects tuner programming for up to 24 hours in case a power failure occurs or if the power cord becomes unplugged After about 24 hours without power the VCR loses t...

Page 15: ...o a cable system with a cable box highlight YES and press SET The VCR asks you to select your cable system setup If you connected the cable box s output to the VCR s input a Highlight CABLE BOX VCR TV...

Page 16: ...w enter 43 or 44 minutes now This gives you time to complete this proce dure before starting the clock 8 Use SEL s t to set DST daylight saving time to ON or OFF When you set DST to ON the VCR auto ma...

Page 17: ...ght SET UP CHAN NEL then press SET 3 Press SET to select the broadcast system either TV or CATV 4 Press SEL t to highlight AUTO SET then press SET The VCR starts scanning for and storing active channe...

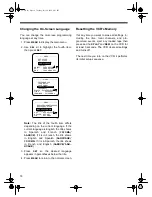
Page 18: ...ess MENU to return to the normal screen Resetting the VCR s Memory If at any time you want to erase all settings in cluding the time local channels and pro grammed events eject any loaded tape then pr...

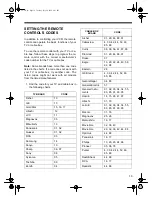
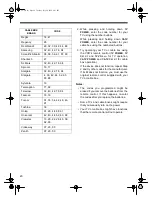
Page 19: ...ld Star 15 16 17 Hitachi 12 JVC 11 Magnavox 05 Mitsubishi 13 Panasonic 01 02 Quasar 01 02 RCA 03 Samsung 14 Sanyo 10 Sharp 06 07 Sony 08 Sylvania 05 Toshiba 09 Zenith 04 CABLE BOX BRAND CODE Archer 01...

Page 20: ...ed might be erased if you remove the batteries from the remote control If this happens re enter the codes after you replace the batteries Some TVs and cable boxes might require that you manually turn...

Page 21: ...number combinations a channel number you see on the VCR s display might differ from the channel number displayed on your cable box You might need to experi ment to determine the proper cable chan nel...

Page 22: ...back the VCR automatically adjusts tracking but you can manually adjust it if necessary see Manually Adjusting Tracking on Page 25 3 Model 60 only Follow these steps to choose the type of audio you wa...

Page 23: ...nction indicator might not ap pear on the VCR s display TAPE MOTION CONTROLS Fast Forward Rewind and Visual Search To advance the tape quickly when it is stopped press FAST F To rewind the tape quickl...

Page 24: ...You can skip over unwanted material on the re corded tape such as commercials Press ZERO 1MIN during playback The VCR fast for wards over 1 minute of recording then re sumes normal playback REAL TIME...

Page 25: ...eat play mode it stays in effect even after you turn off the VCR To turn off repeat play select OFF in Step 3 TRACKING Digital Auto Tracking System The auto tracking system automatically adjusts track...

Page 26: ...es that display the offi cial VHS logo High grade tape has a better oxide coating that helps prevent dirty video heads and gives the best results Although T 160 video cassettes offer the long est reco...

Page 27: ...jacks RECEIVING RECORDING STEREO SAP BROADCASTS MODEL 60 ONLY The Model 60 has 3 channels for audio record ing two left and right stereo channels on the Hi Fi track and one monaural channel on the st...

Page 28: ...9 Press REC TIME again The TV displays the recording length Repeatedly press REC TIME to advance the timer to the desired recording length The recording length advances in 30 minute increments up to...

Page 29: ...rea and set the VCR to automati cally set the clock from the EDS signal the clock is reset within 10 minutes after power is restored and the VCR records at the programmed time s Setting the Program Ti...

Page 30: ...press SET or CLEAR to move the cursor to the wrong entry enter the correct information then press PROG Note The TV displays PROGRAM IS INCOMPLETE if you did not correctly enter a timer program before...

Page 31: ...ng the Pro gram Timer on Page 29 to correct the entry you want 6 After checking or correcting a program press PROG again then turn off the VCR Clearing a Program Timer If the timer recording has not y...

Page 32: ...opyrighted material is a violation of the copyright laws of most countries and such duplication may result in fines imprison ment or both Note however that in the United States it is not a violation o...

Page 33: ...ideo input if you connected it to the VCR s AUDIO VIDEO OUT jacks Audio video connections are incorrect Check all connections Remote control buttons do not work when the power is on and a cassette is...

Page 34: ...can cause premature wear of parts Handle the VCR gently and carefully Dropping it can damage circuit boards and cas es and can cause the VCR to work improperly Use only fresh batteries of the required...

Page 35: ...dioShack store Storing Your Video Cassettes Unless you are making an automatic timer re cording eject and store the cassette before you turn off the VCR This helps protect the cassette and the VCR s i...

Page 36: ...HF F Type Antenna Output VHF UHF F Type Video Input Output Phono Connector Audio Input Output Phono Connector Video Output Level 1 0 Vp p Video Output Impedance 75 Audio Output Level 8 dBV Audio Outpu...

Page 37: ...Power Consumption Model 110 18 Watts Model 60 23 Watts Dimensions H x W x D 31 2 143 16 111 4 Inches 8 9 36 28 5 cm Weight Model 110 7 lbs 15 oz 3 6 kg Model 60 8 lbs 3 oz 3 7 kg Specifications are t...

Page 38: ...38 NOTES 16 547 fm Page 38 Tuesday July 20 1999 4 45 PM...

Page 39: ...39 16 547 fm Page 39 Tuesday July 20 1999 4 45 PM...

Page 40: ...k store Warranty does not cover transportation costs Nor does it cover a product subjected to misuse or accidental damage EXCEPT AS PROVIDED HEREIN RadioShack MAKES NO EXPRESS WARRANTIES AND ANY IMPLI...

Reviews: