background image

AMPLIFICADOR

AMPLIFIER

AM-120Z

Manual de instalación y funcionamiento v1.0
Installation and operating instructions v1.0

Summary of Contents for AM-120Z

Page 1: ...AMPLIFICADOR AMPLIFIER AM 120Z Manual de instalación y funcionamiento v1 0 Installation and operating instructions v1 0 ...

Page 2: ...la potencia de salida de los amplificadores cuando se utiliza la línea de 100 V para avisos NO SOBREPASAR el 70 de la potencia de salida de los amplificadores cuando se utiliza la línea de 100 V para música ambiental a alto volumen NO UTILIZAR altavoces exponenciales para música ambiental excepto si éstos han sido especialmente diseñados para esta función EVITAR empalmes en los cables de micrófono...

Page 3: ...0 6 3 1 Funciones de los botones generales 10 6 3 2 Funciones de los botones en los modos USB y SD MMC 11 6 3 3 Funciones de los botones en el modo Tuner 11 6 3 4 Funcionalidades generales 11 6 3 4 1 Control de volumen 11 6 3 4 2 Control EQ 11 6 3 4 3 Control Mute 12 6 3 5 Funcionalidades en modo USB y SD MMC 12 6 3 5 1 Selección de entradas USB SD Card 12 6 3 5 2 Comprobación de memoria 12 6 3 5 ...

Page 4: ... PAGING con conexión por regleta Alimentación phantom para los canales de micro 1 y 2 Entradas de prioridad Dos tonos pregrabados gong y sirena Protección por limitación de corriente y protección térmica Instalación en sobremesa o en rack de 19 Ecualizador gráfico de siete bandas Ampliable mediante los conectores LINK y PRE AMP Bajo nivel de ruido y distorsión Perfecto para uso comercial e industr...

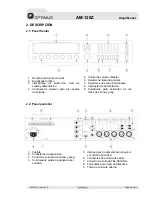
Page 5: ... volumen Master 6 Selector de llamada general 7 Selectores de zonas individuales 8 Interruptor de alimentación 9 Pulsadores para activación de los tonos de sirena y gong 1 Fusible 2 Conectores de expansión 3 Control de volumen de sirena y gong 4 Controles de ajuste de ganancia por entrada 5 Interruptores de alimentación phantom y control de prioridad 6 Conectores de entrada de señal 7 Conector de ...

Page 6: ...je en Rack 1 Localice las dos escuadras y los seis tornillos suministrados con el equipo 2 Coloque una escuadra en un lateral del frontal del chasis 3 Inserte los tornillos en los agujeros de la escuadra y el chasis Atorníllelos 4 Repita los dos pasos anteriores para el otro lateral del chasis 5 Retire las cuatro patas de la parte inferior de la unidad Para mayor detalle observe la figura 3 3 Cone...

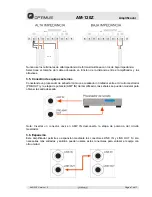
Page 7: ...e profesional de alta calidad A fin de evitar la posibilidad de cortocircuitos aísle cualquier parte del cable que pudiese quedar expuesta El equipo dispone de 5 terminales para salidas individuales de 100 V y un terminal para salida de baja impedancia de 4 Ohms La siguiente figura muestra los terminales correspondientes a la salida de altavoces ...

Page 8: ...rocesador de señal tal como un ecualizador o limitador entre el circuito mezclador PRE OUT y la etapa de potencia AMP IN del amplificador las señales se pueden modelar para obtener la salida deseada Nota Insertar un conector Jack en AMP IN desconecta la etapa de potencia del circuito mezclador 3 6 Expansión Este amplificador permite su expansión mediante los conectores LINK IN y LINK OUT Si son ne...

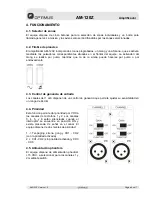
Page 9: ...tras que la de la sirena puede hacerse por pulso o por enclavamiento 4 3 Control de ganancia de entrada Los canales del 1 al 6 disponen de un control de ganancia que permite ajustar su sensibilidad en un rango de 44 dB 4 4 Prioridad Esta función permite dar prioridad por VOX a los canales de micrófono 1 y 2 Los canales 3 4 5 y 6 serán silenciados cuando el interruptor se encuentre en posición ON y...

Page 10: ...AM 120Z Versión 1 0 Página 9 de 17 AM 120Z Amplificador 5 DIAGRAMA DE BLOQUES ...

Page 11: ...chivos y carpetas hasta 2 000 archivos y 200 carpetas Disponible ID3 tag de hasta 32 caracteres Nombre archivo Titulo Artista Álbum 6 2 Descripción 1 Interruptor de alimentación 2 Conector USB 3 Ranura para tarjetas SD MMC 4 Pantalla LCD 5 Botones de funciones 6 3 Operación 6 3 1 Funciones de los botones generales POWER enciende y apaga el equipo Function cambia el modo de funcionamiento cíclicame...

Page 12: ...a siguiente manera Nombre archivo Titulo Artista Álbum 6 3 3 Funciones de los botones en el modo Tuner PLAY PAUSE cambia de mono a estéreo STOP cambia de FM a AM NEXT Incrementa la frecuencia del Tuner Presionando el botón 2 segundos se inicia una búsqueda automática de emisoras incrementando la frecuencia BACK Decrementa la frecuencia del Tuner Presionando el botón 2 segundos se inicia una búsque...

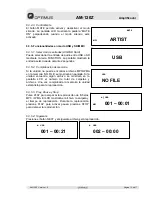
Page 13: ...ia Si la unidad no puede encontrar archivos MP3 WMA en la memoria NO FILE se mostrará en pantalla Si la unidad encuentra algún archivo se mostrará en la pantalla LCD el número de total de carpetas y archivos Una vez comprobada la memoria la unidad estará lista para la reproducción 6 3 5 3 Play Pause y Stop Pulse PLAY para empezar la reproducción de ficheros MP3 WMA El LCD mostrará el archivo la ca...

Page 14: ...la reproduccion el nombre del archivo será mostrado Pulse otra vez para entrar en del modo ID3 tag donde la infomación del archivo será mostrada de la siguiente manera título álbum artista El tamaño máximo de la información es de 32 caracteres 6 3 6 Funcionalidad en modo Tuner 6 3 6 1 Selección de salida de audio Pulse II para cambiar de estero a mono 6 3 6 2 Selección de banda Pulse para cambiar ...

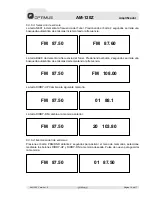
Page 15: ...o el botón 2 segundos se inicia una búsqueda automática de emisoras decrementando la frecuencia La tecla DIRRY UP Cambia a la siguiente memoria La tecla DIRRY DN cambia a la memoria anterior 6 3 6 4 Memorización de emisoras Presione el botón PRG RND durante 2 segundos para activar el menú de memorias seleccione mediante los botones DIRRY UP y DIRRY DN la memoria deseada Pulse de nuevo para guardar...

Page 16: ...o balanceada 20 dB 3 dB Entrada AMP IN no balanceada 0 dB 3 dB Ecualizador 125 Hz 250 Hz 500 Hz 1 kHz 2 kHz 4 kHz y 8 kHz 12 dB 3 dB Respuesta en frecuencia 80 Hz 15 kHz 3 dB Alimentación phantom 15 VDC Salidas de altavoces 4 Ω 70 V y 100 V Diafonía entre salidas 80 dB a 1 kHz Refrigeración Refrigeración por convección Temperatura de funcionamiento 0 40 ºC con 95 de humedad sin condensación Alimen...

Page 17: ... Relación señal ruido 70 dB Respuesta de frecuencia 20 20 000 Hz 3 dB THD 1 kHz a potencia máxima 0 1 Voltaje alimentación 12 Vcc Consumo de corriente máximo 500 mA Condiciones de funcionamiento 0 40ºC 95 humedad Dimensiones Ancho alto Profundo 168 190 x 40 x 185 mm Peso 0 7 kg 0 dB 775 mV ...

Page 18: ...nimiento 5 La garantía carecerá de validez cuando se observe Enmiendas o tachaduras en los datos del certificado de garantía o factura de compra Falta de factura original o falta de fecha en la misma Falta de número de serie o lote en el equipo 6 La garantía no cubre los desplazamientos por asistencias técnicas a excepción de los motivados por incidencias ocurridas durante los tres primeros meses ...

Page 19: ...OT run microphone cables near mains data telephone or 100V line cables DO NOT run 100V line cables near data telephone or other low voltage cables DO NOT exceed 90 of the amplifier s output power when using 100V line speech only DO NOT exceed 70 of the amplifier s output power when using 100V line high level background music DO NOT use horn loudspeakers for background music unless the loudspeaker ...

Page 20: ...ion 10 6 3 1 General Key description 10 6 3 2 Key description in USB and SD MMC modes 11 6 3 3 Key description in Tuner mode 11 6 3 4 General functionality 11 6 3 4 1 Volume control 11 6 3 4 2 EQ control 11 6 3 4 3 Mute control 11 6 3 5 Functionality in USB and SD MMC mode 12 6 3 5 1 Input source USB SD Card selection 12 6 3 5 2 Memory checking 12 6 3 5 3 Play Pause and Stop 12 6 3 5 4 Forward 12 ...

Page 21: ... block terminal Phantom power for MIC channel 1 and 2 Priority inputs Two built in prerecorded messages gong and siren Advanced protection system includes current limiting over current and thermal protection Desktop and 19 inches rack mountable type Seven band graphic equalizer Expandable by using LINK and PRE AMP terminals Low distortion and low noise level Ideal for commercial and industrial use...

Page 22: ...er indicators 4 Input channel volume controls 5 Master volume control 6 All call zone selector 7 Individual zone selector 8 Power switch 9 Gong and siren activation switches 1 Fuse 2 Expansion connectors 3 Gong and siren volume controls 4 Input gain controls 5 Phantom and priority switches 6 Input connectors 7 Tel paging input 8 Speaker output terminals 9 AC power socket ...

Page 23: ...re a correct convection cooling 3 2 Rack mounting 1 Locate the two rack ears and six rack ear screws supplied 2 Place a rack ear on the right front of the chassis 3 Insert the screws into the holes of the rack ear and chassis Screw them in 4 Repeat steps 2 to 5 for the left side of the chassis 5 Remove the four legs from bottom of unit Please refer to the following figure 3 3 Input connections The...

Page 24: ...nectors is recommended to use high quality cable To prevent the possibility of short circuits insulate exposed loudspeaker cable connectors The equipment includes 5 terminals for individual 100 V speaker outputs and a terminal for low output impedance of 4 Ω The following figure shows speaker output terminals ...

Page 25: ...essor such as an equalizer or limiter between the mixer section PRE AMP OUT and the power amplifier section AMP IN signals can be tuned for desired sound output Note Inserting a 1 4 inch phone plug into AMP IN terminal disconnects internal power amplifier section from the mixer section 3 6 Expansion This amplifier allows expansion with LINK IN and LINK OUT connectors If you need more inputs and ou...

Page 26: ...e while siren can be activated by pulse or interlock 4 3 Input gain control Channels 1 to 6 have a gain control which permits to adjust in a 44 dB range the sensitivity of each one 4 4 Priority This function activates the VOX priority in channels 1 and 2 The signal of other channels is muted when this switch is set to ON and audio signal is detected in the channel This figure shows the position ON...

Page 27: ...AM 120Z Version 1 0 Page 9 of 17 AM 120Z Amplifier 5 BLOCK DIAGRAM ...

Page 28: ...th LOUD function Recognition file and folder up to 2 000 files and 200 folders Available ID3 tag up to 32 characters File name Title Artist Album 6 2 Description 1 Power switch 2 USB interface 3 SD MMC CARD SLOT 4 LCD display 5 Function switches 6 3 Operation 6 3 1 General Key description POWER Power ON or OFF the equipment Function change function mode cyclically TUNER USB SD MMC Card Volume cont...

Page 29: ...ay 6 3 3 Key description in Tuner mode PLAY PAUSE change from mono to stereo STOP change from FM to AM NEXT Increase the tuning frequency Push the button 2 seconds for searching automatically a new broadband by increasing the frequency BACK decrease the tuning frequency Push the button 2 seconds for searching automatically a new broadband by decreasing the frequency DIRRY UP change to next memory ...

Page 30: ...er and total number of files Once memory checking has finished the unit is ready for playing 6 3 5 3 Play Pause and Stop Press PLAY key to start play MP3 WMA file LCD shows file folder number and playback time During playback press PLAY key to pause Press STOP key to stop playing MP3 WMA file 6 3 5 4 Forward Press NEXT key then next file will be played 6 3 5 5 Backward Press BACK key current file ...

Page 31: ...up to 32 characters for each display unit 6 3 6 Functionality in TUNER mode 6 3 6 1 Selecting audio output Press II key to switch between STEREO and MONO mode 6 3 6 2 Band selection Press key to switch between FM and AM frequencies 6 3 6 3 Selecting the station The NEXT button increases the tuning frequency Push the button 2 seconds for searching automatically a new broadband by increasing the fre...

Page 32: ...adband by increasing the frequency DIRRY UP button changes to next memory DIRRY DN button changes to previous memory 6 3 6 4 Presetting Stations Push the PRG RND button 2 seconds to activate memory menu use DIRRY UP and DIRRY DN to select the desired memory number Push again to store memory FM 87 50 FM 108 00 FM 87 50 01 88 1 FM 87 50 20 103 80 FM 87 50 01 87 50 ...

Page 33: ...0 dB 3 dB Unbalanced Input LINK IN 20 dB 3 dB Unbalanced Input AMP IN 0 dB 3 dB Equalizer 125 Hz 250 Hz 500 Hz 1 kHz 2 kHz 4 kHz y 8 kHz 12 dB 3 dB Frequency Response 80 Hz 15 kHz 3 dB Phantom Power 15 VDC Speaker Outputs 4 Ω 70 V y 100 V Crosstalk between outputs 80 dB a 1 kHz Cooling Convection cooling Operating temperature 0 40 ºC at 95 humidity without condensation Input Power 230 Vac 50 Hz Po...

Page 34: ...MTU 20 Signal to noise ratio 70 dB Frequency response 20 20 000 Hz 3 dB THD 1 kHz maximum power 0 1 Supply voltage 12 Vdc Maximum Current Consumption 500 mA Operating conditions 0 40º C at 95 humidity Dimensions Width Height Depth 168 190 x 40 x 185 mm Weigh 0 7 kg 0 dB 775 mV ...

Page 35: ...ing lack of maintenance 5 The guarantee shall not be valid whenever the following is observed Amendments or corrections made to the details of the guarantee certificate or purchase invoice Failure to produce the original invoice or the absence of a date on this Absence of the serial or batch number on the equipment 6 In the case of personal computers the guarantee will not cover the elimination of...

Reviews: