background image


Emissivity 


81

-


8.2  Determination of unknown emissivity 

►  First  determine  the  actual  temperature  of  the  measuring  object  with  a  thermocouple  or  contact  sensor. 

Second,  measure  the  temperature  with  the  infrared  thermometer  and  modify  the  emissivity  until  the 
displayed result corresponds to the actual temperature. 

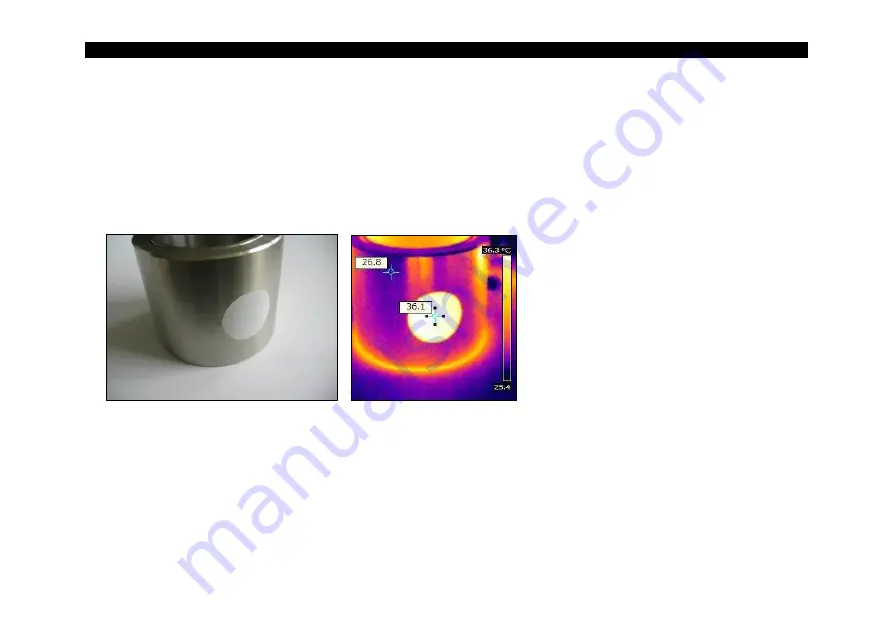
►  If you monitor temperatures of up to 380 °C you may place a special plastic sticker (emissivity dots – 

Part 

No.:


ACLSED

) onto the measuring object, which covers it completely.  


Figure 49: 

Plastic sticker at metal surface 

Set the emissivity to 0.95 and take the temperature of the sticker. Afterwards, determine the temperature 
of  the  adjacent  area  on  the  measuring  object  and  adjust  the  emissivity  according  to  the  value  of  the 
temperature of the sticker. 

Summary of Contents for optris PI 640 G7

Page 1: ...Operator s Manual optris PI 160 200 230 400i 450i 450i G7 640 640 G7 05M 08M 1M Infrared camera...

Page 2: ...Optris GmbH Ferdinand Buisson Str 14 13127 Berlin Germany Tel 49 30 500 197 0 Fax 49 30 500 197 10 E mail info optris global Internet www optris global...

Page 3: ...Table of contents 3 1 General Notes 7 1 1 Intended use 7 1 2 Warranty 8 1 3 Scope of delivery 9 1 4 Maintenance 9 1 4 1 Cleaning 9 1 5 Model overview 10 2 Technical Data 11 2 1 General specifications...

Page 4: ...Changing the lens 39 3 3 Fixing the focus of the lens only for PI 05M 08M 1M 40 3 4 Mounting accessories optional 42 3 5 High temperature accessories 43 3 5 1 CoolingJacket 43 3 5 2 CoolingJacket Adva...

Page 5: ...2 Example for a Fail Safe monitoring of the PI with a PLC 59 4 3 USB cable extension 61 5 IRmobile App 63 6 Software PIX Connect 65 6 1 Installation and initial start up 66 6 2 Software window 68 6 2...

Page 6: ...e of emissivity for metals 84 Appendix B Table of emissivity for non metals 86 Appendix C Quick start for serial communication 87 Appendix D Interprocess Communication IPC 89 Appendix E PIX Connect Re...

Page 7: ...er to do a comfortable detailed analysis with the software PIX Connect The PI is a precise instrument and contains an extremely sensitive infrared detector and a high quality lens The alignment of the...

Page 8: ...After the warranty is expired the manufacturer guarantees additional 6 months warranty for all repaired or substituted product components Warranty does not apply to damages which result from misuse o...

Page 9: ...rface cable incl terminal block 1 m Software package PIX Connect Operators manual Aluminum case PI 640 640 G7 only robust hard transport case IP67 PI 200 230 only focusing tool for VIS camera 1 4 Main...

Page 10: ...perature differences PI 450i PI 450i G7 IR 200 to 1500 C 150 to 900 C 7 9 m 80 Hz 27 Hz Measurement of glass with Line Scanning mode PI 640 IR 20 to 900 C 200 to 1500 C optional 7 5 13 m 32 Hz Pin sha...

Page 11: ...ial housing Aluminum anodized Dimensions PI 160 PI 200 PI 230 45 x 45 x 60 76 mm depending on lens and focus position PI 400i PI 450i 450i G7 PI 640 640 G7 46 x 56 x 76 100 mm depending on lens and fo...

Page 12: ...60068 2 64 broadband noise Shock1 IEC 60068 2 27 25 G and 50 G 1 Used standards for vibration and shock Figure 1 Used standards Stress program camera in operation Shock half sinus 25 G testing Ea 25 G...

Page 13: ...lf sinus 50 G testing Ea 50 G acc IEC 60068 2 27 Acceleration 490 m s2 50 G Pulse duration 11 ms Number of directions 6 3 axes with two directions each Duration 18 Shocks 3 Shocks each direction Vibra...

Page 14: ...4 Frequency range 10 2000 Hz Acceleration 39 3 m s2 4 01 GRMS Frequency spectrum 10 106 Hz 0 9610 m s2 2 Hz 0 010 G2 Hz 106 150 Hz 6 dB Octave 150 500 Hz 1 9230 m s2 2 Hz 0 020 G2 Hz 500 2000 Hz 6 dB...

Page 15: ...PIF AI Input Standard Process Interface PIF in 0 10 V Emissivity ambient temperature reference temperature uncommitted value flag control triggered snapshots triggered recording triggered linescanner...

Page 16: ...3 System accuracy 4 2 C or 2 Thermal sensitivity NETD 40 mK with 23 0 3 K with 6 0 1 K with 41 and 72 Warm up time 10 min Emissivity 0 100 1 100 Software PIX Connect 1 For an ideal combination of IR a...

Page 17: ...F 1 1 29 x 22 F 0 9 53 x 38 F 0 9 80 x 54 F 0 9 System accuracy 3 2 C or 2 Thermal sensitivity NETD 75 mK4 with 29 53 and 80 0 1 K4 with 18 40 mK4 with 29 53 and 80 60 mK4 with 18 130 mK Tobj 650 C W...

Page 18: ...z Lenses FOV 15 x 11 F 1 33 x 25 F 0 8 60 x 45 F 0 8 90 x 64 F 0 8 Microscope lens FOV 12 x 9 F 1 1 System accuracy 3 2 C or 2 Thermal sensitivity NETD 75 mK with 33 60 and 90 85 mK with 15 130 mK Tob...

Page 19: ...le Lenses FOV 2 FOV 764x480 px 26 x 16 F 1 4 FOV 382x288 px 13 x 10 FOV 764x480 px 9 x 5 F 2 8 13 x 8 F 2 4 26 x16 F 1 4 39 x 25 F 1 4 FOV 382x288 px 4 x 3 7 x 5 13 x 10 20 x 15 System accuracy 3 For...

Page 20: ...start temperature for optics with focal length f 50 mm f 75 mm 2 An additionally purchased lens for the PI 05M 08M 1M camera comes with the corresponding protective tube 3 At an ambient temperature of...

Page 21: ...of the lens to the focus setting infinity The visual camera PI 200 230 only is adjusted with the supplied focusing tool Figure 4 For this purpose the focusing tool with the two pins is placed on the...

Page 22: ...measure objects in different distances We offer lenses for close standard distances and large distances Different parameters are important if using infrared cameras They display the connection between...

Page 23: ...Technical Data 23 Figure 6 Measurement field of the infrared camera optris PI representing the 23 x 17 lens...

Page 24: ...mples showing what spot sizes and pixel sizes will be reached in which distance For individual configuration there are different lenses available Wide angle lenses have a radial distortion due to thei...

Page 25: ...Technical Data 25 Table 2 Note The accuracy of measurement can be outside of the specifications for distances below the defined minimum distance...

Page 26: ...26 Note The accuracy of measurement can be outside of the specifications for distances below the defined minimum distance...

Page 27: ...Technical Data 27 Note The accuracy of measurement can be outside of the specifications for distances below the defined minimum distance...

Page 28: ...28 Note The accuracy of measurement can be outside of the specifications for distances below the defined minimum distance...

Page 29: ...Technical Data 29 Note The accuracy of measurement can be outside of the specifications for distances below the defined minimum distance 1 PI 05M and PI 08M is only available with OF25 optics...

Page 30: ...30 Note The accuracy of measurement can be outside of the specifications for distances below the defined minimum distance 1 PI 05M and PI 08M is only available with OF25 optics...

Page 31: ...with two metric M4 thread holes on the bottom side 6 mm depth and can be installed either directly via these threads or with help of the tripod mount also on bottom side The tightening torque of the M...

Page 32: ...32 Figure 7 PI 160 PI 400i PI 450i PI 450i G7 dimensions mm...

Page 33: ...Mechanical Installation 33 Figure 8 PI 200 PI 230 dimensions mm...

Page 34: ...34 Figure 9 PI 640 PI 640 G7 optics 29 33 53 60 dimensions mm...

Page 35: ...Mechanical Installation 35 Figure 10 PI 640 PI 640 G7 optics 13 15 dimensions mm...

Page 36: ...36 Figure 11 PI 640 PI 640 G7 optics 80 90 dimensions mm...

Page 37: ...Mechanical Installation 37 Figure 12 PI 640 microscope optics 10 12 dimensions mm...

Page 38: ...38 Figure 13 PI 05M PI 08M PI 1M dimensions mm...

Page 39: ...t be turned off see Figure 5 Figure 14 Change lens for PI 160 2xx 4xxi 640 Figure 15 Change lens for PI 05M 08M 1M Figure 16 Inserting the lens To get the best possible measurements when inserting the...

Page 40: ...unscrew the protective tube of the camera see Figure 5 There are three small holes on the lens Take the three screws that are included and attach them to the three holes The focus of the lens is now...

Page 41: ...Mechanical Installation 41 Figure 19 Focusing screws for focus ring...

Page 42: ...42 3 4 Mounting accessories optional Figure 20 Mounting base stainless steel adjustable in 2 axes Part No ACPIMB Figure 21 Protective housing stainless steel Incl Mounting base Part No ACPIPH...

Page 43: ...re accessories 3 5 1 CoolingJacket The IR camera can be used at ambient temperature up to 50 C up to 70 C with PI 450i PI 450i G7 For higher temperatures up to 180 C the CoolingJacket is provided For...

Page 44: ...44 Figure 22 CoolingJacket Dimensions...

Page 45: ...2 CoolingJacket Advanced The CoolingJacket Advanced is available as Standard Version and Extended Version The IR camera can be used at ambient temperature up to 50 C up to 70 C with PI 450i PI 450i G...

Page 46: ...46 Standard Version Figure 25 CoolingJacket Advanced Part No ACPIxxxCJAS Standard Version Dimensions...

Page 47: ...trial PIF or the USB Server Gigabit and industrial PIF Both PI Netbox and industrial PIF or USB Server Gigabit and industrial PIF can be integrated in the CoolingJacket Figure 26 Cooling Jacket Advanc...

Page 48: ...48 Figure 28 CoolingJacket Advanced Part No ACPIxxxCJAE Extended Version Dimensions...

Page 49: ...available One for standard IR camera applications Part No ACCJAAPLS and the other for line scanning applications Part No ACCJAAPLL Those two versions are fitting to all focusing units with production...

Page 50: ...tive housing The outdoor protective housing can be used for any PI camera lenses up to 90 FOV In addition the industrial PIF can be installed as an accessory without housing Also available for CSlaser...

Page 51: ...At the back side of the PI there are the two connector plugs The left plug is for the USB cable The right connector plug is only used for the process interface Figure 30 Backside of the camera with c...

Page 52: ...rocess The signal level is always 0 10 V DI 24 V The process interface can be activated choosing the following options Analog Input AI Emissivity ambient temperature reference temperature uncommitted...

Page 53: ...inputs and outputs Name Description max range1 status AI Analog input 0 10 V 2 DI Digital input active low 0 0 6 V 24 V AO Analog output Alarm output 0 10 V 0 10 V 1 Depending on supply voltage for 0...

Page 54: ...54 4 1 1 PIN allocation Figure 32 Rear side of the camera USB PIF 1 VCC 1 INT 2 GND 2 SDA I C 3 SCL I C 4 D 4 DGND 5 D 5 3 3 V Out...

Page 55: ...oprietary PIF cable in the menu Tools Configuration Device PIF in the PIX Connect software is necessary Figure 33 Support proprietary PIF cable Consider that the input of the PIF is not protected if t...

Page 56: ...ess is available connection box with IP65 5 m 10 m or 20 m standard or high temperature cable for camera connection terminal for process integration Appendix F Wiring diagrams PIF Pin assignment PIF c...

Page 57: ...en closed green LED on 0 30 V 400 mA 1 depending on supply voltage for 0 20 mA on the AO the PIF has to be powered with min 5V 1 5 working resistance 0 021 24 V Example RLoad 500 ohm Umin 1 5 500 0 02...

Page 58: ...nstant of the fail safe is 1 5 seconds Controlled conditions on camera and software Standard Process interface ACPIPIF Industrial Process interface ACPIPIFMACBxx Interruption USB cable to camera Inter...

Page 59: ...PLC Figure 35 Fail Safe monitoring states Fail Safe monitoring states 1 Breakdown of PIF power supply 4 Malfunction of PI 2 Cable break of fail safe cable 5 Breakdown of PI power supply Interruption...

Page 60: ...ring states 1 Breakdown of PIF power supply 5 Malfunction of PI 2 Cable break of fail safe cable 6 Breakdown of PI power supply Interruption of USB cable 3 Short circuit of fail safe cable 7 Malfuncti...

Page 61: ...cable length is 20 m For greater distances between PI and computer or for stand alone solutions the optional PI NetBox or the USB Server Gigabit is provided Figure 37 Ethernet direct communication wit...

Page 62: ...62 Figure 39 Stand Alone operation with PI Netbox Figure 40 USB Server Gigabit...

Page 63: ...ended for connection to the device Part No ACPIIAC With IRmobile you can monitor and analyze your infrared temperature measurement directly on a connected smartphone or tablet All you need is an Optri...

Page 64: ...with automatic hot and coldspot search Changing the color palette scaling and temperature range Change of temperature unit Celsius or Fahrenheit Setting of temperature range scaling Manual Min Max 3 s...

Page 65: ...s Windows 7 Windows 8 Windows 10 USB interface Hard disc with at least 30 MByte of free space At least 128 MByte RAM CD ROM drive A detailed description is provided in the software manual on the softw...

Page 66: ...instructions of the wizard until the installation is finished The installation wizard places a launch icon on the desktop and in the start menu Start Programs Optris GmbH PIX Connect 3 To connect the...

Page 67: ...After the calibration files have been installed the live image from the camera is shown inside a window on your PC screen 6 Choose the desired language in the menu Tools Language 7 Adjust the focus o...

Page 68: ...68 6 2 Software window Figure 42 Software window 1 2 2 2 3 4 5 6 7 8 9 10 11...

Page 69: ...rm settings Bar showing the defined temperature thresholds for low alarm value blue arrow and high alarm value red arrow The color of numbers within control displays changes to red when temp above the...

Page 70: ...different windows Compatible with Windows 7 8 and 10 High level of individualization for customer specific display Various language option including a translation tool Temperature display in C or F D...

Page 71: ...splay of snapshot history for immediate analysis Extensive online and offline data analysis Analysis supported by measurement fields hot and cold spot searching image subtraction Real time temperature...

Page 72: ...External communication of software via COM Ports and DLL Adjustment of thermal image via reference values Temperature data analysis and documentation Triggered data collection Radiometric video seque...

Page 73: ...ation Searching for new optical material William Herschel by chance found the infrared radiation in 1800 Figure 43 William Herschel 1738 1822 He blackened the peak of a sensitive mercury thermometer T...

Page 74: ...e length ranging between 1 m and 20 m The intensity of the emitted radiation depends on the material This material contingent constant is described with the help of the emissivity which is a known val...

Page 75: ...earization signal processing The specifications of the lens decisively determine the optical path of the infrared thermometer which is characterized by the ratio Distance to Spot size The spectral fil...

Page 76: ...ature measurements of moving or overheated objects and of objects in hazardous surroundings very fast response and exposure times measurement without inter reaction no influence on the measuring objec...

Page 77: ...Basics of Infrared Thermometry 77 Figure 46 Non contact thermometry...

Page 78: ...ing of electronic cabinets R D of electronics R D of electronic parts Process control extruding plastic parts Process control manufacturing solar modules Process control at calendering R D of mechanic...

Page 79: ...material of the measuring object The emissivity Epsilon is used as a material constant factor to describe the ability of the body to emit infrared energy It can range between 0 and 100 A blackbody is...

Page 80: ...al temperature assuming the measuring object is warmer than its surroundings A low emissivity reflective surfaces carries the risk of inaccurate measuring results by interfering infrared radiation emi...

Page 81: ...sponds to the actual temperature If you monitor temperatures of up to 380 C you may place a special plastic sticker emissivity dots Part No ACLSED onto the measuring object which covers it completely...

Page 82: ...the temperature of the colored surface Afterwards determine the temperature of a directly adjacent area and modify the emissivity until the measured value corresponds to the temperature of the colore...

Page 83: ...rage values only The actual emissivity of a material depends on the following factors temperature measuring angle geometry of the surface thickness of the material constitution of the surface polished...

Page 84: ...84 Appendix A Table of emissivity for metals...

Page 85: ...Appendix A Table of emissivity for metals 85...

Page 86: ...86 Appendix B Table of emissivity for non metals...

Page 87: ...p of the interface 1 Open the Configurations dialog and enter the tab External Communication to enable the software for the serial communication 2 Select the mode COM Port and choose the appropriate p...

Page 88: ...88 Command list The command list is provided on the software CD and in the PIX Connect software Help SDK Every command must expire with CR LF 0x0D 0x0A...

Page 89: ...onnect software Imager exe only A dynamic link library ImagerIPC2 dll provides the interprocess communication IPC for other attached processes The DLL can be dynamically linked into the secondary appl...

Page 90: ...tation on http msdn microsoft com en us goglobal bb688096 aspx If desired the localization process can be illustrated in detail Also the resizing of buttons or other visible resources and the support...

Page 91: ...grams PIF 91 Appendix F Wiring diagrams PIF Analog Output The maximum load impedance is 500 Ohm The analog output can be used as a digital output too The current value for no alarm and alarm on is set...

Page 92: ...gital Input Figure 52 Digital input The digital input can be activated with a button to the PI GND Pin or with a low level CMOS TTL signal Low level 0 0 6 V High level 2 24 V Example Button Figure 53...

Page 93: ...voltage range 0 10 V Figure 54 Analog input Relay output at industrial PIF Part No ACPIPIFMACBxx The analog output must be set to Alarm The range for AO1 AO3 can be set in the software no alarm 0 4 mA...

Page 94: ...94 Figure 55 Relay output at industrial PIF...

Page 95: ...Appendix G Declaration of Conformity 95 Appendix G Declaration of Conformity...

Page 96: ...optris PI MA E2019 06 A...

Reviews: