background image

-

Technical Data 


9

-


2  Technical Data 

2.1  Top-down GIS 

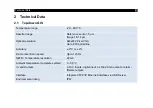
Temperature range 

-20

…900 °C 

Spectral range 

Reference sensor: 5 µm 
Imager: 8-14 µm 

Optical resolution 

640x480 Pixel VGA 
Up to 800 points/line 

Accuracy 

± 2°C or ± 2% 

Frame rate / Scan speed 

Up to 125 Hz 

NETD / Temperature resolution 

40 mK 

Ambient temperature (complete system) 

0 - 50 °C 

In- and Outputs 

0-10 V Inputs, digital input, 3x 0/4-20 mA output or alarm-
/Relais outputs 

Interface 

Integrated TCP/IP Ethernet interface via USB Server 

Environmental rating 

IP67 

Summary of Contents for Top-down GIS

Page 1: ...Operators Manual Top down GIS Glass Inspection System ...

Page 2: ...Optris GmbH Ferdinand Buisson Str 14 13127 Berlin Germany Tel 49 30 500 197 0 Fax 49 30 500 197 10 E mail info optris global Internet www optris global ...

Page 3: ...f contents Table of contents 3 1 General notes 6 1 1 Intended use 6 1 2 Warranty 7 1 3 Scope of supply 8 2 Technical Data 9 2 1 Top down GIS 9 2 2 Factory default 13 2 3 Optical specifications 15 2 3 1 Camera 15 2 3 2 Pyrometer 18 ...

Page 4: ...trical Installation 30 4 Operation 32 4 1 Maintenance 35 4 2 Low E measurement 36 5 Basics of glass measurement 37 5 1 Reflection and transmission 37 5 2 Influence of different measuring wavelengths 39 5 3 Hardening of glass sheets 40 5 4 Referencing from below 40 5 5 Angle dependency 41 ...

Page 5: ... Table of contents 5 Appendix A Control cabinet 43 ...

Page 6: ... cable With the analysis software PIX Connect and a predefined layout the system can be used directly Features Top down system with additional reference pyrometer from below for automatic emissivity correction on low E glasses Digital controlled lens protection system DCLP avoids additional air purge Automatic calculation of the glass surface Pre assembled system for easy installation as retrofit ...

Page 7: ...ges which result from misuse or neglect The warranty also expires if you open the product The manufacturer is not liable for consequential damage or in case of a non intended use of the product If a failure occurs during the warranty period the product will be replaced calibrated or repaired without further charges The freight costs will be paid by the sender The manufacturer reserves the right to...

Page 8: ...ms with mounting bracket USB Server Gigabit 2 0 Control cabinet pre assembled and pre wired Industrial Process Interface PIF Power supply 24 V Cable set 10 m Control unit with 2 buttons for triggger signal of shutter and Low E USB stick with Software and Layout Operators manual Calibration certificate for CT G5 ...

Page 9: ...ion 640x480 Pixel VGA Up to 800 points line Accuracy 2 C or 2 Frame rate Scan speed Up to 125 Hz NETD Temperature resolution 40 mK Ambient temperature complete system 0 50 C In and Outputs 0 10 V Inputs digital input 3x 0 4 20 mA output or alarm Relais outputs Interface Integrated TCP IP Ethernet interface via USB Server Environmental rating IP67 ...

Page 10: ...7 x 121 mm Switch cabinet 400 x 200 x 155 mm Weight Imager with shutter 1 1 kg Sensor with shutter 1 kg Control cabinet 10 kg 13 kg complete system Material Stainless steal Warm up time 10 min Table 1 Technical Data of Top down GIS ...

Page 11: ... Technical Data 11 Figure 1 Dimensions mm shutter system ...

Page 12: ... 12 Figure 2 Dimensions mm switch cabinet ...

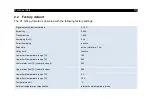
Page 13: ...g AVG 0 2 s Smart Averaging inactive Peak hold active Hold time 15 s Valley hold Inactive Lower limit temperature range C 100 Upper limit temperature range C 900 Lower alarm limit C normally closed 200 Upper alarm limit C normally open 500 Lower limit temperature range C 0 V Upper limit temperature range C 10 V Temperature unit C Ambient temperature compensation internal head temperature probe ...

Page 14: ... 14 Output at OUT AMB as 0 5 V signal on LT G5 and P7 Baud rate kBaud 115 You can change the settings either directly with the CompactConnect software or via the programming keys on the electronics box ...

Page 15: ...ermal channel is adjusted correctly If necessary focus the thermal imaging camera with the optics Figure 3 The turning out of the optics leads to the focus setting near and the turning in of the lens to the focus setting infinity Figure 3 Focusing by turning the exterior lens ring of camera ...

Page 16: ...s available Wide angle lenses have a radial distortion due to their large opening angle the software PIX Connect has an algorithm which corrects this distortion As an alternative to the tables below the optics calculator can also be used on the optris website or via the optris calculator app The app can be downloaded for free from the Google Play Store see QR code ...

Page 17: ... Technical Data 17 Note The accuracy of measurement can be outside of the specifications for distances below the defined minimum distance ...

Page 18: ... Optris website or via the Optris calculator app The app can be downloaded for free from the Google Play store see QR code D Distance from front of the sensing head to the object S Spot size The size of the measuring object and the optical resolution of the infrared thermometer determine the maximum distance between sensing head and measuring object In order to prevent measuring errors the object ...

Page 19: ... Technical Data 19 CT G5L SF optics ...

Page 20: ...e and software recommendations Computer with OS Windows 10 or higher Note The camera must be focused Consider the minimum distance of the selected optics For installation the components must be detached from the profiles All components must be correctly positioned for the first commissioning of the entire system Since all components are already pre wired they only have to be brought into the corre...

Page 21: ...n after a relatively short time The annealing furnace follows the heating furnace at a very short distance Since glass is coated in most cases a measurement from below is necessary On this side the glass is uncoated The specially developed sensor CT G5 operates in the 5 0 µm wavelength range and is perfectly suited for this purpose A thermal imaging camera is required to display the individual gla...

Page 22: ...urement it must always be ensured that the glass runs over the sensor Otherwise no referencing can take place and measurements can be incorrect The emissivity of the G5 sensor is preset to 0 92 see chapter 2 2 Now the control cabinet Figure 5 must be moved to a suitable position The individual cable lengths are 10 m Therefore make sure that the switch cabinet is no further than 10 m from the camer...

Page 23: ...em is the control unit With this unit the shutters can be opened and closed again During the first installation it is necessary to align the devices This can only be done when the shutters are open When the system is powered the yellow LED is on and the shutters are closed When the button is pressed the shutters are opened and the LED goes off The green button is for measuring low E glass It is de...

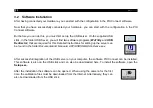
Page 24: ...Tility and USB Redirector that are required for this Detailed instructions for setting up the server can be found in the folder Documentation Manuals ACPIUSBSGB QSG Dxxxx xx x After successful integration of the USB server on your computer the software PIX Connect can be installed This software is also on the USB stick and can also be downloaded here To install the software open the Setup exe Afte...

Page 25: ...ts Select the layout and press Load layout The software already contains two predefined layouts called Top down GIS and Top down GIS Demo You can load these layouts in the menu under Tools and Load layout and use it as a presetting The layout named Top down GIS Demo is used for demonstration and is set to be used for temperatures from 20 to 900 C The layout named Top down GIS has been configured f...

Page 26: ...canner live view It can be moved and enlarged or reduced The shutter should be open so that the line can be aligned correctly Make sure to position the scan line between the rollers of the conveyor belt to avoid possible reflections Figure 7 Position of scan line Furthermore the Ext Ref Sensor G5 measuring area must be moved to the correct position Figure 8 It is important that the measuring area ...

Page 27: ... metric format The furnace is displayed in its dimension This means that the length and width of the furnace must be specified in the software To do this go to the menu Tools Line scanner mode and select Line scanner settings A new window opens Under the tab Presentation the parameters can be entered ...

Page 28: ...r Width Length of line and Length of scan the two parameters can be entered To obtain an undistorted representation of the product at the end of a linescan the Feed rate of the furnace is still required This must also be entered Then click on OK ...

Page 29: ... much material is generated in one scan pass To do this go to Tools and Configuration in the menu In the tab Measuring area click on the measuring area Area On the right side under Total area you can enter the new value Figure 10 Settings of Total area Now you can use the system and start with your temperature measurement ...

Page 30: ...hout any additional electrical installation To integrate the input signal from the furnace with the glass inspection system you must open the control cabinet On the left side is a terminal block which is connected to different colors of wires These are labeled as follows Figure 12 Figure 11 Control cabinet open ...

Page 31: ...ning closing the shutters 5 24 V Power supply 6 24 V Power supply 7 24 V Power supply 8 Ground 9 Ground 10 Ground The wiring of the furnace signal on the control cabinet is done under connection 4 and connection 1 ground The input voltage range is 0 max 24 V An open input is interpreted as a high signal The signal must be switched to ground 0 V ...

Page 32: ...cess starts The software starts the linescan with 125 Hz and builds up the image line by line In the end a complete image of the product is created and automatically saved as a snapshot Since each pixel is saved as a temperature value an exact analysis can be performed afterwards In addition to maintaining the correct temperature the software also displays the temperature distribution as a profile...

Page 33: ...ntrol unit With this unit the shutters can be opened and closed again During the first installation it is necessary to align the devices This can only be done when the shutters are open When the system is powered the yellow LED is on and the shutters are closed When the button is pressed the shutters are opened and the LED turns off The green button is for measuring low E glass It is deactivated a...

Page 34: ... 34 Figure 16 Linescan in PIX Connect software ...

Page 35: ...te opening and closing of the shutters These points must be observed as they have a direct influence on the temperature measurement Figure 17 Shutter open camera Figure 18 Shutter closed camera Figure 19 Shutter open reference pyrometer Never use cleaning compounds which contain solvents neither for the lens nor for the housing The lens surface can be cleaned with a soft humid tissue moistened wit...

Page 36: ...down GIS layout the temperature range changes to 0 250 C In this range it is then possible to measure Low E glass Alternatively the signal can also be taken from a controller e g PLC and be directly connected to the control cabinet for connection see chapter 3 3 Figure 20 Control unit for switching to Low E Furthermore care should be taken to have as few bare parts as possible in the camera s fiel...

Page 37: ...rrect sensors Heat and dust Also pay attention to the measuring depths 1 0 to 3 9 µm for deep layers 5 0 and 7 9 µm for surface 5 1 Reflection and transmission Reflection and transmission must be considered For long wavelength devices 8 14 µm LT the emissivity ε is about 0 85 For devices with a wavelength range of 5 0 µm G5 or 7 9 µm G7 the emissivity ε is 0 90 and there is a low angular dependenc...

Page 38: ...gth for different glass types The figure shows how the dependence of the emissivity of different types of glass behaves with respect to the wavelength A good emissivity is present in the wavelength range 5 0 µm and 7 9 µm and is preferred for measurements on glass ...

Page 39: ...0 Low temperature uncoated glass 7 9 µm PI 640i G7 CTlaser G7 High temperature coated glass 5 0 µm CTlaser G5 1 0 µm PI 1M molten glass looking in through glass The table gives an overview for which purpose which wavelength and therefore which sensor must be used This depends among other things on the material the temperature and the coating ...

Page 40: ...easurement Tempering Change of the heating cooling degree depending on the temperature distribution 5 4 Referencing from below Referencing from below is necessary because Low E glass is used in a glass tempering system Low E coatings minimize IR radiation through glass but not the thermal effect of visible light Low E glass has a coated side top and an uncoated side bottom 2 reasons for referencin...

Page 41: ...ency The angle dependence is another important factor to be considered when measuring temperature On the uncoated side the values are constant up to an angle of 45 On the coated side low E the 60 optics is preferred since the influence of the emissivity change is negligible here The following two figures show the emissivity as a function of angle G5 G7 LT for Low E glass at 250 C Once for coated g...

Page 42: ... 42 Figure 22 Angle dependency of Low E glass coated surface Figure 23 Angle dependency of Low E glass uncoated surface ...

Page 43: ... Appendix A Control cabinet 43 Appendix A Control cabinet Figure 24 Wiring diagram of control cabinet ...

Page 44: ...ration S2 Activation deactivation of fast closing mode S3 Only for factory calibration Switch must be at Normal S4 Switching between mV or mA input Lower screw terminal Connection for power supply Inputs Start Stop signal and Motor Inputs Start Stop signal max 24 V input is active LOW open input HIGH IN 1 Trigger input for normal operation S1 IN 2 Currently no usage IN 3 Trigger input for fast clo...

Page 45: ...trol cabinet 45 Pin assignment PIF electronic box industrial process interface Figure 26 Connections of the industrial Process Interface PIF GREY Interrupt GREEN SCL I C YELLOW SDA I C WHITE 3 3 V BROWN GND SHIELD GND ...

Page 46: ...green LED on 0 30 V 400 mA 1 depending on supply voltage for 0 20 mA on the AO the PIF has to be powered with min 5V 1 5 working resistance 0 021 24 V Example RLoad 500 ohm Umin 1 5 500 0 021 12 V RLoad 100 ohm Umin 1 5 100 0 021 3 6 V min 5 V 2 the AI is designed for max 24 V the voltage level above 10 V is not interpreted 3 active if AO1 2 or 3 is are programmed as alarm output The alarm output ...

Page 47: ...l in and outputs OUT AMB Analog output head temperature mV OUT TC Analog output thermocouple J or K OUT mV mA Analog output object temperature mV or mA F1 F3 Functional inputs AL2 Alarm 2 Open collector output 3V SW 3 VDC switchable for laser sighting tool GND Ground 0 V for laser sighting tool BROWN Temperature probe head WHITE Temperature probe head GREEN Detector signal YELLOW Detector signal ...

Page 48: ...Top down GIS MA E2021 07 A ...

Reviews: