background image

5

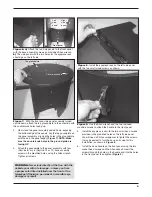
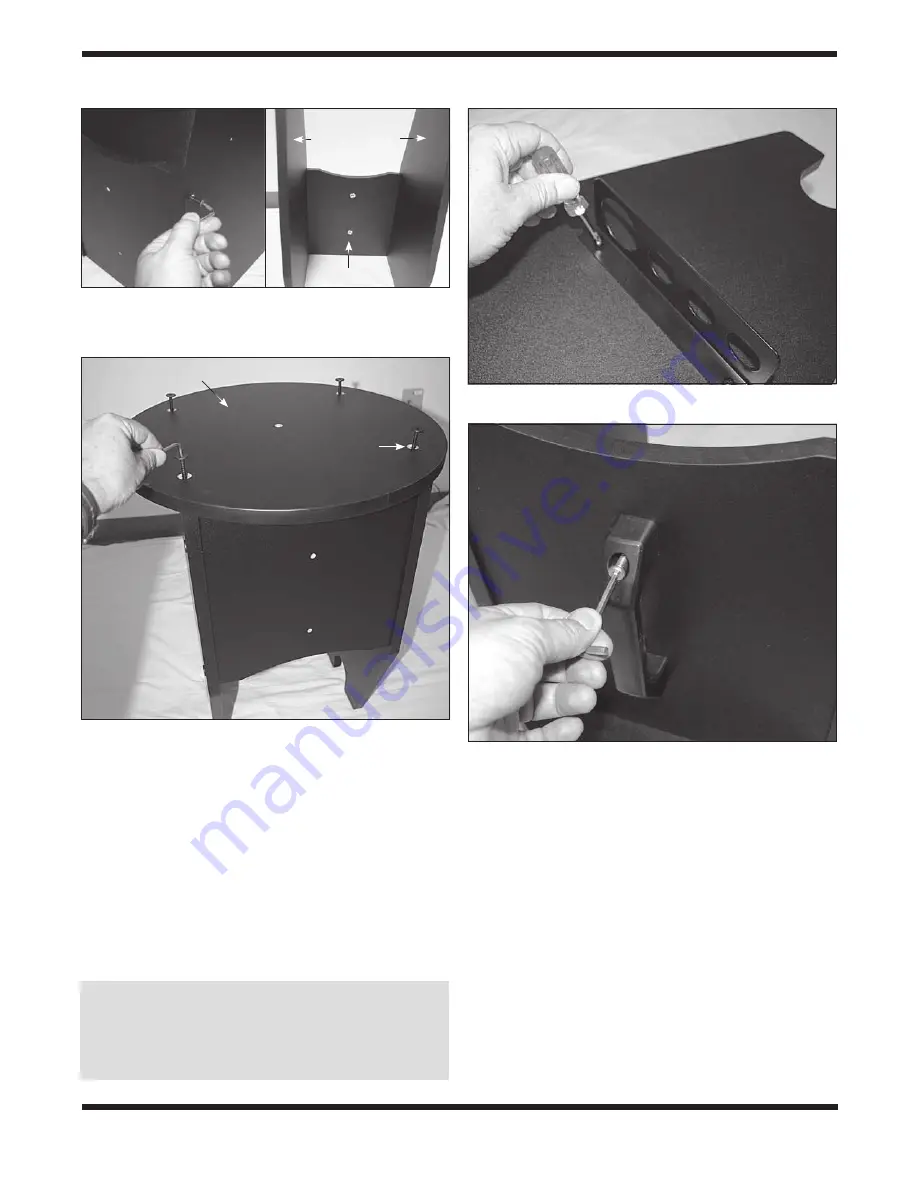
3.  Now stand the panel assembly upside down, exposing 

the bottom edge of the panels. Lay the top goundplate on 
the panel assembly, aligning the holes in the groundplate 
with those in the panel edges 

(Figure 7)NOTE: Make 

sure the countersunk holes in the ground plate are 
facing UP
.

4.  Attach the goundplate to the panel assembly with four 

(SkyLine 8) or six (SkyLine 10 or 12) base assembly 
screws in the predrilled holes, using the Allen wrench. 
Tighten all screws.

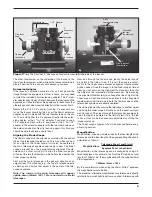
5.  Install the eyepiece rack with the two small wood screws 

provided in the predrilled holes on the left side panel. 
You will need a Philips screwdriver to tighten the screws. 
It may be easiest to turn the base on its side for this 
installation, as shown in 

Figure 8.

6.  Install the base handle on the front panel using the two 

socket head screws and the Allen wrench. Insert the 
screws through the holes in the handle and into the holes 
in the front panel, then tighten (

Figure 9).

Warning:


Never look directly at the Sun with the 

naked eye or with a telescope – unless you have 

a proper solar filter installed over the front of the 

telescope! Otherwise, permanent, irreversible eye 

damage may result.

Figure 7.  

With the front and side panel assembly turned 

upside down, attach the top groundplate to the assembly with 

the countersunk holes facing up.

Figure 8. 

Install the eyepiece rack on the left side panel 

with the two small wood screws as shown.

Figure 9. 

Use the Allen wrench and the two included 

machine screws to attach the handle to the front panel.

Figure 6. a) 

Attach the two side panels to the front panel 

with the base assembly screws and included Allen wrench. 

b) 

The side panel with the two holes for the eyepiece rack 

should go on the left side.

a)

Top groundplate

b)

Left 

side 

panel

Right 

side 

panel

Front panel

Countersunk hole

Summary of Contents for SkyLine 52908

Page 1: ...IN 534 Rev A 10 14 instruction Manual Copyright 2014 Optronic Technologies All Rights Reserved No part of this product instruction or any of its contents may be reproduced copied modified or adapted w...

Page 2: ...m 1 25 eyepiece Dual speed Crayford focuser Optical tube Altitude hub Side bearing Altitude tension knob Left side panel Right side panel Front panel 30mm 2 eyepiece Handle Dobsonian base Top groundpl...

Page 3: ...rts shown are present The base components should all be found in one shipping box and the optical tube assembly and accessories are contained in the second box Figure 2 The contents of the base box in...

Page 4: ...into the small holes on this side using the long Philips screws provided with a Phillips screwdriver Figure 5 2 Attach the front panel to the two side panels with four black base assembly screws in th...

Page 5: ...ad screws and the Allen wrench Insert the screws through the holes in the handle and into the holes in the front panel then tighten Figure 9 Warning Never look directly at the Sun with the naked eye o...

Page 6: ...de with the eyepiece rack Make sure the rounded surface of the aluminum side bearing seats into the side panel indentation and the flat surface is up Figure 14 Installing the Finder Scope SkyLine Dobs...

Page 7: ...n the side panels as shown They should fit snugly a b c Figure 13 a Remove the two screws in the side hub with the Allen wrench b Then align the side bearing with the slot in the hub and install with...

Page 8: ...Figure 17 that accepts both 2 and 1 25 eyepieces The size refers to the outer diameter of the eye piece s chrome barrel Your telescope comes with a 9mm Pl ssl 1 25 and a 30mm Erfle eyepiece 2 For som...

Page 9: ...pear upside down rotated 180 This is normal for reflector telescopes Now look through the finder scope Ideally the object should be visible in the field of view If it is not then coarse adjust ments t...

Page 10: ...Please refer to the manual for the LaserMate Deluxe II laser collimator for the step by step collimation procedure Collimation is the process of adjusting the mirrors so they are correctly aligned wi...

Page 11: ...reatly reduces the amount of time needed for the optics to stabilize It also is a good idea to keep the scope covered until the Sun sets so the tube does not heat greatly above the temperature of the...

Page 12: ...ge RACI 8x50 right angle correct image RACI Optical tube weight 23 75 lbs 34 0 lbs 47 3 lbs Base weight 25 4 lbs 29 1 lbs 35 9 lbs Tube length 46 48 57 Tube outer diameter 9 2 12 0 14 2 Cooling fan Pr...

Reviews: