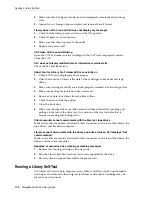
Running a Device Self-test
Troubleshooting
17-3
1.
Make sure the proper drive diagnostic cartridges are in the library (see
"Importing/Exporting Diagnostic and Cleaning Cartridges"
2.
In SLC, select
Tools > Diagnostics
, and click the
Library
folder.
3.
Click the
SelfTest
tab.
4.
In the Mode list, select the type of self-test:
■
Non-Disruptive
— all cartridges used in the test are returned to their original
locations
■
Disruptive
— cartridges may be returned to new locations. The library must
be taken offline to all hosts before running this test.
5.
Click
Run
. Test results display when the test completes.
6.
For disruptive tests, bring the library online to resume normal operations.
What the library checks during a self-test:
■
Verifies the communication path between the library controller, drives, elevators,
and robots.
■
Performs get and put operations to check the health of the robots, elevators, and
CAPs. This includes get and put operations from a reserved system slot to a
random empty storage slot or CAP slot.
■
Audits the entire library.
■
Performs mounts and dismounts of diagnostic cartridges for all the drives
installed in the library. The self-test does not begin unless a diagnostic cartridge is
found in the system slots. If the system finds a compatible diagnostic cartridge, the
self-test repeats for each drive type. If the system does not find a diagnostic
cartridge for a drive type, the system skips the mount/dismount operation for the
drive.
Running a Device Self-test
Use device self-tests to help diagnose issues. A self-test can be performed on a CAP,
robot, or drive.
1.
In SLC, select
Tools > Diagnostics
.
2.
Expand the device folder (CAP, Robot, or Drive). Select the device to test.
3.
Click the
SelfTest
tab.
4.
In the Mode list, select
Non-Disruptive
.
5.
Click
Run
. A message appears when the test finishes.
Note:
Before performing a disruptive test, the library must be taken
offline (see
Note:
To perform a drive or robot self-test, diagnostic cartridges
must be available in the library (
Summary of Contents for StorageTek SL3000
Page 1: ...1 StorageTek SL3000 Library Guide E20875 15 December 2018...
Page 16: ...xvi...
Page 50: ...Ordering 1 32 StorageTek SL3000 Library Guide...
Page 62: ...Installation Tools 2 12 StorageTek SL3000 Library Guide...
Page 66: ...Installing Web launched SLC 3 4 StorageTek SL3000 Library Guide...
Page 74: ...Resolving Orphaned Cartridges Caused by Capacity Changes 6 4 StorageTek SL3000 Library Guide...
Page 88: ...Configuring Dual TCP IP 8 8 StorageTek SL3000 Library Guide...
Page 112: ...Stopping a Validation 12 4 StorageTek SL3000 Library Guide...
Page 124: ...Monitoring Library Events 15 6 StorageTek SL3000 Library Guide...
Page 128: ...Rebooting the Library 16 4 StorageTek SL3000 Library Guide...
Page 166: ...Downgrading Firmware D 4 StorageTek SL3000 Library Guide...
Page 183: ...Wall Diagrams Library Addressing Reference E 17 Figure E 14 Base Module Rear Wall...
Page 185: ...Wall Diagrams Library Addressing Reference E 19 Figure E 16 DEM Front Wall...
Page 186: ...Wall Diagrams E 20 StorageTek SL3000 Library Guide Figure E 17 DEM Front Wall continued...
Page 187: ...Wall Diagrams Library Addressing Reference E 21 Figure E 18 DEM Rear Wall...
Page 188: ...Wall Diagrams E 22 StorageTek SL3000 Library Guide Figure E 19 DEM Rear Wall continued...
Page 190: ...Wall Diagrams E 24 StorageTek SL3000 Library Guide Figure E 21 Cartridge Expansion Module Rear...
Page 191: ...Wall Diagrams Library Addressing Reference E 25 Figure E 22 Parking Expansion Module Left...
Page 192: ...Wall Diagrams E 26 StorageTek SL3000 Library Guide Figure E 23 Parking Expansion Module Right...
Page 193: ...Wall Diagrams Library Addressing Reference E 27 Figure E 24 Access Expansion Module Left...
Page 194: ...Wall Diagrams E 28 StorageTek SL3000 Library Guide Figure E 25 Access Expansion Module Right...
Page 202: ...Label Care F 8 StorageTek SL3000 Library Guide...


