Approximate Installation Time
2-10
StorageTek SL3000 Library Guide
Approximate Installation Time
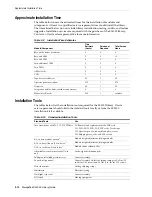
The table below shows the estimated times for the installation of modules and
components. At least two qualified service representatives should install the library.
The times listed below do not include library initialization, testing, audits, and feature
upgrades. Installation services are required with the purchase of the SL3000 library.
Contact an Oracle sales representative for more information.
Installation Tools
The tables below list the installation tools required for the SL3000 library. Oracle
service personnel should obtain the standard tools locally or from the SL8500
installation kit if available.
Table 2–9
Installation Time Estimates
Module/Component
Time
Estimate
(hours)
Personnel
Required
Total Person
Hours
Base with 8 drives (standard)
3
2
6
Base and DEM
5
2
10
Base and CEM
4
2
8
Each additional CEM
2
2
4
Two PEMs
2
2
4
AEMs (each)
2
2
4
CAPs
1
2
2
Tape drive (each drive)
0.5
1
0.5
Operator panel or window
0.75
1
0.75
Firmware 0.2
1
0.2
Integration (cables, hubs, switches, connections)
8
1
8
Media install (each)
0.02
1
variable
Table 2–10
Standard Installation Tools
Standard Tools
Use
Torx screwdriver with T8, T10, T15, T25 bits
T8:
Removal and replacement of the PUK card.
T10:
PUO, PUW, PUN, PUF, PUZ cards. Track stops.
T15:
Operator panel, window, blank plate, arrays
T25:
Shipping brace, rails, and CAP screws.
3/8-in. drive ratchet wrench
1
Module height adjustment, joining modules
5/16-in. hex Allen on 3/8-in. drive
Module height adjustment, joining modules
9/16-in. socket on 3/8-in.-drive
Module removal from pallet
Adjustable wrench (must accept 7/8-in.
nut)
Lock weight distribution pads
Phillips and flat blade screwdrivers
General assembly
Power drill (optional)
General assembly. Adjust the torque settings to 2.8 Nm (25
in.-lb) for T-25 screws and 0.6 Nm (5 in.-lb) for T-10 screws.
Wire side cutters
Cutting shipping straps
Multimeter
Electrical testing
Flashlight, step stool
General assembly
Pallet jack
Moving equipment
Summary of Contents for StorageTek SL3000
Page 1: ...1 StorageTek SL3000 Library Guide E20875 15 December 2018...
Page 16: ...xvi...
Page 50: ...Ordering 1 32 StorageTek SL3000 Library Guide...
Page 62: ...Installation Tools 2 12 StorageTek SL3000 Library Guide...
Page 66: ...Installing Web launched SLC 3 4 StorageTek SL3000 Library Guide...
Page 74: ...Resolving Orphaned Cartridges Caused by Capacity Changes 6 4 StorageTek SL3000 Library Guide...
Page 88: ...Configuring Dual TCP IP 8 8 StorageTek SL3000 Library Guide...
Page 112: ...Stopping a Validation 12 4 StorageTek SL3000 Library Guide...
Page 124: ...Monitoring Library Events 15 6 StorageTek SL3000 Library Guide...
Page 128: ...Rebooting the Library 16 4 StorageTek SL3000 Library Guide...
Page 166: ...Downgrading Firmware D 4 StorageTek SL3000 Library Guide...
Page 183: ...Wall Diagrams Library Addressing Reference E 17 Figure E 14 Base Module Rear Wall...
Page 185: ...Wall Diagrams Library Addressing Reference E 19 Figure E 16 DEM Front Wall...
Page 186: ...Wall Diagrams E 20 StorageTek SL3000 Library Guide Figure E 17 DEM Front Wall continued...
Page 187: ...Wall Diagrams Library Addressing Reference E 21 Figure E 18 DEM Rear Wall...
Page 188: ...Wall Diagrams E 22 StorageTek SL3000 Library Guide Figure E 19 DEM Rear Wall continued...
Page 190: ...Wall Diagrams E 24 StorageTek SL3000 Library Guide Figure E 21 Cartridge Expansion Module Rear...
Page 191: ...Wall Diagrams Library Addressing Reference E 25 Figure E 22 Parking Expansion Module Left...
Page 192: ...Wall Diagrams E 26 StorageTek SL3000 Library Guide Figure E 23 Parking Expansion Module Right...
Page 193: ...Wall Diagrams Library Addressing Reference E 27 Figure E 24 Access Expansion Module Left...
Page 194: ...Wall Diagrams E 28 StorageTek SL3000 Library Guide Figure E 25 Access Expansion Module Right...
Page 202: ...Label Care F 8 StorageTek SL3000 Library Guide...


