

Install a Heatsink and Processor (FRU)
positioning the tool and the CPU with the CPU socket. The tool and the CPU are correctly
positioned with the socket when all of the triangles are aligned.
b.
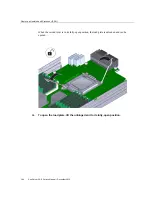
Turn the replacement tool upside down, noting the corner of the tool that is
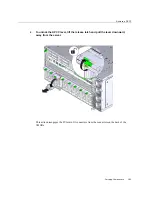
marked with a triangle (alignment key).
c.
Note the corner of the CPU that is marked with a triangle (alignment key).
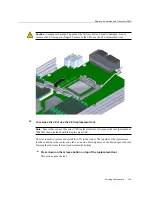
d.
Lift the CPU by its edges, taking care not to touch the metal contacts on the
underside of the CPU.
e.
Turn the CPU upside down (metal contacts facing upward) and set it on
the replacement tool, ensuring that the triangle on the CPU aligns with the
triangle on the tool and that the CPU sits flat in the tool. Do
not
release your
hold the CPU.
The CPU is not yet secured in the tool.
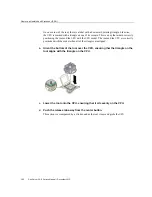
f.
With the tool and the CPU in the topside down position, press the topside
release tab outward, away from the center button.
This action is accompanied by a click sound as the tool closes and grabs the CPU. The
CPU should now be secured in the tool.
g.
Ensure that the CPU is secured in the tool.
When the CPU is secured in the tool, there is no side-to-side movement of the CPU within
the tool.
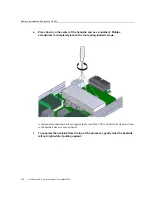
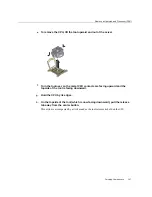
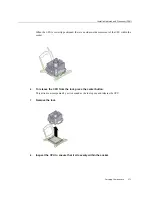
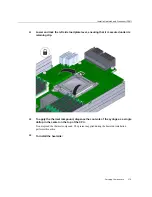
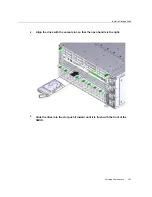
3.
Turn the tool over, so that the CPU contacts are facing downward.
This positions the tool with the topside facing upward.
4.
Orient the tool so that the triangle on the tool aligns with the triangle on the
socket.
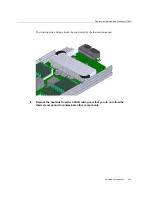
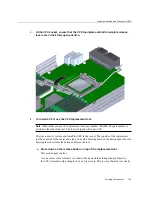
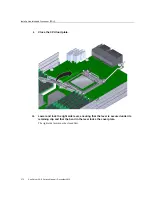
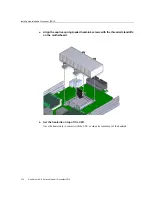
5.
Lower the tool onto the socket, ensuring that the CPU is correctly positioned and
sits flat and evenly in the socket.
170
Sun Server X4-8 Service Manual • December 2015
Summary of Contents for SUN X4-8
Page 1: ...Sun Server X4 8 Service Manual Part No E40317 07 December 2015 ...
Page 2: ......
Page 10: ...10 Sun Server X4 8 Service Manual December 2015 ...
Page 14: ...14 Sun Server X4 8 Service Manual December 2015 ...
Page 16: ...16 Sun Server X4 8 Service Manual December 2015 ...
Page 18: ...18 Sun Server X4 8 Service Manual December 2015 ...
Page 51: ...Server Block Diagram Server and Components Overview 51 ...
Page 52: ...52 Sun Server X4 8 Service Manual December 2015 ...
Page 78: ...78 Sun Server X4 8 Service Manual December 2015 ...
Page 228: ...228 Sun Server X4 8 Service Manual December 2015 ...
Page 236: ...BIOS Setup Utility Screens 236 Sun Server X4 8 Service Manual December 2015 ...
Page 237: ...BIOS Setup Utility Screens BIOS Setup Utility 237 ...
Page 245: ...BIOS Setup Utility Screens BIOS Setup Utility 245 ...
Page 247: ...BIOS Setup Utility Screens Memory Configuration BIOS Setup Utility 247 ...
Page 249: ...BIOS Setup Utility Screens Advanced Serial Port Console Redirection BIOS Setup Utility 249 ...
Page 250: ...BIOS Setup Utility Screens 250 Sun Server X4 8 Service Manual December 2015 ...
Page 251: ...BIOS Setup Utility Screens BIOS Setup Utility 251 ...
Page 252: ...BIOS Setup Utility Screens 252 Sun Server X4 8 Service Manual December 2015 ...
Page 253: ...BIOS Setup Utility Screens Advanced Trusted Computing BIOS Setup Utility 253 ...
Page 254: ...BIOS Setup Utility Screens 254 Sun Server X4 8 Service Manual December 2015 ...
Page 255: ...BIOS Setup Utility Screens Advanced Network Stack BIOS Setup Utility 255 ...
Page 257: ...BIOS Setup Utility Screens Advanced BMC Network Configuration BIOS Setup Utility 257 ...
Page 258: ...BIOS Setup Utility Screens 258 Sun Server X4 8 Service Manual December 2015 ...
Page 259: ...BIOS Setup Utility Screens BIOS Setup Utility 259 ...
Page 263: ...BIOS Setup Utility Screens BIOS Setup Utility 263 ...
Page 264: ...BIOS Setup Utility Screens 264 Sun Server X4 8 Service Manual December 2015 ...
Page 265: ...BIOS Setup Utility Screens BIOS Setup Utility 265 ...
Page 268: ...268 Sun Server X4 8 Service Manual December 2015 ...
Page 274: ...274 Sun Server X4 8 Service Manual December 2015 ...


